Installing Windows XP on ACER laptops. How to restore the windows operating system on acer aspire one laptop Installing windows xp on acer aspire
Most modern mobile computers are sold with an operating system preinstalled. Usually it is Windows Seven and Vista. If you have a desire to install Windows XP on a laptop, then you should be prepared for the possible difficulties of this process.
You will need
- - Paragon Disk Manager;
- - Windows XP installation disc.
Instruction
This article will help you install Windows XP step by step on a particular laptop (in this case, Acer Aspire 5920G).
What we need:
1. A disk with a working distribution of Windows XP
2. nLite and Net Framework 2.0
3. All necessary drivers. You can get them from this site: acerpanam
4. nv4_disp.inf to install the nVidia video driver
5.kb888111xpsp2.exe
If you have everything you need, then you can proceed with the installation.
1. If the installer does not see the hard drive.
Many problems arise because the Windows XP installer cannot find the hard drive during installation. But this problem is easily solved using the nLite utility. This program can port drivers of various devices directly to the distribution kit of the operating system.
Attention: before proceeding with the installation of nLite, Net Framework 2.0 must be installed.
program after installation.
In order to enlarge this and all subsequent images, just click on it with the mouse.
Press the NEXT button.
Insert the Windows XP distribution disc and copy it to your hard drive. Click the button Overview and specify the path to the folder where you copied the distribution.


In the window Drivers click on the button Add>Drivers Folder and specify the path to the SATA folder where the hard disk drivers are located. From modes select Text. Select all the added drivers with the Ctrl key pressed and press the OK key.

If you have selected the automation mode, then you will need to specify all the requested system settings. If you are in doubt about the choice of certain settings, it is better to just press the button Further.

Once you have finished integrating drivers and other components, create an ISO image. And burn it to a blank disc.
Now, during installation, the hard drive will be detected automatically and Windows will boot up without problems.
2. Driver installation.
Well, now Windows XP is installed, but that's not all. If you managed to notice, now there is no sound and the video card is not configured.
Attention: follow the sequence of driver installation. Sometimes this leads to errors.
Chipset.
You should start installing devices from the chipset driver, otherwise problems with device recognition may occur in the future.

There shouldn't be any problem installing the chipset. The installer will do everything by itself, you just need to press the appropriate buttons.

Make sure the item is selected Yes, I want to restart this computer now and click on the button Ready.
Sound card.
After the reboot, we proceed to install the sound card driver. But before we start the installation, you need to install the Microsoft Hd Audio Patch, this kb888111xpsp2.exe. This is a small patch that will update audio devices.
Everything, now you can install the driver itself.

Restart your computer after installation. The sound should appear.
If for some reason this did not happen, then go to Device Manager.
(To do this, right-click My Computer>Properties>Hardware>Device Manager.)

Find in the list of system devices PCI Device marked with an exclamation mark in a yellow circle.

Right click on the device and select Update driver>Install from a specified location. Put a tick in front of the item Enable next search location and specify the path to the WDM folder, which is located in the folder with the sound card driver. For example: F:\Drivers\Sound Card\5470_WHQL_XP_VISTA_ACER\WDM.
Now the unidentified device should be defined as Realtek High Definition Audio. After that, you need to install the driver itself, as mentioned above.
video card
Now the video card. A common problem when installing a video card is the impossibility of recognizing it by the system. But we'll fix it. All you have to do is replace the file nv4_disp.inf in the driver folder. After that, the installation will proceed normally.
The rest of the drivers are installed without problems.
As for laptops from other companies, the installation principle is the same, only other drivers (compatible with a laptop) will be needed.
http://obs.my1.ru on this site you can find computer articles on software, hardware and much more.
Page 1 of 3
Laptop and Windows XP - friends forever?
In continuation of a series of articles on installing Windows XP, today we will look at installing this operating system on an Acer Aspire One netbook. Reinstallation on windows laptop XP is made by users for a variety of reasons. The main one is that the owners of the device want to speed up its performance. In our articles, we have repeatedly reminded that the Windows 7 operating system on a modern laptop looks preferable to XP. And installing Windows XP makes sense only if you had Vista installed as a regular OS.
But with our today's test subject, the situation is somewhat different. Its owner asked to install XP, since this OS was installed on his desktop computer, he got used to it and did not want to retrain to work with Seven. Well, the owner is a gentleman. Let's proceed with the installation.
Since we are dealing with a netbook, the task was complicated by the lack of a floppy drive. Friends did not have such a device, and buying an external drive for the sake of one installation did not smile at all. But at hand was a flash drive with a capacity of 4 GB. After studying the Web, a plan of action was drawn up for installing Windows XP on a netbook, which is described below.
Preparing a bootable USB flash drive with Windows XP
In order to do the manipulations described below, you will need:
- Working PC or laptop;
- USB flash drive with a capacity of at least 1 GB;
- Distribution of Windows XP;
- Internet connection.
Before we start working on a bootable USB flash drive, we will need to slightly adjust the Windows XP installation distribution. To do this, create a folder on your WindowsXP hard drive (in the example D:\WindowsXP) and copy all the files from your installation folder there. Windows disk xp. You will end up with something like this:

After that, you will need to integrate the SATA drivers into our distribution. This is necessary for the Windows Installer to find the hard drive. In principle, this problem can be solved by setting the BIOS mode work hard disk in IDE Mode. But if for some reason you do not want to change the BIOS settings, or you need the AHCI Mode enabled, then you need to perform a series of operations below.
After installation, launch nLite.


In the next window, select drivers for 32 or 64 bit OS. Depends on your operating system.

In the window that appears, select all the drivers and click OK, and then next. A dialog will appear asking you to confirm starting the driver integration process. We press Yes.

After a while, the process will end.

After preparing the distribution, you can proceed to create a bootable USB flash drive.
Installing Windows XP on an Acer Aspire 5315 laptop
Recently, a friend asked me to install Windows XP on an Acer Aspire 5315 laptop instead of Vista preinstalled there. It turned out that such a simple task has its pitfalls. I spent three hours and 200 meters of Internet traffic on this. In this article I decided to talk about all the intricacies of such an installation. It turned out or not, as always, you be the judge. The material is written, implying that the reader has basic knowledge of installing the OS.
I started, of course, with Internet searches on this topic, since there were no drivers for Windows XP with this machine. I found two useful sources on this topic: the XP installation guide on the Acer Aspire 5315 and this oszone.net forum thread. The specified XP installation guide is written in English, but there is a translation if you click on the Russian flag at the beginning of the document. It would be better if there were no such translation at all. Therefore, I translated the manual into normal Russian. See.
So what is offered in this guide. It describes two installation options: using a USB floppy drive and writing a CD + Internet. Whoever liked it, implement it, but in my opinion, the disadvantage of the first is that such a specific drive is needed, and the second is too tricky. Therefore, I will tell you how I managed to defeat the Aspire 5315:
We take (4.6 Mb) iso image of the Paragon Disk Manager boot disk. We open, for example, with the help of Nero and burn it to a disc. Then boot the laptop from the burned CD. (It is enough to leave it in the drive, in the BIOS the drive is the first to boot). At the same time, in the BIOS, in the Configured SATA type item, you need to change AHCI to ATAPI. After loading, you will see all the partitions of the hard drive, but their file systems will be displayed as unknown, or as unformatted partitions. We demolish partitions, create new ones at your discretion with file system FAT32, NTFS. Next, reboot from the installation CD and install XP in the usual way.
- Realtek HD Audio
- Intel Chipset Driver
- Intel Graphics Driver
- Atheros WiFi Driver
- Broadcom Ethernet Driver
- launch manager
- Touchpad Driver
- Acer Empowering Framework
- Acer ePower Management
All drivers in a single archive can be downloaded from this link.
Here everything goes normally, only before installing Acer Empowering Framework (p. 8) the system requires installed NET Framework 1. Take .
After all the installation of all the drivers in the task manager, "Modem Device on High Definition Audio Bus" hung. And this is where I had to sweat. The recipe for installing the modem driver in the above guide didn't work. After dancing with a tambourine, I found this oszone.net thread, and specifically this post. Thanks for the recipe Angry Demon. I quote verbatim:
We do so. We take this file, unpack the driver into any folder, open the GENHDA5.inf file in a text editor and edit it:
ExcludeFromSelect=HDAUDIO\FUNC_02&VEN_14F1&DEV_2BFA
ExcludeFromSelect=HDAUDIO\FUNC_02&VEN_14F1&DEV_5045
ExcludeFromSelect=HDAUDIO\FUNC_02&VEN_14F1&DEV_2C06
%HSFModem% = ModemX,HDAUDIO\FUNC_02&VEN_14F1&DEV_2BFA
%HSFModem% = ModemX, HDAUDIO\FUNC_02&VEN_14F1&DEV_5045
Add the following line here
%HSFModem% = ModemX, HDAUDIO\FUNC_02&VEN_14F1&DEV_2C06
Then we remove this device from the device manager, start the search for new equipment and poke the master with our nose into the folder with the unpacked driver. Installation completed successfully.
note
If another modem is installed on your Acer Aspire 5315, then when editing the file you need to specify its ID. This information can be taken from the device manager.
How to do it?
Right-click My Computer -> Properties (you can just press Win+Break) -> Hardware -> Device Manager. Next, we are looking for our modem -> click on it p.k. Mouse -> Properties -> Details tab -> in the list below, select Device Instance ID. In the image below, what you need is underlined in red.

Update as of April 28, 2008
Over the three months of its existence, the article was viewed by many people, I received a large number of reviews, comments, and questions. I decided to make a small addition to the article based on them. Thanks to everyone who unsubscribed about solving certain problems when installing Windows XP on Acer Aspire 5315. It was on them that I compiled this add-on.
Here are three main comments on the article:
1) Atheros WiFi Driver. Most of the questions were due to the fact that this driver for WiFi did not fit. To be honest, I still have not figured out why the driver is suitable for some instances, but not for others. Solution. Everyone who unsubscribed about solving this problem was approached by the Broadcom driver for WiFi. Lies (~ 80 Mb). The archive contains two 2 drivers for XP (versions 3.10.40.0 and 3.10.40.1) and one for Vista (version 5.60.350.9).
2) Modem Device on High Definition Audio Bus. The next most common problem is installing a modem. Solution. Again, of those who unsubscribed about solving this problem, the installation of Foxconn drivers helped, and without any editing of the files. Download . At the same time, for whom Foxconn firewood did not fit, the option with editing the file, described above, went through.
3) Chipset and graphics drivers. The least common problem is related to the stuttering of movies and games. Literally a couple of people wrote about it. There may be a sea of \u200b\u200breasons that are not related to drivers. But, since many people simply asked for a link where you can download the latest video drivers, I give a link to the website of the chipset and graphics manufacturer, i.e. Intel. Link . The table contains all the drivers for the Intel GL960 Express chipset, on which this laptop is based.
How to install Windows 7 on an Acer laptop with UEFI BIOS! Hello friends, I bought one of my acquaintances a laptop Acer Aspire ES1-511 without an operating system. The laptop is inexpensive and not designed for games, but only for work.
The BIOS of the Acer ES1-511 laptop is common for all Acer laptops with UEFI elements with all the ensuing consequences, and my friend could not install Windows 7 on it. Having killed two days off for this business, on Monday he called me and asked me to install operating system.

How to install Windows 7 on an Acer laptop
My comrade lives outside the city and it took a long time to get there, and then his dog almost ate me.

Then we take out our laptop from the box,

connect our bootable flash drive to it. We connect the flash drive to a USB 2.0 port, since Windows 7 does not support USB 3.0 (ports are usually painted in blue).


Turn on the laptop and press F2, enter the BIOS and immediately go to the Main tab.

Main Tab
We enable the ability to call the boot menu of the laptop when booting using the key F12. Set the F12 Boot Menu option to Enabled, then go to the tab Boot.

Boot tab
Naturally, this tab does not contain our Kingston installation flash drive, but it would be if we made it a specially UEFI flash drive. Set the Boot Mode option to Legacy

We agree with the warning. OK


We press F10, thus we save the changes made to the UEFI BIOS parameters and reboot.

Hit while loading F12(call the boot menu of the laptop)

and please our Kingston bootable flash drive is present in boot menu, select it using the arrows on the keyboard and press Enter.

Note: If for some reason you cannot open the boot menu of the laptop using the key F12, then enter BIOS UEFI on the Boot tab and use the keys F6(raise up) put the flash drive in the first position, then click F10(save settings and reboot)

As I have already noticed, after successfully installing Windows 7 on an Acer laptop with UEFI BIOS, we will have driver problems and we will successfully solve them.
What to do if Windows 8.1 is already installed on the Acer Aspire ES1-511 laptop, how then to installWindows 7 on this laptop
When the message "Press any key to boot from CD or DVD" appears on the screen, press any key on the keyboard, by this we agree to boot from installation disk.


Install.

We accept the terms of the agreement. Select full installation.

Friends, to install Windows 7, you need to delete all existing partitions on your GPT hard drive and install Windows 7 directly into unallocated space. Click on the "Disk Setup" button and delete all existing partitions,

then install Windows 7 directly into unallocated space.
Windows 7 automatically converts the hard drive to MBR during installation. Click the Next button.

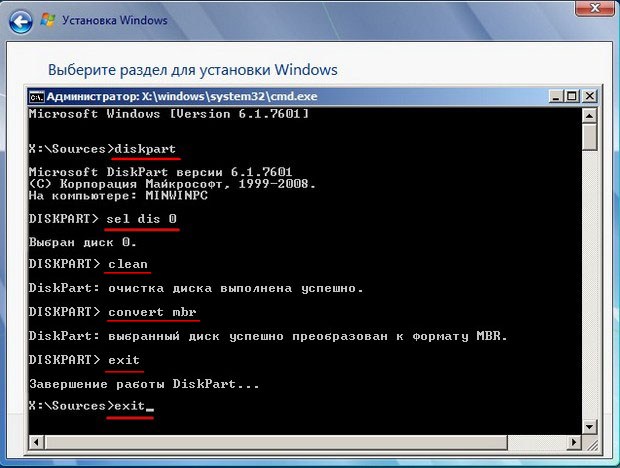
If the Next button is inactive or an error occurs (which is unlikely), then we call the command line, press Shift + F10 on the keyboard and convert our hard disk to the MBR standard on the command line, all partitions and data on the disk will also be deleted.
Press Shift + F10 on the keyboard. On the command line, enter the following commands in sequence:
diskpartsel dis 0
clean
convert mbr
exit
exit
Click Update.