Data recovery from damaged CD. How to remove scratches from a disc and avoid them How to restore a scratched cd
Despite the emergence of a number of portable media used to store large amounts of information, CDs are still considered one of the most persistent and reliable in the designated group. They are less prone to causeless breakdowns, however, they are not protected from physical influences and, as a result, mechanical damage. A couple of scratches on the surface of a CD are enough to stop the media from working correctly or being read at all, "burying" a significant part of the data that is important to the user.
But do not despair: there is still a chance to repair the equipment. To do this, there are special commercial kits for sale and a lot of tips on the Web to help restore the original state of the disk.
CD/DVD preparation
Before removing scratches from a disk, its surface should be cleaned of dust and prints, since it was dirt that could be the root cause of the breakdown.
This can be done in several ways:
- With non-abrasive products.
- Carefully wipe heavily soiled media with a soft cloth.
- Hold under running lukewarm water.
After shaking off the water from the CD, it must be dried by laying it on a paper towel without getting wet. This is done in order to understand the extent of the damage: if the depth of damage reaches the metal layer, the carrier cannot be saved on its own.
Removing defects on the surface of CD / DVD
It is possible to cope with this task at home, the main thing is to know how. Removing scratches from a disc is easy; various household products are used for this - from petroleum jelly to toothpaste.
Waxing with a polish, car wax, or other creamy texture works well when the polycarbonate finish shows signs of heavy wear. In this case, the media is covered with one of the listed products, the excess of which is then removed with a lint-free cloth. This method will help temporarily, since it does not contribute to the removal of defects, but only fills in scuffs. After its successful use, you should make a backup copy of the information from the damaged CD, the further use of which will remain in doubt.

The following technique (how to remove scratches from a disc with toothpaste) is very simple. It consists in polishing the upper layer of the CD, thinning it and thereby reducing the depth of damage. It is worth resorting to it at the very last moment, if more gentle options have not worked.
It is advisable to use a paste based on baking soda as the most effective. The substance is applied to a smooth cloth (glass cloth is suitable) and with its help is distributed over the scratch perpendicular to the digital tracks. This will protect the media from the appearance of new, more dangerous flaws.
It will take about 2-5 minutes to polish the disc in this way, then carefully rinse the paste under warm water and allow the CD to dry in the open air on its own.
Both methods are equally effective in dealing with the described task (how to remove scratches from an Xbox disk).
Xbox CD damage
If a defect is found on the disc for the game console, you should make sure that it was not the culprit of the problem. Xbox sometimes has a similar flaw, and if it was bought recently, there is a chance that the unusable media will be replaced with a new one in tech support.
If the exchange and compensation of damage is not possible, then the main methods of how to remove scratches from the Xbox 360 disc are those already described earlier using toothpaste or polish.
Portable media care
The best way to solve a problem is to prevent it from occurring. To delay the collision with the question of how to remove scratches from the disk, you should provide it with proper operating conditions:
- It is necessary to clean strong dirt with specialized means, with gentle movements in the direction from the central hole to the edge of the CD. In no case should you wipe the surface of the disk in a circle - this creates a risk of data loss.
- Media should be stored away from direct sunlight in a CD/DVD folder. This method will provide fragile disks with the proper level of security and take up a minimum of space.
- Remove the media from the optical drive by holding it by the edges or the inner ring.

By following these instructions, the user will protect themselves from unexpected loss of information and may never face the problem of how to remove scratches from the disk.
CD/DVD discs are an important medium for data storage. You can store your favorite movies, songs, or even some important work projects on them. Discs must be stored in special packaging and not in bulk in any box. But even if you handle the discs with the utmost care and in the appropriate way, scratches on the surface of the discs cannot be ruled out.
This article will tell you about some easy ways to get rid of CD scratches. There are even special devices for polishing and “repairing” a scratched disc, however, these devices are quite expensive, so we will make do with “folk” tools available in everyday life.
First you need to thoroughly clean the disk. This is necessary because sometimes dust and other contaminants can interfere with the normal reading of data from the disc. In order to clean the CD of contaminants, you need to wash it in warm soapy water. It can also be cleaned with liquid soap, detergents or even alcohol.
Disk needed clean away from the center of the disc to the periphery (i.e. to the edges of the disk). Necessary use a soft, lint-free cloth. After you wash the disc, it must be dried. Do not dry the disc in the sun or under a lamp, and do not use a towel to dry it.

If the CD does not work properly even after cleaning, then try turning it on in another player or drive. Often the cause of the problem is not at all the disc, but the laser of the "low" power of the player or drive.
If you begin to notice problems with reading data from a disk, and you value the data recorded on it, then you urgently need to make a copy of it or save its contents on your computer.
Note, How are the scratches on the disc?. Their location directly affects the degree of disk damage. Scratches that are perpendicular to the center of the disc affect the functionality of the CD/DVD to a much lesser extent than scratches that are located along the spiral of the disc.
Proven and reliable way polishing the disc that improves the playback quality of a scratched disc. For this you can use such tools, like soda, toothpaste, alcohol, anti-freeze (glass cleaner). These funds must be applied to the surface of the scratched disc and wipe it in a circular motion. As a rag Use a soft, lint-free cloth or wipes to clean your glasses. The CD should then be washed and allowed to dry.
For polishing disc you can also use polish for the car or neutral shoe polish.
After polishing the CD, check its surface. If you notice that the surface of the CD has become much shinier (although some small scratches may still remain on the surface), this means that the polishing has worked well. If you did not notice any difference, even after polishing the disc, then the scratches on its surface are large and deep, and in this case, regular polishing will no longer help.
If everything worked out for you, then you can safely turn on your favorite CD player and go to
Despite the fact that the discs are extremely reliable and resistant, it is almost impossible to avoid the periodic appearance of scratches and scuffs on them. This corruption could end up missing your favorite music track, or in the case of a data disc, losing a datasheet you've been working on for two weeks. Do not despair, there is a chance to fix the disk. There are commercial scratch repair kits and machines for repairing damaged discs (which are definitely worth looking into if you deal with scratched discs all the time), but you may be able to fix everything at home.
First of all, clean your disk. Even if the disc isn't actually scratched or scuffed, or the scratches aren't causing a readability problem, dust, grease, and other surface dirt could be. So in any case, cleaning is the first step.
Use a commercially available set of non-abrasive cloth and special disc cleaning fluid, or:
- if you find persistent dirt or fingerprints on the surface, rub this area very gently with your fingers (not nails !; but it is better to buy a special non-abrasive cloth for discs) or even use liquid soap (with water); or use rubbing alcohol instead of water. Whenever you rub or wipe a disc, start at the center of the disc and work straight up towards the edge to avoid new scratches.
— Shake the disc to remove any water droplets and let the disc air dry (do not wipe the disc with a towel or tissue).
Try to count the disk. If it doesn't work - try counting on other equipment: some players cope with scratches better than others; in this case, computer CD / DVD drives and car stereos are optimal. If you can read it on a computer, immediately make a copy of the disk.

Those that run from the center to the edge of the disc, perpendicular to the circular spirals, may not have any effect on readability at all. Dangerous are those that go in the direction of the disk spirals. It is they who are responsible for the loss of many consecutive bits of data, due to which the algorithm of data recovery programs may not be able to cope with the task.
If there are several scratches, but the disc does not read / skips only some files / tracks, you can probably figure out which specific scratches are causing problems. The first track on a music disc starts near the center of the disc and the direction of play is outward towards the edge of the disc.

Many disc burning programs can be set to continue reading after an error is detected (such as when the data cannot be read due to a scratch). If the program is unable to read the data at all, it will fill it with random information. Also, the program may try to read the damaged section many times at a very low speed. Plus, this technique does not carry the risk of damaging the drive even more, so before trying anything else, first use the program (but even if you later damage the drive even more, this method can still be applied) .
For Windows, try Nero in this case; for Linux - Ddrescue. These programs often do the job well, and they are especially effective with audio CDs (where accuracy is less important). Remember that due to long reading and numerous attempts to read the damaged section, these programs may take a long time to work (in Windows XP, disk recovery takes about 2 hours).
Disc polishing
WARNING: THIS CAN DAMAGE THE DISK EVEN MORE! USE THIS METHOD ONLY AS A LAST REMEDY AND READ THE INSTRUCTIONS CAREFULLY!
Despite the seemingly counterintuitive action, polishing a disc can remove scratches by removing the outer plastic coating and, thanks to this, making existing scratches not so deep. A number of household products can be used for polishing, but toothpaste (especially baking soda paste) and Brasso polish are the most commonly used and effective products. You can also use fine-grained polishing compounds, which are used for cars or tool processing.

- Apply a small amount of paste (it should be a paste, not a gel) or Brasso on a soft, clean, lint-free cloth (an old undershirt, for example); either buy a special disk wipe or use a glasses wipe;
- Gently rub with a cleaning cloth over the scratch or work your way around the radius (start in the center and move forward to the outer edge of the disc, like the spokes on a bicycle wheel). Repeat 10-12 times throughout the disc. Rubbing in a circular motion can cause small scratches that will completely knock out the laser system in any player. Try to focus your efforts strictly on the scratch or scratches you find (see search method above), if possible.
- Polish in this way for a couple of minutes, adding the product (Brasso or paste) to the cloth as needed. Be careful not to push too hard. However, you will still feel the napkin gently, and yet rub the disc.
Remove the polish from the disc. If you used a paste, rinse the disc thoroughly with warm water and let it dry -!completely! - on air. Make sure all the paste is washed off. If Brasso polish is applied, wipe off the remaining product with a work cloth and allow the rest to dry properly. Then, using a clean, non-abrasive cloth, gently wipe the disc again.
Try playing the disc again. If the problem persists, repeat polishing, but now extend the process to 15 minutes or until the scratch is completely smoothed out. The surface around the scratch should be shiny and covered with many tiny, superficial scratches. If you don't notice any difference after polishing for a few minutes, the scratch may be too deep, or you may be polishing the wrong scratch.
If the drive is still not working, try taking it to the pros at the computer toy store - they run into this problem often.
Waxing

Then wipe off excess product from the surface using a clean, soft, lint-free cloth - again, from the center straight up, along the radius. Follow the product manufacturer's instructions (some products must dry before you wipe them off, others must be removed before they dry).

Test the disk. If the disc was read, make a copy immediately. This method is just a temporary solution.
Light bulb method
Note: This method doesn't always work, but it's very simple and worth trying.
Turn on the lamp on the desktop (or any available) - the bulb needs 60 watts. Insert your index finger into the center hole of the disk and turn the working area of the disk towards the lamp. The distance to the lamp should be about 10 cm (keep an eye on this while holding). Continue "solar procedures" for about 20 seconds, slowly rotating the disc around your finger. Then - while the disk is still hot - try to read the data. It turns out - immediately make a copy.
A disk recovery device can cost as much as 750 rubles, but high-performance machines will cost 9000-180000 rubles.
Removing scratches on the silver layer of the disc
Look at the working surface of the disc in the light - for areas with no silver coating. If you find one, turn the disc over with the side with the logo / design up and mark on it with a marker the place with the found (the one that you saw on the other side) problem. Cut two pieces of masking tape, put them on top of each other and stick the resulting one directly on the drawn mark. In this case, the music disc will probably start playing a little louder, but 70% is due to the fact that small areas that have lost their silver coating will be restored.
Additions and warnings:
- Deep scratches that have reached the silver coating of the disc can make it completely inoperative;
— Tools for removing scratches from discs are often sold in gaming stores. They do a good job with small and shallow scratches;
- Poorly calibrated lasers in players and disc drives cause such devices to be unable to read anything but brand new, smooth and unscratched discs. It may simply be a property of the hardware;
- Practice first restoring scratched discs that are not too important for you to fill your hand;
Don't forget to make 2 copies of important materials. Moreover, if the disc is scratched, but still readable, immediately make a copy of it;
“Really deep marks on the disk can no longer be repaired. But due to the nature of the structure, when data is distributed along a spiral track on disks, such a scratch along the radius of the disk may not cause you any special problems, and you can recover data quickly and easily. But a number of small defects along the tracks / paths are much more dangerous than one large and perpendicular to them;
“The polycarbonate bottom layer of the disc acts as a lens that focuses the larger laser beam down to the small size required to see the track on the data layer of the disc. This allows the laser to ignore small imperfections on the plastic surface of the disc that are much larger than the track on the data layer. If you remove a lot of plastic, this can affect the refractive power of the lens, making the data no longer readable. This means that even with visible wear or a network of scratches, the disc can be played normally, because through the coating defects visible to your eye, the laser looks through or reads next to them. That's why the waxing method helps a lot. After it, the disk does not have to look perfectly polished so that the data can be read;
- It is better to immediately give a disk with important data into the hands of professionals;
- Expensive specialized polishing tools work no better than Brasso, so the choice is yours;
- If the disc is an Xbox 360 game, try to exchange the disc in the store. Disc mileage may vary, but Microsoft saves 25 cents on the production cost of Xbox 360 discs by not including disc security measures that would help avoid many scratches. Such disks will show themselves as deep scratches along the radius, but sometimes not over the entire surface of the disk;
- Do not keep the disc in the sun for a long time (examining scratches) and near the lamp;
- If you polish ineptly (for example, apply too much force and / or rub in a circular motion), you can shorten the life of this disc;
- In order not to damage the equipment, make sure that after the procedures the disk is completely cleaned of funds and absolutely dry;
- Do not inhale disc polishing agents - wear a mask and work in a well-ventilated area;
- The data on the discs is stored under a thin colored layer on top, which is much thinner than the polycarbonate layer on the work surface. Therefore, be careful not to place the disc with the picture on a surface that is too rough, hard and/or uneven during operation. The thin top layer of paint is very easy to damage, if this happens, the data will be lost forever. If the surface is too soft, by pressing on the disc, you can leave a crack in it or cause delamination;
- Solvents cannot be applied to discs, they will change the formula of the polycarbonate base, due to which it will become opaque and the disc unreadable;
- Remember that the paste can scratch the disc even more;
- If you decide to try these methods with a licensed DVD (the last 3), be extremely careful not to start rubbing the side with the name of the DVD with a rag. If you do this, you will completely kill the drive. So just clean its shiny working side.
Problem: scratched disc
If you've ever dealt with a scratched disc, you know that scratches do a lot of damage to the contents of the disc. Where do scratches come from? There are several reasons for disc scratches:
- frequent use of the disc (in this case, the CD-Rom itself can scratch the disc);
- careless handling of the disc (for example, the disc is stored without packaging);
- accidental drop of the disc on the floor;
- other influences.
The result of scratches are sectors on the disk that the laser cannot read. Why is this happening? Because the grooves on the disc, i.e. scratches distort the laser path. And, although the information under the scratches is preserved in itself, the laser cannot reach it. Thus, scratches block access to information on the disk and make it inconvenient or impossible to use. For example, if a movie is recorded on a disc, then when the movie approaches a scratched area on the disc, the image may start to "jump" and stop completely. This greatly spoils the impression of the film, and sometimes makes it impossible to watch. And if important text documents are recorded on the disk, then there is no need to say that unreadable sectors are completely unnecessary there! What to do?
Is it even possible to extract information from a scratched disk?
After studying the information on the Internet, we realized that this issue is the subject of controversy. Some believe that it is possible to recover data from a scratched disk, others do not agree with this, and still others doubt it. We were wondering if there is an answer to this question at all? We did not find special experiments on the Internet, and the materials we found turned out to be dubious. Therefore, we decided to conduct our own independent experiment.
Data Extraction Methods
We know that there are two possible approaches to extracting data from a damaged disk, namely the software method and the mechanical method. Program method consists in data recovery using special programs (such as "Reliable Copy", etc.). It allows you to read corrupted files, skipping unreadable places, i.e. extract everything that can be extracted. mechanical method based on mechanical polishing of the disc surface. This method allows you to increase the readability of data.
independent experiment
We want to explore the mechanical method in practice, because want to recover data that may seem lost. We also use the program because standard copying tools will not allow us to extract data from a file that is at least slightly damaged (the standard program will immediately give an error reading the file and stop working). And we want to try to extract all available information from the disk.
Let's assume that polishing the scratched surface of the disc allows you to completely erase the scratches and / or make them less deep. Thus, the problem of curvature of the laser trajectory can be eliminated completely or partially, and the information on the disk will be read. Let this be our hypothesis. Based on this hypothesis, we conducted an independent experiment. And now we illustrate here the step-by-step process of the procedure and present the results obtained. We hope that you will be interested to read this information and you will find something useful for yourself.
task The experiment is to find answers to the following questions:
- Is extracting data from a scratched drive a solvable problem?
- What does the disc polishing method give? Is polishing a real data recovery due to better data availability for the laser?
Restoring a scratched disk using improvised means
Stages of the experiment:
- We took a completely undamaged new disc (no scratches) and ran a readability test on it using the Trusted Copy disc reader.
- We scratched the new disc hard with a sharp-edged seashell and a piece of granite.
- We have checked the readability of the damaged disc using the Trusted Copy disc reader and compared it to the original unscratched copy using the Sync Last Files Professional file finder.
- We sanded and polished the disc for 30 minutes using regular toothpaste as an abrasive. At the same time, we sanded for 10 minutes with a medium hard toothbrush and toothpaste, and polished for 20 minutes with a rag, toothpaste and water.
- We have tested the readability of the sanded and polished disc using the Trusted Copy disc reader and compared it to the original unscratched copy using Sync Last Files Professional.
- Next, we polished the disc for another 60 minutes with a cloth, toothpaste and water.
- And then we again checked the readability of the polished disc using the Secure Copy disc reader and compared it to the original unscratched copy using the Sync Last Files Professional program.
At the end of the experiment, you can see its results ( conclusions).
Stage 1. Checking the readability of an undamaged disk.
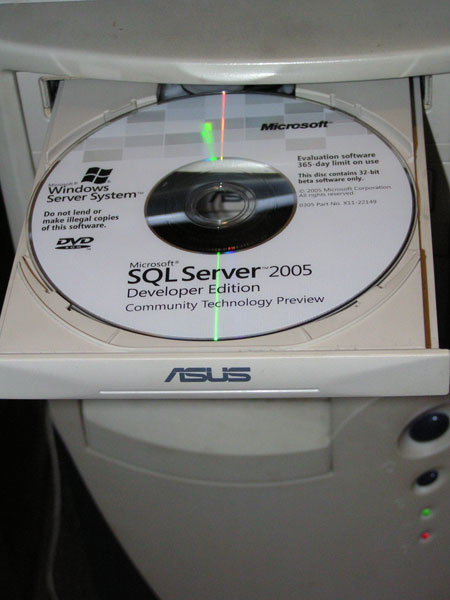
Photos 1 and 2. We took a completely undamaged disc (no scratches).
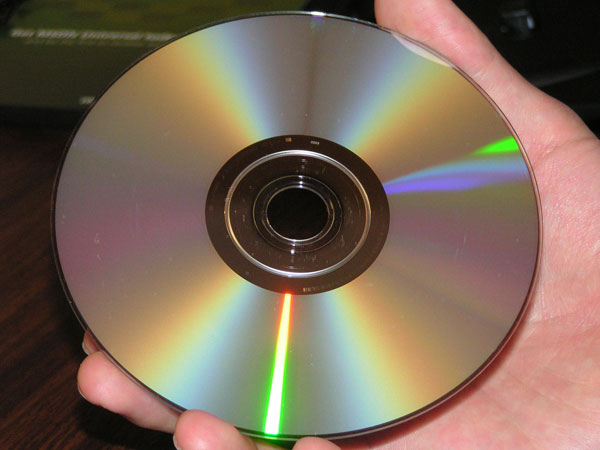
Photo 3. We inserted this disc into the drive and launched the "Trusted Copy" disc reader to make a master copy of the disc.

Screenshot 1. Here you can see that we are ready for copying: we want to copy a disk to use it as a master copy later on. As the disk gets damaged, we will compare it with the master copy to see if we were able to recover the data. The right column contains the source for copying files, i.e. the disk itself. In the left column there is a clean directory in which we will store the original, i.e. undamaged copy of the disk.

Screenshot 2. The disk is being analyzed.
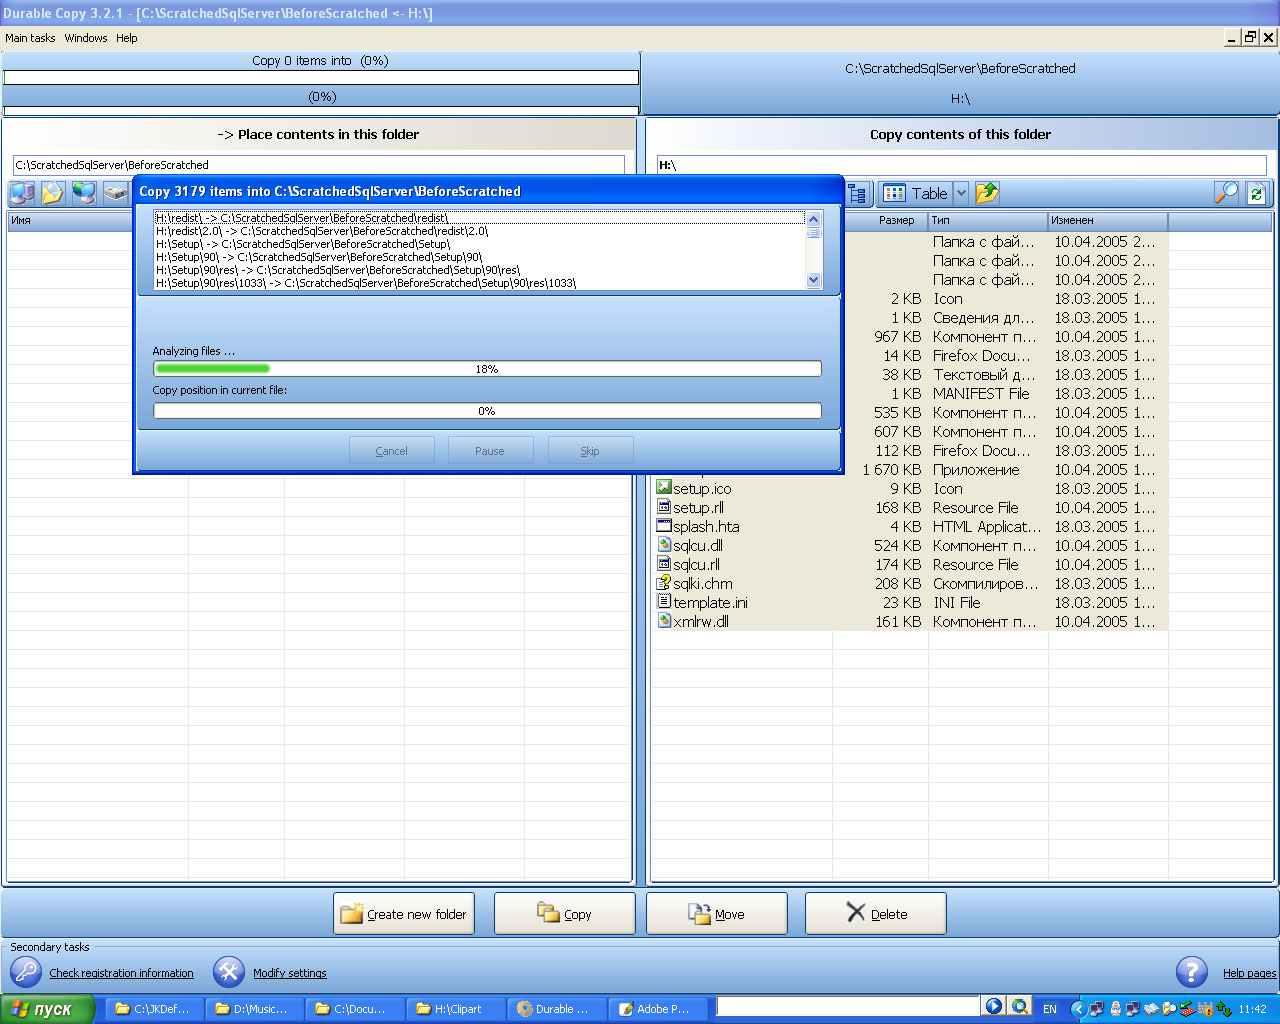
Screenshot 3. Files are being copied from an undamaged disk.

Screenshot 4. No error notifications appeared. All files were copied successfully. 
Stage 2. We scratch a good disk.
Photo 4. We have prepared tools to damage the surface of the disk: a sea shell with sharp edges and a piece of granite.

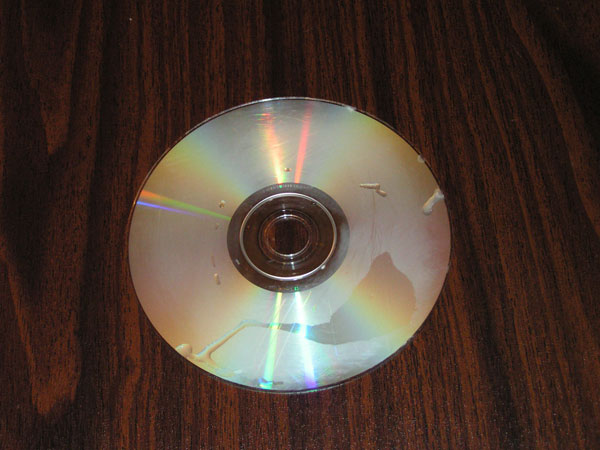
Photo 5. Scratching. To complicate the recovery task, we deliberately applied scratches of various thicknesses and types: transverse and longitudinal lines and zigzags, the most dangerous for disk data:

Photo 6. We thoroughly scratched the disc. At the same time, the scratches were deep, but not so deep as to damage the information layer itself (they did not scratch the disc through and through).

Stage 3. Checking the readability of a damaged disk.
Photo 7. We inserted the scratched disc into the drive and launched the Trusted Copy disc reader. We are wondering if this program will be able to extract the data and check the number of readable files.
Screenshot 5. The copy program is trying to read our scratched disc. It can be seen that some files are not readable at all, while others are only partially readable. 
Screenshot 6. The scratched disc has been copied. As can be seen from the table, only 142 files ( 5% ) were copied successfully, 2560 files were only partially read, and 8 files were not read at all.

The fact that the files were copied does not mean that they are intact. Let's perform a byte-by-byte comparison of the copied data with the reference copy using the "Sync Last Files Professional" program.
Screenshot 7. Sync Last Files Professional shows the comparison result. 
Screenshot 8. Close-up result of the comparison. 2568 different files were found. 
As you can see from the table, there is a difference in the total number of items shown by Sync Last Files Professional and Trusted Copy. There are several reasons for this:
- "Sync Last Files Professional" counts both files and directories. For example, there are 469 directories on our disk.
- "Sync Last Files Professional" excludes identical files and directories from the results, as it is designed to synchronize dissimilar files and directories.
- "Sync Last Files Professional" will synchronize when there is a file in one of the compared directories and not in the other.
This means that Sync Last Files Professional had to find 2568 different files. 2562 different files were identified, which is less than expected. Why? This could be due to the fact that some of the files copied at the first stage contained empty data (for example, there was a large picture in BMP format, the damage of which fell on empty space). But the main thing here is that there are no more damaged files than the Durable Copy program considers damaged.
Stage 4. Grinding and polishing the scratched disc (first stage).
Photo 8. We have prepared tools for grinding a scratched disc: a medium hard toothbrush and toothpaste as an abrasive.

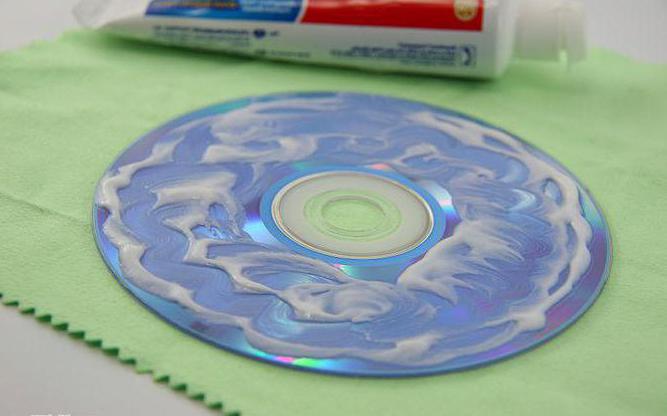
Photo 9. We applied toothpaste to the brush and began to grind the disc.

Photo 10. The brushing process lasted only 10 minutes, after which we took a rag.

Photo 11. We abandoned the brush and took a rag instead. We applied toothpaste to the disk and polished hard for another 20 minutes, periodically wetting the disk with water. The change from a toothbrush to a cloth was due to the fact that the cloth was softer and more delicate than the brush, which itself left scratches, although it was soft. We hope that the abrasive power of toothpaste and a rag will be enough for polishing.

Photo 12. After that we washed the disc. As you can see in the photo, the surface of the disk has ceased to be shiny: it has become matte due to polishing. Through the matte surface, our scratches are visible, which are no longer as deep as at the beginning.
Stage 5. Checking the readability of a polished disc.
Photo 13. We wiped the disc dry, inserted it into the drive and launched the Trusted Copy disc reader.

Screenshot 9. 694 files copied successfully ( 26%
). Partially copied 2016 files. 0 files not copied. 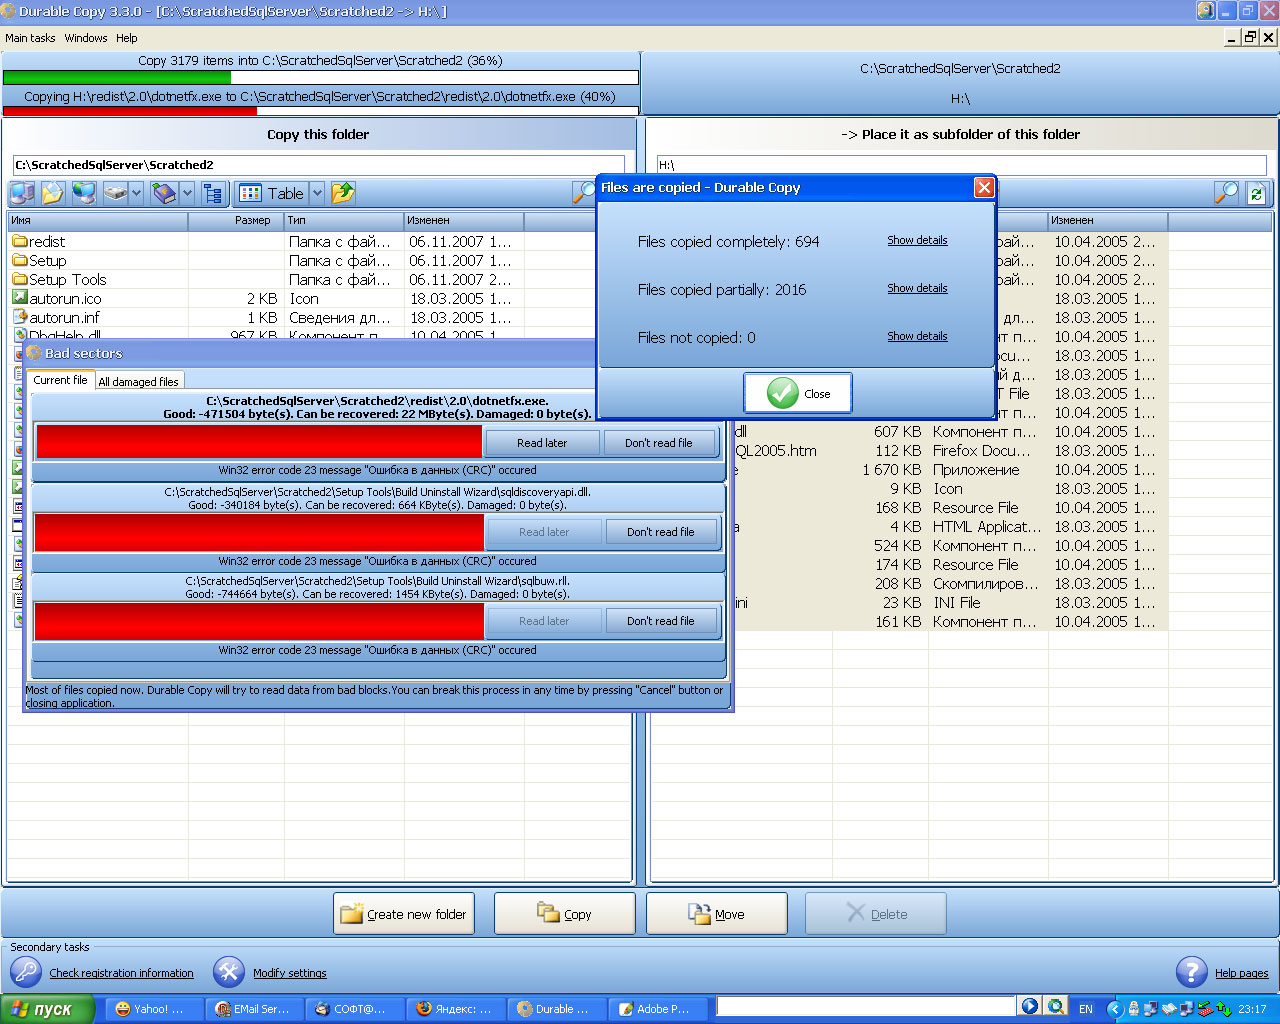
Screenshot 10. The result of the comparison using the "Sync Last Files Professional" program.

Screenshot 11. Close-up result of the comparison.

Comparison of the resulting copy with the standard using the "Sync Last Files Professional" program in the byte-by-byte comparison mode also showed a positive trend. 2016 files are different. This means not only that we have increased the readability of the data for the laser, but also that the data itself really preserved under the scratched disc surface.
Stage 6. Polishing a scratched disc (second stage).
Photo 14. Inspired by the first success, we again applied the toothpaste to the rag and began to polish the disk with an effort. From time to time we moistened the disk with water and continued polishing. The polishing process lasted 60 minutes.

Photo 15. Then we thoroughly washed the disc with warm water.

Photo 16. We wiped the disc dry and saw the final result of our efforts: after polishing, our scratches became less deep, although we were not able to polish the disc to the end. But still, we see progress in polishing the disc with this method.
We inserted the disc into the drive and launched the Trusted Copy disc reader.

Stage 7. Final check of the readability of the polished disc using the Trusted Copy disc reader.
Screenshot 12. The program copies data from a polished disk.
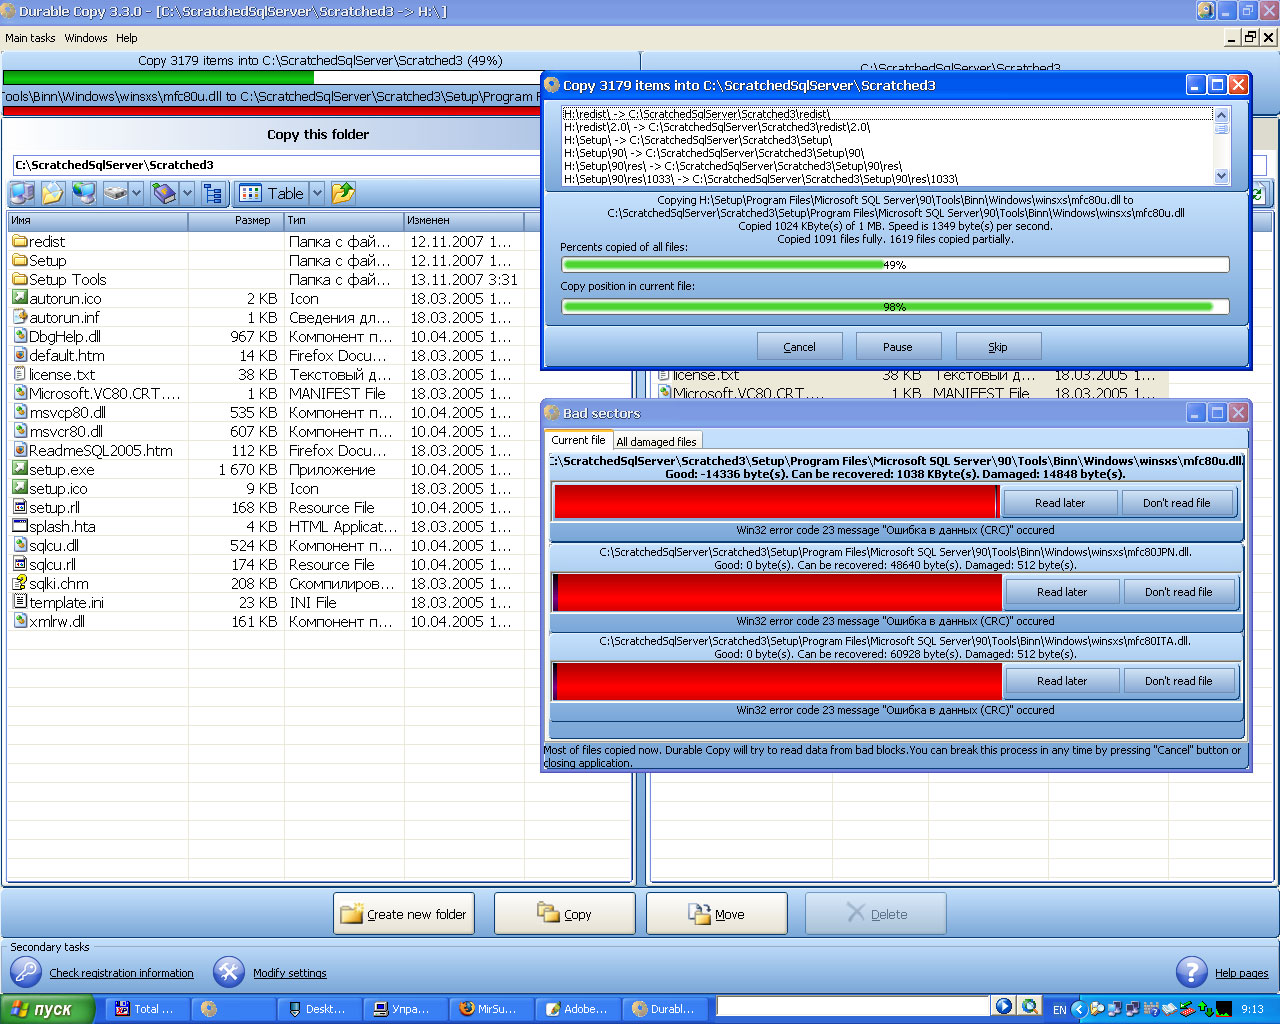
Screenshot 13. A total of 1099 files were copied ( 41%
). Partially copied 1606 files. 5 files not copied. 
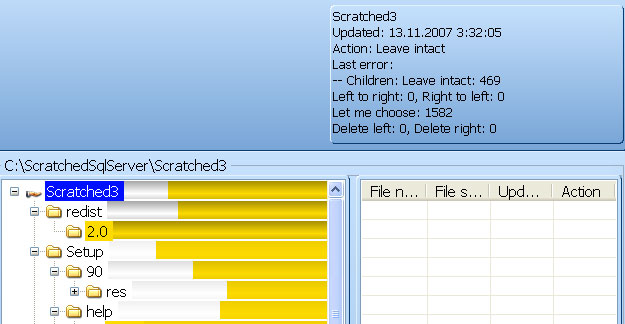
Screenshot 14. Sync Last Files Professional found 1582 different files by byte comparison.

Screenshot 15. Close-up of the result of the comparison using the "Sync Last Files Professional" program.
And we again see positive dynamics: after a long polishing, we were able to read an additional 405 files, while after the first iteration we were able to read an additional 552 files. At the same time, although the overall dynamics is positive, we see the beginning of a progressive destruction of files by long-term polishing: after the first polishing, we did not read 0 files, and after the second polishing, there are already 5 files.
conclusions:
- Our experiment shows that extracting data from a scratched disk is a solvable problem;
- Disc polishing does result in data recovery due to better data availability to the laser;
- In 1.5 hours of polishing, we were able to extract 967 files out of 2568 initially damaged, which was confirmed by a byte-by-byte comparison of files with a reference copy;
- Moderate polishing improves the availability of data to the laser, while prolonged polishing can result in data loss;
- Polishing copes well with small scratches, but does not cope with deep ones;
- Polishing by hand is a laborious and lengthy process.
The working surface of optical discs is easily damaged - the protective layer is covered with scratches even with not very intensive use. Deep defects often lead to the impossibility of extracting information from the damaged media. Next, we will tell you how to restore a scratched disk by polishing with toothpaste, GOI paste, and also consider some "harmful" tips from the CD resuscitation Network.
Rules for dealing with damaged optical discs
Let's say right away that an unreadable medium with deep scratches can be restored in this way, at best, only partially. Moreover, you will have to act very carefully, otherwise the surface can be completely ruined. It would be better to practice on old unnecessary media before restoring a disk with valuable information - so you can evaluate the effectiveness of the method and, as they say, get your hands on it.
And do not immediately try to use the method described below when a read error occurs - check the disc on another computer - often it is the DVD drive that causes problems. In addition, there are many applications that allow you to extract the maximum information from scratched blanks thanks to a modified reading algorithm. One of the effective solutions is Durable Copy.
It is advisable to use the program to work with disks already restored by polishing, because we have already noted that heavily damaged media can never be reanimated 100%.
How to polish a blank with toothpaste at home
The most affordable and safest way to polish is with toothpaste:

The movements during the polishing process should not be too intense so that the surface does not quickly heat up. There is also no need to press on the blank. After 15-20 minutes, thoroughly rinse the disc in warm water. Its surface may become matte due to the appearance of many microscopic scratches, but deep damage will become much less noticeable, which should have a better effect on the readability of the disc.
Dry the optical drive, try inserting it into the DVD drive. If your goal is to extract photos, important documents, etc., use Durable Copy or a similar application. Surely the copied intact information this time will become noticeably larger.
If necessary, the restoration of the working surface by the method described above can be repeated, but it makes sense to carry it out for no more than an hour. As practice shows, polishing with paste for too long already causes the opposite effect - there is less readable data on the media.
Professional polishing method
For really valuable and expensive discs, such artisanal methods should no longer be used. To obtain an acceptable result, the polycarbonate base will need to be polished with GOI fine abrasive paste (sold in hardware stores) using an electric drill with a grinding nozzle:

If you don’t have a power tool, polishing with GOI paste can also be done manually, but a positive result is far from guaranteed, and the process can take a long time.
How not to repair optical discs
Often on the Internet you can read a lot of alternative ways to restore scratched compacts. For example, sometimes polishing is advised simply with soft or denim. It is clear that you will not be able to polish the surface with non-abrasive materials. It will simply overheat and the media will no longer be recoverable.
Another extreme option (the real advice of "specialists" from the Web) is polishing with fine-grained sandpaper. In this way, you can immediately spoil the surface, without even making an effort. The same applies to heating the disc in the microwave, under a table lamp, etc.
Another popular advice from the Internet is to cover the scratch with green paint or even completely treat the surface of the compact with it.