MiniTool Partition Wizard Home Edition partition recovery. Create additional partitions on the SD card, and use them to transfer applications Minitool partition wizard how to merge partitions
Sooner or later, every computer user encounters such a need as changing the size, volume of local disks or creating new partitions on your computer. I had such a need as a result of the transition from the operating system XP on Windows 7. The fact is that Windows 7 during installation takes up more disk space than XP. Moreover, after installing all the programs I needed, the amount of memory occupied on the C:\\ drive became even larger. And so I needed increase disk (partition) memory C:\\ from 30 GB to 50 GB due to other partitions. ( for example partition E:\\) And now the problem arose of finding a program with which this operation could be performed. The fact is that for the XP operating system there are many programs that do an excellent job with this task, but for Windows 7 there are not many such programs and basically they are all paid. But as the saying goes "he who seeks - he finds." I searched and I found such a program.
It's called MiniTool Partition Wizard Home Edition. That's what we're going to talk about in this article...
Go…
Installation, functionality overview (according to developers) and work with MiniTool Partition Wizard Home Edition.
Installing MiniTool Partition Wizard Home Edition.
Installation is extremely simple, so I will not dwell on it. And download this miracle of programmer thought and generosity (do not forget - the program is free, unlike similar ones) You can visit the official website of the program developer. And from our site you can.
Functionality of MiniTool Partition Wizard Home Edition.
Supports both 32 and 64 bit operating systems Windows family, that is Windows XP, Windows 7 and Vista (you can read about what 32/64 bit operating systems are). Home users will be able to easily perform complex operations with system partitions. Features include: resizing (volume) partitions, copying system partitions, creating new partitions in the system, deleting or formatting a partition, partition conversion, hide section, change drive letter (partition), set active partition, recovery partition etc. The program also supports working with disks and partitions with more than 2 TB of memory. (terabyte) . I think this is more than for a free program.
Working with MiniTool Partition Wizard Home Edition.
As for working with this program. I will describe only the procedure that I have already described above, namely for increase the amount of memory on the C:\\ drive. Why not fully about all the features of the program? Because the program has a lot of functions and it is impossible to put all this in one article with a detailed description. Yes, and pouring "water" simply, without doing this work myself, I do not want to.
And so ... To begin with, we launch the program itself (I hope you have already downloaded and installed it). An interface will open where everything is in Russian.

Even the most advanced user, I think, will be able to figure it out and do everything himself, without anyone's help. But still ... I will describe how I did all this personally. I ...
To get started, to increase the size of the partition C:\\ With 30 GB before 50 GB we need extra memory of 20 GB, which we do not have. To get it, you need to reduce the volume of another partition, for example, a partition E:\\, on 20 GB. To do this, run the program. By running it, we will see all the disks and partitions that are in your system. I have three partitions in my system C, E, And D. Allocate a disk E just by clicking on it once. Next, at the top of the program there is a button "Size", click on it. You can also right-click and select from the context menu "Size". This window will open.

Here in order to reduce partition size, drag the right end of the slider to the left and down into the field "Make room after" follow the volume. When there is about 20,000 mb there, it will mean that we have freed up 20 GB due to the partition E:\\.


In it, we already drag the left slider to the left, thereby, as it were, filling it with those megabytes that we took from the disk E. And so that the program has already performed all these operations, click, in the upper left corner, the first button "Apply" in the form of a tick. In the process, the program may ask you to restart the computer and will already perform operations to resize partitions in bios e. After the reboot, you will be able to work with the computer. You can also create new partitions in the same way. First, we free the required amount of memory from any partition, then on the unallocated, freed part, press the left mouse button and click on the item "Create". In the next window, specify the letter of the future section, and leave the rest as default. And click OK, and then "Apply". And that's all. After the reboot, you will be able to work with the new partitions you created.
That's about all there is to it. I think now you can easily resize partitions in your system at your discretion, as it suits you.
Note: This program will be very convenient when buying a Notebook, as they often do not have hard drives divided into sections.
Attention: When working with a laptop, you must consider the following nuances:
- before work, be sure to fully charge the laptop, and even better, leave it connected to the power supply, otherwise data may be lost when it is turned off while the program is running.
- on laptops there are so-called "secret" partitions designed for system recovery. You need to work with them more carefully or not touch them at all.
- among other things, I warn you that if your disk on a laptop, and even on a stationary computer, is full to capacity, then I think it will not do without data loss in any case. Therefore, before doing this, save your important data to some kind of removable media.
- If, after changing the size of the disk, the system requires you to format the disk, then simply restart the computer and the disk will work as it should.
A new version of Minitool Partition Wizard Home Edition_8 has been released. You can also download its English version from the official website of the developer. I gave a link to the official site at the beginning of the article. To download its Russian version from our website, use the link -. There are two programs in the archive from our site. This is actually Partition wizard home edition 8 rus and another very useful program from the same developer called Power Data Recovery, which is designed to recover deleted files, partitions from various media. You can read the instructions for using it in the article
This free program is part of the famous and very powerful Hirens BootCD. If you haven't downloaded the distribution yet, be sure to do so and burn its image to CD. If you are too lazy to do such manipulations, then just download the program after the article itself MiniTool Partition Wizard Home Edition, unlike Partition Magic, it is completely free and has great functionality.
How to Create a New Disk Partition in Partition Wizard Home Edition
First of all, we download and install the program. Then, running it, we look at our hard drives, and possibly hidden partitions. My picture looks like this.In this case, I will be partitioning hard disk #2 labeled E. What do you need for this?
Right-click on the hard drive E, and in the menu that opens, select the Move / Resize item, or use the special icon at the top of the program.
In the window that opens, you need to specify the size of the new partition. You can do this by holding the right arrow and dragging it to the left. Since I could not make an even size of 5000 MB, you must specify the appropriate size in the "Unallocated Space After" field. If the topmost field is filled with numbers, fill them with zeros as shown, and click OK.

If everything is done correctly, the program will show a new section with an unallocated area as in the figure.

Now you need to specify the partition file system (NTFS, FAT or EXT for Linux), set the drive letter, specify the drive name. To do this, click on the Create button in the upper section of the program, or right-click on an unallocated area, and select the Create menu.

In the window that opens, fill in the required data, and click OK.

If everything is done correctly, the program will show the created section J with the label you specified, in my case it is the label SOFT.

Well, that's all, we have done the most important thing, now you need to press only one APPLY button for the changes to take effect.

What you need to know when creating a partition using the Partition Wizard Home Edition
Be sure to wait until the hard drive is completely partitioned. If during the operation you restart your computer, or your power goes out, the disk will most likely stop displaying, but of course it will not be damaged.If you partition the system disk with Windows into partitions, then, of course, Windows will not boot after a crash. What to do in this case? In this case, write Hiren's BootCD to a disc and write here, I'll try to help, but usually everything goes without problems.
Conclusion.
In fact, the MiniTool Partition Wizard Home Edition program has a lot of different settings, I just described what you most often need to do with a hard drive, and it's completely free. By the way, this program helped me a lot when the file system crashed on the disk for no apparent reason.
Usually, after such cases, various data recovery programs are used, but I simply used the "Change Partition Type ID" item by changing the current ID to 0x07 NTFS. A similar situation was corrected using this program in the Mini Windows Xp shell.
MiniTool Partition Wizard- professional software for working with partitions on physical disks. Allows you to create, merge, split, rename, copy, resize and delete volumes.
Among other things, the program formats partitions and converts the file system NTFS to FAT and vice versa, works with physical drives.

MiniTool Partition Wizard can create partitions on empty drives or on unoccupied space.
This procedure assigns a label and a letter to the partition, a file system type, and a cluster size. You can also specify the size and location.

Section split
This function allows you to create a new partition from an existing one, that is, simply cut off the space necessary to create it.

Partition Formatting
The program formats the selected partition by changing the drive letter, file system, and cluster size. All data is then deleted.

Moving and changing partitions
MiniTool Partition Wizard allows you to move existing partitions. To do this, just specify the amount of unallocated space before or after it.
Resizing is done by the slider or indicated in the corresponding field.

Partition expansion
When a volume is expanded, free space is “borrowed” from neighboring partitions. The program allows you to choose from which section the required space will be cut off, its maximum allowable volume, and also indicates the new sizes.

Merging Sections
MiniTool Partition Wizard merges the target partition with the adjacent one. In this case, the new volume is assigned the letter of the target, and the files of the adjacent volume are placed in a folder on the target.
Partition copying
Copying a selected partition of one physical disk is possible only to the unallocated space of another.

Setting a partition label
In the MiniTool Partition Wizard, you can assign a label (name) to the selected partition. Not to be confused with volume letter.

Change drive letter
This feature allows you to change the letter for the selected partition.

Changing the cluster size
Reducing the cluster size can result in more efficient file system performance and more efficient use of disk space.

File system conversion
The program allows you to convert the partition file system NTFS to FAT and vice versa without loss of information.
It must be remembered that the FAT file system has a file size limit (4GB), so before converting, you need to check the volume for such files.

Wiping a section
The wipe function allows you to completely delete all data from the volume without the possibility of recovery. For this, algorithms with varying degrees of reliability are used.

Hidden section
MiniTool Partition Wizard removes a partition from the list of devices in a folder "Computer". This is done by removing the drive letter. At the same time, the volume itself remains untouched.

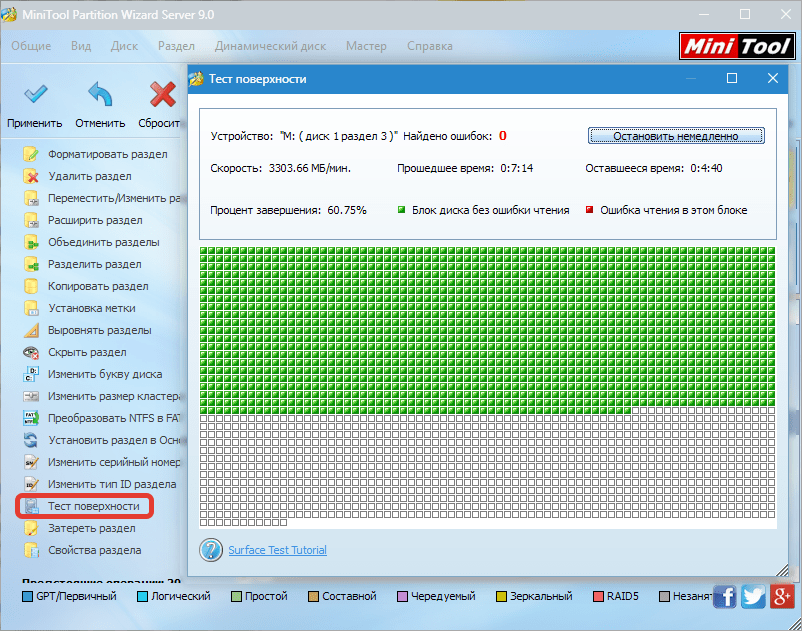
Surface test
With this function, the program checks the partition space for reading errors.
Working with physical disks
With physical drives, the program performs the same operations as with volumes, with the exception of formatting and some specific actions intended only for partitions.

Wizards will guide you step by step to perform some operations.

1. OS Migration to SSD/HD Wizard helps your Windows "move" to the new drive.
2. Partition/disk copy wizard help to copy the selected volume or physical disk, respectively.
3. Partition Recovery Wizard restores lost information on the selected volume.
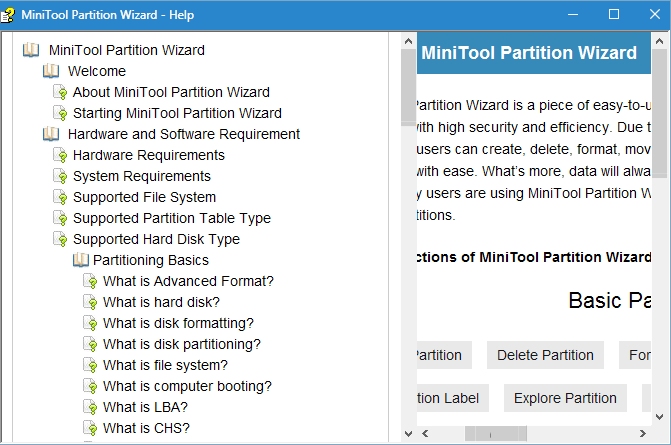
Help & Support

Help on the program is hidden behind the button "Help". Reference data is only available in English.
Clicking on a button FAQ opens a page with popular questions and answers on the official website of the program.

Button "Connect with us" leads to the corresponding page of the site.
MINI TOOL PARTITION
License type:
grunted
Languages:
Windows 8, 8 64-bit, 7, 7 64-bit, Vista, Vista 64-bit, XP, XP 64-bit
Downloaded:
Create partition on sd card
Do you want to handle SD cards professionally? This guide will help you do just that!
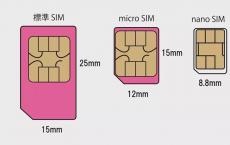
Personal SD - cards are now widely used in mobile devices. They are used to store system and user files. The price of such cards is low, and at the same time there is a large selection of volume. Today we will talk about porting third-party custom applications. An SD card is perfect for this purpose.
Before transferring, you should prepare the map accordingly. We will talk in detail about creating a second partition on microSD, for later use.
SD card preparation
First, it's a good idea to check the card for errors, which can be done using the factory Windows tools. After that, you need to find any program that allows you to create new partitions on the SD card. In this example, this will be done using the MiniTool Partition Wizard Home Edition. This free program presents all the functions we need. You can download it from our website using this link.
Very good, now you can proceed to the task. First, the SD card must be connected to the PC. Use a card reader or any other equivalent for this.
If there is important data on the card, make a backup copy before the process, otherwise the information will be deleted.
Open the MiniTool Partition Wizard Home Edition utility. This is how the main window of the program looks like.

Check if your card - SD is displayed in the list of connected removable drives. Most likely, there will be only one section on it, which we will delete now. Use the mouse to click on it, thereby activating it. Next, in the menu bar, click "Partition", and after "Delete".

After that, all free memory will be marked as "Unallocated" that is, not allocated.
Now you need to select an unallocated area, after which we again go to the "Partition" menu, but this time we click "Create".

In case you did everything correctly, the partition setup wizard window will follow. Next, we move on to creating a section.
Preparation of section 2
For our purposes, two sections will suffice for us:
- The first partition will be formatted in FAT32 and will be used for user data
- Second in EXT2 - this partition will be used to transfer files
So, the last step we launched the wizard to create partitions. Let's start creating the first one. We should fill in all the required fields in the window that opens.
In the line "Partition label" you need to specify the name of the partition. Choose any name you like. Next, select Primary in the "Create As" field. In the "File System" section, you must select the format of the partition to be created. As we have decided, the FAT32 format will be used. Select it from the menu. If the available SD space is less than 2 GB, FAT must be selected. Next, you need to assign a beech and a cluster size. You can set these settings as you wish. After that, it remains to configure the volume of the created partition. Three parameters should be configured in the "Size and Location" field:
- Unallocated area before
- Partition size
- Unallocated area after
Also note that you need to leave space for the extra partition.

Create partition 2 on SD card
We don't have much left. Further, there will be no particularly difficult tasks. It remains only to create the second section of the map, and this process is very similar to the one described above. The only difference is that we will choose the EXT2 format. Fill in all fields in the same way, but instead of FAT32 or FAT, select EXT2. To use, adjust all remaining space. Click OK. After that, you will be moved to the main window of the utility. If you did it right, in the upper left corner, click the "Apply" button. The Mini Tool Partition Wizard will ask you for confirmation and start the process.

Press "YES" and wait for the process to complete, after which you can already use the card.
Conclusion
So, as a result, our SD card has two partitions in FAT / FAT32 and EXT2 format. If we have a backup copy of the information, then we can already restore it to the user partition.
This is done by simple copying. Now you have a second microSD partition where you can transfer applications. We hope you enjoyed this guide and found it useful.
I want to write a few words about an interesting utility for working with disks and SSDs - MiniTool Partition Wizard. First, it has been updated to version 10.2, which means there is something new that we should know about now. Compatibility with Windows 10 has also appeared, so any crashes and bugs from the program should not be expected. Now Partition Wizard has a pretty high rating and has already been downloaded by more than 20 million users.
You can download from the official site.
A year ago, I already wrote and wrote about the functionality, but let's take a closer look.
The utility has many features to optimize the use of disk space, as well as protect your data. You can work with partitions and disks and perform manipulations such as resizing a partition, copying a disk, scanning for lost partitions, . Very often there is a problem and vice versa, and so, the program can do it.
The presence of such features as checking the disk for bad sectors, and this, by the way, is very important and you do not need to look for additional utilities to format the disk at the same time. The MiniTool Partition Wizard utility has it all, so to speak, ten in one.
Of course, not much is available in the free version, but purchasing the PRO version will allow you to take advantage of all the features. Now there are 5 versions of this utility: Free, professional, server, Enterprise, Technician. To access all the features, it is enough to have a professional edition.
What is in the PRO version but not in the free version?
- Converting from NTFS to FAT32
- Resizing a cluster
- Copying operating system from MBR disk to GPT
- Changing the Partition Serial Number
- Changing partition ID type
- Dynamic Volume Management
- Converting a dynamic disk to basic
- Create bootable media
As you can see, the professional version has a lot of features that are not available in the free one, I think it makes sense to buy the program. In order not to constantly pay $39 or $59 for a license, you can purchase the professional edition forever for $99, and I think this is a reasonable solution. Moreover, the license is tied to 3 PCs. Of course, first you need to test the utility and understand its effectiveness, for this there is a FREE version, and then decide whether to buy it or not.
Another disadvantage of the professional version is that you cannot use it on Windows Server, for this you need to buy a special version for this.
conclusions
The program is good because it has a lot of functions and capabilities, one contains a whole set and you do not need to download ten utilities that do only their job. Of course, it is still unknown how effective each of the program's functions is, but this is a matter of time, especially since a lot of people use the utility.
Let's now summarize how many functions there are in the program:
- Creating and deleting partitions;
- Formatting partitions and disks;
- Changing partition labels;
- Moving and resizing partitions;
- Partition expansion;
- Partition separation without data loss;
- Erasing data ;
- Section research;
- Setting a partition as logical or primary;
- Partition copying;
- Merging sections;
- System transfer to SSD or HDD;
- Convert from MBR to GPT and vice versa;
And many more other features. Well, what do you say? The program is just great. In the following articles I will try to describe how several functions work. For example, I already wrote . That's all, good use.