Setting up a local network in Linux. Shared folder - open access from the local network to the Ubuntu folder Local network between windows and Linux
In the process of working with a computer, a variety of tasks arise, one of which is setting up local network. In this article, we will take a closer look at how to set up a local network in the Ubuntu operating system. So let's get started.
Setting up a local network in Ubuntu is done using commands.
Console network configuration in all Linux-like operating systems, including Ubuntu, is carried out using the special ifconfig command. If you simply write this command in the terminal, the console will show all the network interfaces that are running on the PC at that moment. It looks like this:
eth0 Link encap:Ethernet HWaddr 00:04:75:c1:e2:ab
inet addr:10.2.10.32 Bcast:10.2.10.255 Mask:255.255.255.0
….
….
eth1 Link encap:Ethernet HWaddr 00:04:75:c1:e2:6b
inet addr:192.168.140.1 Bcast:192.168.140.255 Mask:255.255.255.0
….
….
lo Link encap:Local Loopback
inet addr:127.0.0.1Mask:255.0.0.0
….
….

The first column contains the names of the interfaces, and the second - the settings of these same interfaces. The ifconfig eth0 command displays the configuration of the eth0 interface only. To disable or enable the eth0 interface, enter the commands:
sudo ifconfig eth0 down
sudo ifconfig eth0 up
Please note that so-called superuser rights are required to manage interfaces.
To change the interface settings, write commands of the following form:
sudo ifconfig eth1 inet 192.168.140.1
change eth1 interface IP address to 192.168.140.1
sudo ifconfig eth0 hw ether 00:12:34:56:78:90
will change the MAC address to 00:12:34:56:78:90
sudo ifconfig eth0 netmask 255.255.255.0
change the subnet mask of interface eth0 to 255.255.255.0
However, settings set in this way are reset when the computer is restarted. To avoid this, change the settings in the network interfaces configuration file located in /etc/network/interfaces. This file looks like this:
# This file describes the network interfaces available on your system
# and how to activate them. For more information, see interfaces(5).
# The loopback network interface
auto lo
iface lo inet loopback
# The primary network interface
auto eth0
iface eth0 inet static
address 10.2.10.32
#hwaddress ether 12:34:56:78:90:12
netmask 255.255.255.0
network 10.2.10.0
broadcast 10.2.10.255
gateway 10.2.10.1
dns-nameservers 212.212.45.174
# The secondary network interface
auto eth1
iface eth1 inet static
address 192.168.140.1
netmask 255.255.255.0

To set the DNS server address, go to the /etc/network/interfaces file, but note that usually the DNS server addresses in Ubuntu are managed through the /etc/resolv.conf file, the syntax of this configuration file is extremely simple, and looks like this
nameserver 80.227.64.17
nameserver 80.231.56.1
After making changes to these configuration files, restart the network service with the command:
If you need the computer to receive network settings dynamically (via DHCP), write the following lines in the /etc/network/interfaces file:
To dynamically update network settings, write:

To stop or start the network service, use the commands:
sudo /etc/init.d/networking stop
sudo /etc/init.d/networking start
If you look at the configuration file in question, in the settings of the eth0 interface, the line that changes the MAC address is commented out. This is done because if it is not commented out, then network service may not start, and to change the MAC address, you may need to register:
sudo ifconfig eth0 down
sudo ifconfig eth0 hw ether 12:34:56:78:90:12
sudo ifconfig eth0 up
sudo /etc/init.d/networking restart
Alternatively, you can write a bash script.
In the /home/user folder, create a file called mynetconfig and copy the following code into it:
echo “########OTKLYCHENIE eth0#######”
sudo ifconfig eth0 down
echo “#####MENYAEM MAC ADRES#####”
sudo ifconfig eth0 hw ether 00:13:8f:cb:10:21
echo “########VKLUCHAEM eth0#########”
sudo ifconfig eth0 up
echo “####PEREZAGRYGAEM NETWORKING####”
sudo /etc/init.d/networking restart
echo "KONEC"
Now instead of these lines you have to write only one command: /home/user/mynetconfig
Next, copy the mynetconfig file to the /use/local/bin directory. Now you can run the script simply with the mynetconfig command. To make the script run immediately when the system boots, copy it to /etc/init.d/ and then open the console and go to /etc/init.d/ , then run the command:
update-rc.d mynetconfig defaults 99,
where mynetconfig is the name of the script;
defaults - execute on all boot modes from the second to the fifth;
99 - loading order.
To remove the script from startup, open the /etc/init.d/ directory and write:
update-rc.d -f mynetconfig remove
There is another way to add a script to startup. Simply enter the name of the script in the /etc/rc.local file, or delete it if you want to remove the script. The first method is somewhat more complicated, but it is worth giving preference to it, since in this case it will be possible to choose the order and boot mode, which can be important in some situations.

Now let's see how to connect network drive in Ubuntu. This is done quite simply. First, open the Go menu and select Connect to Server. In the window that opens, you will need to specify the type of service and other general data. Click the "Connect" button. Next, you will need to enter your password and click on the “Connect” button. Ready. Everything is quite easy and fast.
Now you will know how to configure the network yourself through the console in Ubuntu, as well as how to map a network drive. Write in the comments if you managed to cope with this task, share your experience with other users, and ask any questions that interest you on the topic of this article.
Before you start setting up a network connection in Linux, you need to start by looking at what network settings are currently in use. To do this, you need to use the command ifconfig. In information mode, it is available without ROOT rights, although for its full use it is better to obtain superuser privileges by entering the command sudo ifconfig. The result of its work will be a list of network connections available in the system and their parameters.
In different versions of Linux, the name of the network interface can be an abbreviation for Ethernet - eth0, eth1, eth2, etc.
On the interface lo - short for loopback - that is, a local loop with the address 127.0.0.1 .
For example, consider the Eth0 interface.
In line inet addr displays the current IP address of the computer on the local network connected to this network card. In the example it is: 192.168.1.144
Bcast- This is a broadcast address on the network, the so-called Broadcast (Broadcast).
Mask is the netmask.
HWaddr- this is the hardware address of the network card, it is also the MAC address used at the data link layer.
We learned information about current connections, now let's look at setting up a local network in Linux. You can do this in three ways:
1 - Through the graphical shell
2 - via command ifconfig or tool network manager
3 - through the configuration files of the Netork or Networking network service.
In my opinion, the last method is the most convenient and reliable, and therefore the correct one. To set up a network in Linux, you need to open the file containing the interface config. It all depends on which Linux distribution is being used.
Option 1: On Debian-based distributions (Ubuntu, Kubuntu, etc.)
File with network connection parameters:
/etc/network/interfaces
In order to change into linux settings network, you need to file it with as root any text editor. For example, via nano:
sudo nano /etc/network/interfaces
To automatically obtain addresses from a DHCP server, write the following:
Allow-hotplug eth0 iface eth0 inet dhcp
If the address needs to be registered statically, then specify the following:
Allow-hotplug eth0 iface eth0 inet static address 192.168.1.2 netmask 255.255.255.0 network 192.168.1.0 broadcast 192.168.1.255 gateway 192.168.1.1 dns-nameservers 192.168.1.1
This config is an example of a normal home network, where the computer address will be 192.168.1.2, the address of the gateway and DNS server (their functions are usually performed by a wifi router) - .
Option 2. RedHat-based distributions (Fedora, OpenSuse, CentOS)
Linux network settings file:
/etc/sysconfig/network-scripts/ifcfg-eth0
We open it in the same way through nano or vim:
Vim /etc/sysconfig/network-scripts/ifcfg-eth0
If automatically receiving settings from a DHCP server:
DEVICE=eth0 BOOTPROTO=dhcp HWADDR=00-1C-1B-11-F6-07 ONBOOT=yes
Static IP address:
DEVICE=eth0 HWADDR=00-1C-1B-11-F6-07 IPADDR=192.168.1.2 NETMASK=255.255.255.0 BROADCAST=192.168.1.255 GATEWAY=192.168.1.1 ONBOOT=yes
The IP addresses of the DNS servers in this case are written in the file
/etc/resolv.conf
Here is an example for public DNS servers from Google:
Nameserver 8.8.8.8 nameserver 8.8.4.4
Network setup in Linux is complete. It remains only to restart the network with the command:
Service network restart
Actually everything.
As a postscript, I'll tell you how to turn the network on and off in Linux. This is done through the same ifconfig command. Disable eth0 network card:
sudo ifconfig eth0 down
Enable the network card in Linux back:
sudo ifconfig eth0 up
Completely stop all network interfaces.
Service network stop
/etc/init.d/network stop
Turn everything back on:
Service network start
/etc/init.d/network restart
All the manipulations to open a shared folder on the local network, I carried out in Ubuntu 14.04 LTS.
- To get started, right-click on the folder you want to share on the network and select the "LAN Shared Folder" option. If this option is not available from the context menu on a mouse click, then you need to open the Ubuntu Software Center - find and install nautilus-share. After restarting Nautilus, with the command:
nautilus -qor just log out and log back in.
- When the Share Folder dialog box opens, select Share this folder. Click the "Install Service" button if the system asks for it.
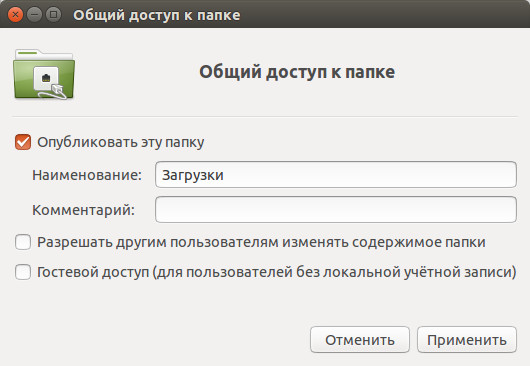 After finishing the installation process, you will have to log out and log in again.
 - After all installations, by setting up a shared folder, additional options will open. Depending on your needs, you can enable: "Allow other users to change the contents of the folder", "Guest access (for users without a local account)". At this point, all settings can be applied. This folder will be available on the local network for all users.
- But if you want client machines to be able to access this folder only by username and password, then the following conditions must be met:

- Open Ubuntu Software Center, find and install system-config-samba.
- Launch from the menu the installed graphical Samba service configuration tool.
- Settings -> Samba Users.
- Click the Add User button.
Then select a username, enter a name in "Name Windows user” and “Samba Password” -> OK.


Now, you can access this folder from the local network of another "machine" using the username and password.


