How to open Yandex disk. How to connect a Yandex drive as a network drive How to share files from a Yandex drive
Evernote and others. Yandex does not lag behind in this. Having created a shared folder on your Yandex disk, you can work on files in it with the whole team. You don't have to think about how to coordinate the work on documents, where to store them, how to synchronize changes. Yandex will take care of this itself.
How to organize collaboration on Yandex disk
What does the organization of collaboration give? This is the ability to view, edit, rename files by anyone who has the appropriate rights to do so. They are configured by the owner of the folder on Yandex disk.
Let's consider a sequence of actions in order to make a folder shared and start collaborating on a project.
- Select the folder where the shared files will be located.
- In the property pane on the right, click the Make this folder public button.
- A list of your contacts will appear. Specify the users to whom you want to open access, configure the rights (view only or full access) and click the "Invite" button.

If the required contact is not in the list, enter his e-mail in the field above and, specifying the rights, send the invitation.
Note: in the picture above, the contact list is overwritten for privacy reasons.
To access the folder, users must have a Yandex account!
After you have clicked the "Invite" button, a letter will be sent to the person at the specified e-mail address. It will indicate that you have shared your folder. If the user accepts the invitation, a copy of your "open" folder will be created in his Yandex disk folder.
In the event that the respondent does not have a Yandex account, he will be asked to create one.
User rights
When you assign rights to work with a folder, you thereby determine the set of actions that will be available to users.
- View only... Assumes reading and downloading files from a shared folder. You cannot add or modify files. A person with this set of rights acts as an observer.
- Full access... This means that the user is allowed to do everything: read, download, rename, modify, delete and publish (distribute a public link) files from the folder.
You must absolutely trust the person to whom you are granting full rights. On the other hand, don't worry too much. You can always close access to all members of your team or only some. If an attacker deletes files, you can restore them from the recycle bin.
How to change rights and deny access
When working together on documents stored on Yandex disk, you can at any time change the rights of an arbitrary user or deny him access to files.
For this:
- Select the shared folder.
- In the property bar, use the Configure Access button. Here you can also see the list of e-mail users who have access to the folder.

- A list of contacts will open. It will indicate those who accepted the offer to work together and indicate their rights.

- Change the set of rights, if necessary, or deny access to the folder altogether. To do this, select "No access" from the list of rights. If you decide to deny access to all users, use the "Close access to all" button at the bottom of the window.
The user who is denied access to the folder, its copy on his Yandex Disk will be deleted!
Which folders cannot be accessed
Not all folders on Yandex disk can be used for collaboration. This rule applies to:
- Folders that you do not own.
- Folders that contain shared folders (that is, open for public access).
- Folders that are inside a shared folder.
What operations can be performed with shared folders and possible problems
Let me remind you that each participant in a joint project creates a copy of the shared pack in his Yandex storage and any actions with it are limited only to this copy. Wherein:
- All users can rename and move the shared folder on your Yandex Disk.
- Any user can opt out of a shared folder and delete it.
- If the owner of the folder deletes it, then everyone will lose access To her.
This leads to two potential problems. Suppose you have access to a shared folder and files that are important to you are stored there. You can lose them at any time if the owner denies you access. Therefore, take care of creating backups in your personal folders.
The second difficulty comes down to reducing the space on your Yandex disk, up to its complete exhaustion. After all, you create a copy of the folder with all its contents. In this case, you must stop working together and delete the shared folder.
There can be several shared folders. You can view their list by using the "Shared folders" item in the main menu of the Yandex drive.
In the next article, you will learn about the integration of Yandex disk with social networks and other features of the service.
Method 1: At the time of placing the file in the "cloud"
Immediately after, the opportunity is available to generate an address leading to it. To do this, put the slider next to the name of the uploaded file to the position "On"... In a few seconds, a link will appear next to it.

All you have to do is click on it and choose how you would like to apply it: just copy it, send it via social networks or email.

Method 2: If the file is already in the cloud


Method 3: Yandex Disk program
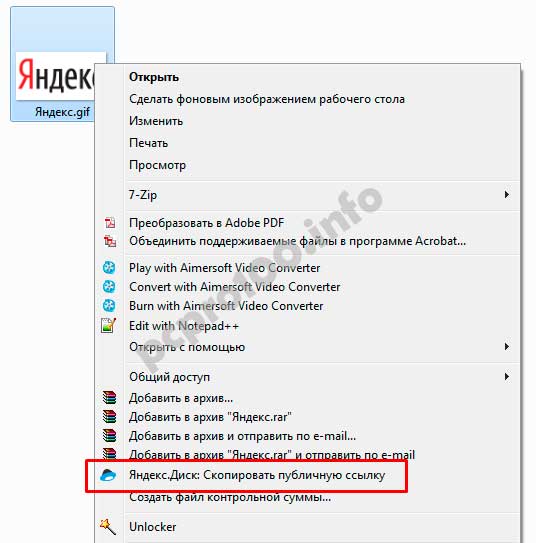
A dedicated Windows app also provides the ability to share the contents of the repository. To do this, you should go to the "clouds" folder, open the context menu of the desired file and click Yandex.Disk: Copy public link.

A message in the tray will confirm that everything worked out, which means that the resulting address can be inserted anywhere using the key combination Ctrl + V.


Attention! To perform the above actions, synchronization must be enabled in the program.
How to check files available to other users
The list of such files and folders is available in the section "Links".

How to remove a link
If you want no one else to gain access to a file or folder on your Yandex Disk, then this function can be disabled. To do this, just put the slider in the position "Off" and confirm the action.

Files that you delete from the Yandex.Disk folder on the server will be moved to Shopping cart.
Files moved to the Trash continue to take up space on your Drive. If you are running out of space, empty the Trash.
To empty the Trash on Disk, open the Yandex.Disk folder, right-click on the Trash and select Yandex.Disk: Empty Trash.
Shared files and folders
A file selection dialog will open, in which you can select any file on your computer. If you select a file that has not yet been uploaded to Disk, the program automatically copies the file to the Yandex.Disk root folder, uploads it to the server, and copies the public link to the clipboard.
You can paste a link from the clipboard into an email, ICQ client, or any other program. Any person receiving the link and clicking on it will be able to download the file to which the public access was provided.
Similarly, you can grant access to the folder. In the menu you need to select Share - Select a folder and share.
In the window that opens, you need to select a folder, after which the Yandex.Disk web interface will open in which you need to click the Open access to folder button
In the window that opens, enter the e-mail of the necessary people and send the invitation. Here you need to select access rights.
Use in the educational process
It is very convenient to use this opportunity to check term papers and theses. The teacher creates folders by the names of students and gives these students full access (each to his own folder). The student, of course, must also have Yandex.Disk installed.
The student writes the work and saves it in a folder with his last name on his computer. When the Internet is connected (and it is, of course, connected, because the student writes the work, as it were), the file is automatically synchronized with the server and with the folder located on the teacher's computer. And this happens every time you save the file.
The teacher can also open this file, read, write, check, comment, highlight with a marker, etc. After saving, the file will be synced again. You do not need to carry it on a flash drive, send it by e-mail. The file is already in the right place (the main thing is that at the right hour).
Thus, the file has at least three copies, and before the delivery of the work "otmaz" a student of the type "... just yesterday the computer broke down, the system flew, the viruses overpowered" will not work!
Cloud storages have firmly entered our Internet life, and since everything is interconnected with us, then for off-line these very storages are useful, for example, give a book to download or a photo. You already know how Google Drive works, now let's take a look. instructions for using Yandex Disk .
Search Yandex Disk. we will be in the same place as Yandex wallet - on the Yandex Internet portal at yandex.ru.
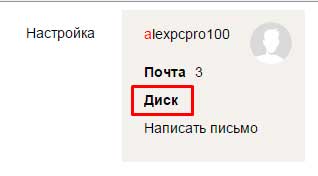
The screenshot shows that the Yandex Drive button is in three places, choose any, click and the Yandex Drive page will open. To work with Yandex Disk, you need to create a Yandex mail. I already have mail on Yandex, I think you already created it when you opened Yandex wallet.
Clicked and got this picture.
At the top of the Disk, there is a menu. In the picture, the Files tab is open. Here you can upload files, create folders, move files from one folder to another, that is, perform all actions with folders and files. which you do on your computer. How to download a file, I think it's clear, after downloading it will go to the Downloads folder, and then you can already distribute it into folders. And for this, you need to create folders and give them a name so that everything is “on the shelves”.
Click on the plus sign next to the word Upload and your new folder will appear on the right. Delete the title and write your own, what you need. The same window shows all the actions that you can do with the folder. Let's look from top to bottom, from left to right, since this is the most important thing you need to know and be able to do on Yandex Drive. You can immediately open the folder, in fact, we create folders for the most part in order to look into them. Next, download to your computer, delete. When you click on the next button, a menu will open from which all possible actions are clear.
Choose what you want and take action. For example, when you select the Move button, a window will appear and you will be asked Where to move the folder?
Click on the folder where you decided to move and click the Move button.
We go below. The button Make the folder shared allows you to make the folder available not only for reading, but also for adding or changing the attached files. That is, you, together with someone, are the full-fledged owners of this folder, and the folder will be the same for each of you on his Yandex Disk. Click this button and add friends to access.
Write your e-mail address, select the access level - full or read-only and click the Invite button. At the bottom there is a button to invite friends from Facebook, why only from there, it is not clear, probably, as the most advanced. When invited, click Close and move on.
Click the Off button and get a full link.
We will disassemble the next tabs a little later, but for now I will tell you that I forgot something, namely that Yandex Disk is already loaded on my computer, and you have to do it.
Let's go back to the beginning. You have started a mail and entered the Yandex Disk page. The first thing you will be shown.
Yes, you will be prompted to download the Disk to your computer, I advise you to do this, then the files on the Disk will be available to you without an Internet connection. You download the Disk, the picture shows where you can search for it later. I'll show you where the Drive is on my computer.
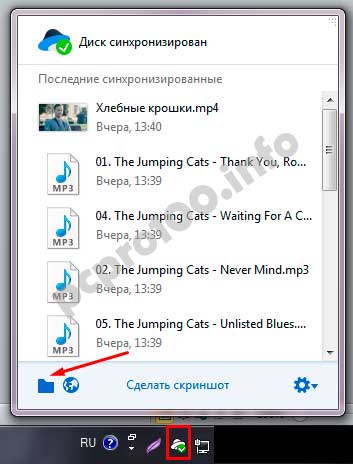
Pay attention to the Drive icon on the taskbar. You can open the Yandex Disk folder directly from there and not only open it, but perform all the necessary actions with Yandex Disk.
And the Yandex Disk folder itself looks like an ordinary folder on a computer.
So, you can upload files to Yandex Disk directly to the Disk folder on your computer, and then Enable synchronization and the content of Disk on your computer and on the Internet will become the same. And then you will already deal with the access levels of your folders.
Let's continue our study of the Yandex Disk menu. Camera tab. See the picture, everything is clear, there is nothing to add. Although I will add. Yandex Disk is available on any device-computer, tablet, phone. The disk downloads photos automatically: from the phone whenever there is Internet access, and from the camera - every time you connect to a computer.
Let's see how it works on the example of Odnoklassniki. I press the Odnoklassniki button. A window appears asking for permission to access.
I also allow the next step.
The next tabs of the menu Shared folders and Links duplicate the actions that we have already analyzed in actions with a folder. Rather, they do not duplicate, and inside these tabs are collected only those folders that are common and only those files and folders to which you link.
The next tab is Trash. Don't forget to clean! That's all, use Yandex Disk with benefit and pleasure and see you on the pages of the Computer ABC pro100.
I forgot to tell you that when you load Yandex Disk, a very convenient application will be installed on your computer - Screenshots in Yandex Disk, and we will talk about this next time.
Yandex disk who sees my files, local disks: Yandex Disk. Installation, possibilities, application
Many users have heard about cloud storage, Yandex Disk belongs to them. This service is available to all users who have mail on Yandex to get to the desired section should introduce your username and password, go to the mail, and then select the desired item or immediately click on the disk. What opportunities this service provides and how to use it will be discussed in this article.
Features and Capabilities
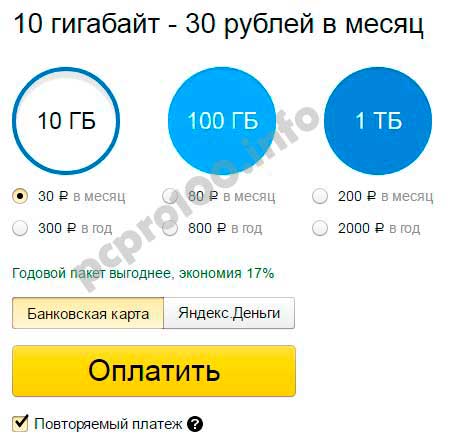
Immediately after registration, the user 10 gigabytes available storage. You can do whatever you want with them, you can save files and give a link to them to other users, you can upload files for yourself so that they are available at any convenient time. Additional space will have to be purchased separately, the cost can be seen in the screenshot below.
In addition, there is an opportunity to get several gigabytes for free. They are usually offered during promotions that are periodically held on the service.
You can work with the program both using a regular browser and using a special program. A good help for most people can be the Yandex Documents service, which is integrated with the disk. He will allow create and edit many kinds of documents, which makes it very convenient for office work from different points. The service can work with the following extensions:
- the documents- DOCX / DOC, ODT, DOCM;
- tables- XLSX / XLS, ODS, XLSM, XLSB;
- presentations- PPTX / PPT, ODP, PPSX.
Registration on the service
If the user has a Yandex account, no additional steps are required. If it does not exist, then it must be created. First, go to the yandex page and register there by clicking on the appropriate button. 
You can also log in using accounts social networks... Next, you should come up with a username and password, as well as enter all the required information. After the end of registration, the user will be sent either to the mail or directly to the service. In the first case, select Disk in the top line. 
Login to your Yandex Drive page
You can enter your page using the link https://disk.yandex.ru/client/disk. If the user is not authorized in this browser, then you will have to enter data account... In order to enter via mail, you just need to select the required item in the top menu.
Installing the app
However, work is possible not only through the browser. Can be installed a special utility for working with the disk, or connect it as a network folder. The application can be downloaded from the link https://disk.yandex.ru/download/#pc. After downloading, only run file and follow the instructions of the wizard. However, it is worth unchecking the additional options if they are not needed. 
After completing the process, the full range of cloud storage capabilities will become available on your device. For its use, only run utility and get to work. 
To connect the storage as a network drive, you just need to right-click on the computer icon and select the " Map network drive». 
In the next window, you will need to specify the link https://webdav.yandex.ru as the address. Also noteworthy restore option login connections. 
Next, you will need to enter your Yandex account details. Copying the password may not work, so it is better to enter it manually. After completing all these manipulations, you can exchange information with a yandex disk as well as with a usual drive on a computer. 
How to use Yandex cloud
Usually, when using the service, there are no special problems, however, further simple steps will be given for different use cases.
Using in a browser
Most users will begin their acquaintance with the service from the browser version, its interface is shown in the picture below. 
On the left side of the window there is a small menu that will allow you to better navigate the disk.

To search you can use the line at the top of the window. There is also a button that is responsible for creating new documents. Below you can choose the way to display the data and see all the existing elements. 
To share a link on a document, you should click on it and enable the corresponding option. 
How to use the program
After installation, a window with the corresponding icon will appear in the tray, after clicking on it, you can open the program or go to the settings. 
You can work with the opened folder in the same way as with any other folder on the device. Over time synchronization will occur, and all the data will appear on the disk.

Mobile app
The user can also download the application for his device from the built-in store (https://play.google.com/store/apps/details?id=ru.yandex.disk&hl=ru). You just need to go into it and enter the required data. From here you can get access to folders and files, as well as configure the utility so that all photos and videos are immediately placed in the cloud, which will facilitate their transfer. At the same time, now photos and videos uploaded to the service from a mobile through auto-sync do not take up space in the cloud. 
Several ways to upload files
There are several ways to upload data to the cloud storage. To do this, you can right-click on the file and select the desired item in the pop-up menu. You can also just drag and drop data to the Yandex disk folder.
The mobile application also has the ability to add files through the menu. When the service page is open in the browser, you can simply drag and drop the necessary data onto it, they will automatically loaded... It is possible to save files of other users to your storage, for this there is a corresponding button in the file menu. 
Removing an application from a computer
First, you need to go into the settings and disconnect the computer from the disk. 
After that it will be possible to act by standard means
... It remains to go to the control panel, then to add or remove programs, then select the storage and delete it. 

Working as a team, you need to have reliable communications. As soon as we started working on falbar, this question became very tough. After all, each article, before appearing in the feed, goes through the stage of selection, demo and code development, writing the main article, editing and moderation. At each stage, it is necessary to exchange materials, to transfer something for verification, to add something. Previously, we used the "file sharing" Skype, but the transfer rate of even small files is very low and the presence of a person on the other side of the monitor is required to press the confirmation button. To get away from the need to catch each other online, we switched to Documents from VKontakte - and the speed is good, and you can upload files at any time. Filled it in, attached it to the message and dropped it - they will be taken away at the other end at any time. However, the social network did not please with its reliability and periodic failures associated with the inability to upload files to the server turned our eyes to Yandex Disk.
We have been using mail since time immemorial, over time it became possible to attach larger and larger files to messages, but downloading them is not always convenient, you have to archive it once again, but the Disk turned out to be extremely useful.
To set up Yandex Disk for teamwork, first of all, you need to create mail on Yandex, if you don't already have one. Then follow the link - Yandex Disk. You will immediately see an offer to download Yandex Disk to your computer, but more on that later, so we close and see a set of standard folders. I already have more of them.

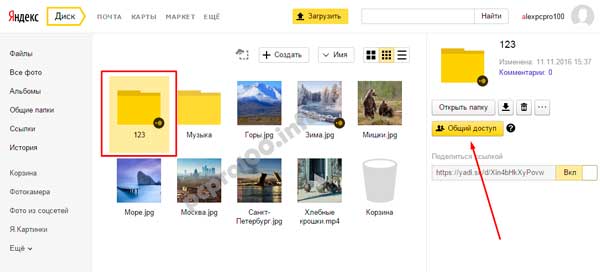
So, we need to create a shared folder, my name is "Shared Documents" and is marked with an icon with little men. To do this, click on the desired folder and at the bottom left of it we see a checkbox - put it on! A menu appears on the right side of the panel.

We click on "open public access". In the window that appears, we see a list of our addresses. We select the rights and invite. The specified addressees will see this folder in their Yandex Disk.

Now about the application. Yandex Disk can be installed on a computer and it will be seen as a regular folder, i.e. to work, you will not need to open a browser - just copy the necessary files there and that's it. One thing, but if you fill in large volumes there, then the folder grows greatly, in fact, it turns out that you store the same information twice on your hard disk (in the working folder and Yandex Disk folder on the system disk by default).
For example, your friend uploaded 20 gigs of video to Yandex Disk - take a look. You turn on the computer and are slightly perplexed: the Internet slows down, the system disk turns red and requires more space - this is the result of Yandex Disk's work. After booting the system, it began to synchronize data between the folder on your computer and the Internet storage. Actually, because of this, I abandoned the application, but I use the site with pleasure. By the way, after removing Yandex Disk, you will be asked a number of questions "why are you abandoning the application", among them the first is the storage of data on the hard drive. So they can fix it in the future.
PS: There is also a mobile application, but in my opinion it is very, very spy: all the photos taken with your phone will be automatically uploaded to Yandex Disk - sometimes it’s pale, isn't it?
Novice Internet users may be interested in what Yandex Disk is. Let me explain right away - this is cloud storage, disk space that is provided to any user with access to the Internet.
What is Yandex.Disk for?
It helps to store files that are rarely used on personal computer(archives, images of programs, photographs).
Note! The amount of disk space allocated is usually 10 gigabytes.
Using Yandex Disk often saves valuable data that has been previously duplicated on the computer and in the cloud storage.
For example, if the operating system does not start as a result of a crash or a hard drive breaks down, the owner of the files can log into their Yandex account and download them to a new device. This foresight saves a lot of time and money.
It remains only to learn how to use Yandex Disk - in order to get the opportunity to personally experience all the advantages of the project.
Registering a mailbox
Unfortunately, the creators of the service did not foresee the possibility of using Yandex Disk without mail. Therefore, you first need to register a personal box:
Open the site www.yandex.ru and follow the link "" located in the corner of the page.
Enter your first and last name. You can use an invented pseudonym or real personal data, there is no difference.
The screen will display a welcome new user and a notification that you have been granted 10 gigabytes of disk space for perpetual use. It is allowed to be freely used to save files of a wide variety of formats.
If the allocated 10GB is not enough for you, there is an opportunity to purchase additional gigabytes of disk space for money.
How to use Yandex Disk for the first time?
When you log into Yandex.Disk for the first time, we are prompted to download an application for your computer ("Download Disk for Windows"). I think you shouldn't rush to install the application. For a start, it is better to appreciate all the advantages of the online version. Therefore, we say "thank you" and close the invitation window.

Next, go to the main tab "Files". There it is possible to upload or download data, as well as create new directories. To add your first file to the cloud storage, just click on the appropriate button and select it on your computer.
The process of completing the task depends on the file size and the connection speed provided by the ISP. Upon completion of the operation, a new item will appear in the main or preselected folder.
After that, the received address must be copied to the clipboard and sent to any user. Anyone can download the information using a direct link - even if he does not understand what Yandex cloud storage is and how to use it.
Program for Yandex Disk
You can use the storage service not only through the web interface, but also through the official program on your computer. But it is better to do it when you master the online version of the disc.
The Yandex.Disk application is optimized for working with files. While a regular browser often makes mistakes when downloading large amounts of information and even closes automatically in the middle of the process.
You can download the application at https://disk.yandex.ru/client/disk and install it on your PC for free. Our instruction will help with this:
Go to Yandex Disk and choose your own from the list. operating system.
Download the installation image to your hard drive and launch it by clicking on it with the mouse button.
Accept the license agreement, wait for the installation, and the program will appear in the registry of your computer.
In the window that opens, enter your email address and password to gain access to your personal file storage.
After that, the main directory will be displayed with a list of files, as well as folders and sections. To download new information, be it an archive, video or image, just drag it with the mouse into the program window and wait for the task to start.
In general, working with storage elements is completely similar to the web interface, except for the increased speed of data processing and high convenience.
A feature of Yandex Disk installed on a computer is integration into the operating system. After installation, the user will see that a new disk has appeared in the "My Computer" folder. It is on it that files uploaded to the cloud will be duplicated - for greater security.
If desired, Yandex Disk for Windows can be configured in detail, managing synchronization, the amount of allocated space and other important aspects. This makes the application flexible, functional and very user-friendly.
To configure Yandex.Disk, we find the icon in the lower right corner of your computer screen. Click on it to go to the disk settings.

Further, by going into the settings, we can designate the folders that will be automatically synchronized. That is, their contents will be automatically duplicated in the Yandex disk cloud. To do this, go to the "synchronization" tab of the disk settings and uncheck the folders that do not need to be synchronized.

Thus, you have learned how to install and use Yandex Disk. This cloud storage will help free up memory of your computer and protect valuable files - while paying money only if you want to increase the size of the allocated space. And even a novice computer user can master the cloud. You just need to adhere to this instruction and have a desire to learn how to work with the service.
Good day everyone! Today we are talking about a very convenient service that I have been using for a long time in my work - Yandex Disk... What kind of "beast" is this? - you might ask. I will talk about this in detail in the article below. If you have any questions, ask them in the comments, we will sort it out and look for answers! In the meantime, let's get acquainted with one of the most convenient file storages from the developers of the popular Russian search engine Yandex.
1. Yandex Disk: what is it
Yandex.Disk is a popular cloud storage that allows users to store various information (photos, videos, audio, texts and other files) in the so-called "cloud", i.e. on a server on the network. Data stored on Yandex.Disk can be shared with other users and can be accessed from various devices - other computers, tablets, and smartphones. The basic version of Yandex.Disk is completely free and available to everyone. I remember that in 2012 it was an invite-only sign-up, and I used an alternative service, Dropbox. But now I have completely switched to Yandex Disk Cloud. After all, free, and even available from everywhere 10 GB are not superfluous.
2. Yandex Disk: how to use - step by step instructions
So, I convinced you, and you decided to install Yandex Disk on your computer. Now let's take a closer look at how to use Yandex Cloud (this is also called Yandex.Disk, since it is cloud storage data).
2.1. How to create Yandex Disk (registration in Yandex Cloud)
In order to start using Yandex.Disk, you need to register and create a mailbox from Yandex(if you already have one, go straight to the second point).
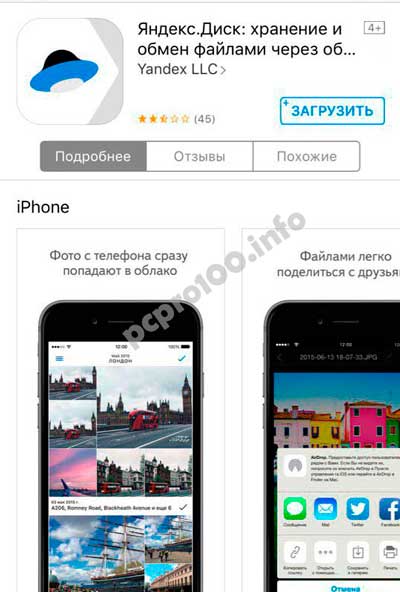
4. Installing Yandex.Disk on a smartphone. Free Apps are available for iOS and Android, so they can be downloaded without any problems in App Store and Google play... The iOS app does not have a very high rating, there are some shortcomings, all this can be seen in the reviews.
2.3. Yandex Disk: how much space is free?
Immediately after registering and installing Yandex.Disk, you have access to 10 GB free space in the Cloud. For a start, this is quite enough, it was enough for me for about six months. What if there is not enough space?
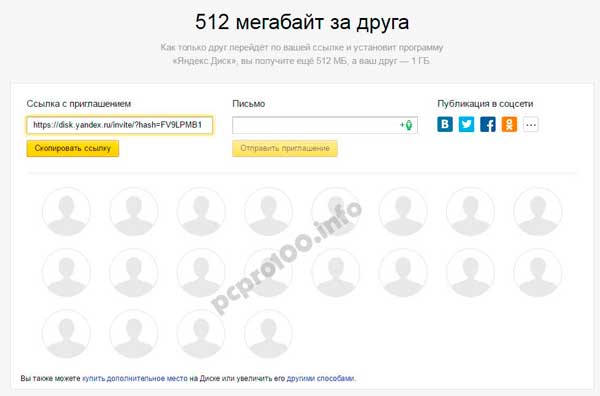
- Additional 10 GB free for inviting friends... You can get 512 MB of free cloud space for each friend you invite. Go here - https://disk.yandex.ru/invites and you will see your referral link, which must be copied and sent to friends. After registering each user using your link, you will receive additional Disk space, and your invited friend will receive an additional 1 GB.
- Additional up to 250 GB as a gift from Yandex partners... Various promotions are regularly held, which will allow you to get additional gigabytes of free space. You can track current promotions on this page.
And of course, as you might expect from Yandex, additional seat can be bought... However, the pleasure is not cheap:
If you need a lot of space in the Cloud, but don't want to pay, you can create several mailboxes and create Yandex.Disk for each of them.
2.3. Login to Yandex Disk
Registration passed, we figured out the available space, the question arises -?
You can view the downloaded files in several ways:
1. Open a shortcut to the Yandex.Disk folder on your Desktop, if you haven't deleted it after installation.
2. Open Yandex.Disk in the My Computer folder.
3. Click on the Yandex.Disk icon in the taskbar located in the far right corner of the screen.
4. Log in to your Yandex mail through any browser and at the top there will be a link to the Cloud:
6. Go to the Yandex home page, being logged in in the mail. In the upper right corner there will be a link to Yandex.Disk:
2.4. How to upload files to Yandex Disk - 7 easy ways
Let us now consider the most important moment, because of which we performed all these actions -. Again, there are several ways to do this:
1. Through the context menu... Select the file that you want to upload to the Cloud, right-click on it and select the item: "Yandex.Disk: Copy public link":
2. Copy the file to the Yandex.Disk folder(I wrote above how to enter it). By default, this folder is automatically synced, so when you copy there, all files will be immediately added to your Drive.
3. Upload files via mobile app iOS or Android. I can consider this method in a separate article, if you leave such a wish in the comments.
4. Upload a file to the Cloud via a browser... To do this, simply drag the selected files with the mouse into the browser window with Yandex.Disk open:

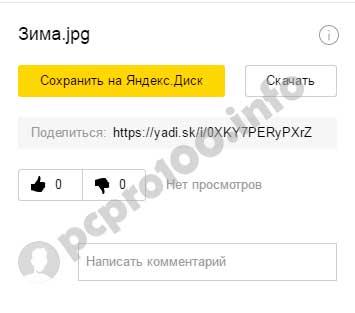
5. Copying someone else's files... If someone has shared with you a link to a file that is stored on Yandex.Disk, you can easily save it to your Cloud. To do this, you need to follow the link sent in the form https://yadi.sk/*** and click on the "Save to Yandex.Disk" button on the right.

They also often ask - how to upload a folder to Yandex Disk... The principle is the same as described above in the section with files. But there is another additional benefit - the folder can be assigned Shared access. Thus, other users to whom you grant access rights will be able to view and download files in this folder, as well as upload their files there.
How to upload a video to Yandex Disk? Is also a very popular question from Cloud users. This is due to the fact that video files are usually large in size, and many worry that they simply will not "fit" and cannot be stored there. This is not the case, video files, like photos, can be uploaded and stored on Yandex.Disk.
2.5. Yandex Disk: how to transfer files to another user

You can also remove access to the file by clicking the mouse and toggling it to OFF.
If for some reason you need to remove Yandex.Disk from your computer, then you should do the same as with a regular application - use the standard tools of the operating system.
We pass: Start -> Control Panel -> Programs and Features
In the window that appears, select Yandex.Disk (usually it is the last one in the list) and click the "Delete" button. The downloaded files will remain in your account, only the application will be removed from the computer.