Create a fantasy city in Photoshop Photoshop tutorials. Fantasy photo editing Tutorials for creating fantasy images
I think that many of you may have seen fantasy eye artwork on DeviantArt, Behance, etc. and ask yourself how it's done. Today we will learn the basics of how to create such an effect in Photoshop.
Preview of the final result:
We will need a pair of eyes for this tutorial. I found beautiful eyes from Maria Gao.
Open the image of the girl's eyes from the lesson materials in the Photoshop program.

The first thing we start with is to make the eyes burning from the inside. Using tool, Oval area (Elliptical Marquee Tool) (M) make a selection of the iris of the girl's eyes. Next go to Select > Modify > Feather (Select > Modify > Feather) with a radius of about 20 pixels.

Next, press the keyboard shortcut (Ctrl+C) (copy) And (Ctrl+V) (insert). You will get a new layer with only the selected area. Name this layer "Eye Glow" and set the blending mode for this layer to Screen (screen). Then duplicate the Eye Glow layer 3 times and you should end up with something like this:


Adding a Levels Adjustment Layer (Level adjustment) with values 20, 0.84, 255.

Create a new layer (Ctrl+Shift+N) and name it "Face Color". Set the foreground color to #45ADCA. Using a Soft Round Brush (brush) (B) size 200px, paint the face under both eyes. Set the blending mode for this layer to Soft Light. (soft light).


Create a new layer (Ctrl+Shift+N) and name it "Glitter". Using the brush tool (brush) (B) With size 3px and color #FFFFFF, place lots of dots around the girl's eyes. Next, right-click on the "Glitter" layer and go to Layer Styles, select Outer Glow (outer glow) with default settings.

Repeat the 7th step, but for the eyelashes.

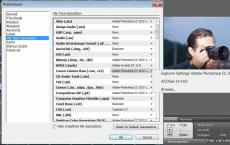
Next, we need the Adobe Illustrator program, which is included in the standard Photoshop package. Or download a PSD file with a set of swirl layers from the lesson materials.
Load a set of curls into the program. And working randomly, place patterns around the eyes of the model, using each pattern on a separate layer. (Ctrl+Shift+N).

Merge all pattern layers into one. Next, add a Hue/Saturation adjustment layer. (Hue/Saturation) how to clipping mask left-click between adjustment and adjustment layer while holding down the key (alt). Make the Brightness value (Lightness) by -100. This will make the image black and white. Set the blending mode for this layer to Soft Light. (soft light). Next go Filter > Blur > Gaussian Blur (Filter > Blur > Gaussian Blur). Set the radius to 2px.

Create an adjustment layer Layer > New Adjustment Layer > Exposure (Layer > New Adjustment Layer > Exposure) and enter the settings from the screenshot.
Instruction
Search online for large images of several storm clouds and a white cloud, hills and a castle. It is desirable that the selected photos are clear and not blurry. Open the folder with saved images. Create a new document by clicking on File → New or Ctrl+N. Give the new canvas a large size. Turn on the layers palette with the F7 key if it is not turned on. Drag the cloud photo from the folder onto the canvas.
Copy the cloud layer with Ctrl+J. From the top menu, click Image → Adjustments → Auto Contrast (in some versions of Photoshop, this path is shortened to Image → Auto Contrast). In the Layers panel, select Overlay from the Modes drop-down list and set the Opacity to 45%. Merge both layers into one with Ctrl+E. If necessary, increase the sharpness in Filter → Sharpen → Sharpen.
Use the Patch Tool in the toolbar if you want to create a more dramatic sky. The patch is useful if half of the image is darker than the other. To do this, duplicate the layer with the Ctrl + J combination, move the dark part to the light one, without covering it entirely. Select a patch.
Draw a circle on the seam that appears between the dark and light part. Place the cursor inside the selection. Drag the selection to a piece of the photo that can cover the seam. To deselect, press Ctrl+D. Repeat several times until the seam disappears. Save the file in .psd format with any name so as not to lose data.
Drag the hill images and paste them onto the cloud image. Place the hill layers side by side so that one photo slightly overlaps the other. Select both layers and press Ctrl+E to merge them into one layer. Use the Patch Tool to carefully remove the seam between the hills. Follow the color scheme and avoid too black or too white spots. Move the hills down so that half of them are visible.
Switch to the Quick Mask edit mode by pressing Q. Select the hard black brush from the toolbox. Outline the sky above the hills, erasing extra strokes with the Eraser if necessary. Exit the mode by clicking Q again, press Ctrl+Shift+I. Press Del on the keyboard. Merge all layers by pressing Ctrl+Shift+E. Next, hold down Ctrl + U and put in the field next to Saturation -50.
Place a castle on the canvas by dragging it from the folder. Take the eraser, reduce its Hardness to zero and set the opacity to 30-40% in the top bar. Erase the foundation of the castle so that it looks like it is floating, and click the eraser on the sides of the castle a few times. Open the second white cloud image and transfer it to the working canvas. Erase the sky around the cloud with the eraser, changing the opacity of the eraser to 100%. Position under
Before starting the tutorial, make sure your photos are of good quality. Of course, you can create a photo collage in Photoshop using your personal photos.
Formulation of an idea on paper and a rough sketch
First, I made a sketch in which I would display what I want to create.
I came across a photo of a charming little girl, which I decided to take as a basis. Then I found some more pictures.

Then I created a rough sketch in Photoshop from the found images.

Getting Started
Step 1
Create a document with a canvas size of 2000x2200 pixels, 300 dpi.
Fill the background of the canvas with light blue #eef3f6.

Step 2
Open Bird1.jpg. Use "Magic Wand Tool" (key

Invert selection (<Сtrl> +
Click the "Refine Edge" button on the top toolbar and set the following values:

Place the bird on another layer (<Сtrl> +
Select this layer in the layers palette, and by right-clicking, select "Convert to Smart Object" (Convert to Smart Object). I use smart objects for all images without exception. This method gives us many possibilities when working in Photoshop.

Then drag the bird into the BirdGirl.psd document, rotate it horizontally: click<Сtrl> +<Т>, and right click, select "Flip Horizontal", scale to 75%, to do this, enter the appropriate value in the field in the top tool settings panel.

Step 3
Now let's prepare the image of the girl.
Outline the girl's head using the pen tool "Pen Tool" (key
), create a selection (<Сtrl> + <Еnter>).
Click
Click<Сtrl> +

Place the little girl's head on our document. Name the layer with the head "Head".
Use<Сtrl> + <Т>to scale and rotate the layer. The image at this stage should look like the picture.

Step 4
Let's make the eyes bigger.
Select the area around the left eye with the "Lasso Tool" (key
Press combination<Сtrl> +

For the right eye, repeat the same. Name the layer "Right Eye".

Make the left eye layer active, click<Сtrl> + <Т>, zoom in and rotate it as shown below. Repeat the same with the right eye.

Create a mask for the "Right Eye" layer by clicking on the mask icon at the bottom of the layers palette.
Using a large, soft brush, paint on the mask with black where you want to erase the extra areas around the eyes.
Repeat the same for the "Left Eye" layer.

Here's what you should get.

Step 5
Make the "Head" layer active and go to Filter > Liquify. Using the "Forward Warp Tool" with a brush of 200px, slightly change the shape of the face, increasing the distance between the eyes, lift the mouth and nose. Click OK. Well, we are done with the shape of the face, now you can play a little with the colors.

Step 6
Create a new layer Ctrl+Shift+N.
Add mask: holding<Аlt>, click between the layer named "Head" and the new layer.

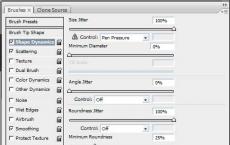
On this and several subsequent layers, we will use a brush, changing its hardness, size and transparency. We will take the colors from the photo itself to give the face a smooth and picturesque effect. I'm using one of the standard Photoshop brushes with the following settings.

Select a brush ( ), set the hardness to 0%, the opacity to 20%, and the size to 70px.
To easily and quickly select the desired colors, with the Brush tool selected, press the key

Add blush to the cheeks and use a 7px brush to paint the mouth. For each new color, don't forget to create new layers and use clipping masks.

Step 7
With a large soft brush at 20% opacity, paint with pink, taken from the cheeks, the nose area and around the eyes, as in the picture. Change the blending mode to "Overlay".

Step 8
Let's add highlights. Using a transparent hard brush, paint over the light areas of the face with a pale pink color. With a smaller diameter brush, paint over the teeth and whites of the eyes with white.

Step 9
With a small soft brush at 20% opacity and blue, paint over the eyes as shown. Change the blending mode to "Overlay", reduce the opacity of the layer to 60%.

Step 10
Take a brush with a diameter of 2px, opacity - 100%, hardness - 100%. Draw the eyelashes and the outline of the eyes with a dark brown color. You can add shadows to the eyes by taking the same color and a softer brush with an opacity of 10%.

Step 11
Let's draw the girl's eyebrows. Let's take them from another image. Open Boy.jpg. Using the "Lasso Tool" (

Add a layer mask to the "Eyebrow right" layer by clicking on the mask icon in the layers palette. Using a soft brush, paint on the mask with black to remove unwanted areas around the eyebrows. Repeat these steps with the "Eyebrow left" layer.

Add a 'Levels' adjustment layer for the 'Eyebrow right' layer by clicking on the appropriate icon in the layers palette or by running Window > Adjustments. Change the values as shown. In the settings palette, click on the “Clipping Mask” icon to apply this effect only to the current layer. Repeat the same for the "Eyebrow left" layer.

Create a new layer. Taking a brush with a diameter of 2px, with an opacity of 20%, draw hairs on the eyebrows.

Step 12
Now let's get to the hair. Let's give them some volume. With a large soft brush at 20-30% opacity, make strokes with the base color. You can take colors from the photo or choose others. Gradually reduce the diameter of the brush to draw details. Don't forget to paint each color on a new layer. In this case, it will be easy to correct if something is done wrong. You should end up with something like this.

I don’t like the shape of the girl’s bangs, so we will change it. With a 15px brush, 80% hardness and 80% opacity, paint over some of the hair.

Using a 4-6px brush, paint on the ends of the bangs.

Step 13
Select the bird layer and add adjustment layers as shown.

Select the bird layer and all adjustment layers, convert them to smart objects.

Step 14
Open Vird2.jpg. Tool "Magic Wand Tool" (
Invert selection (<Сtrl> +
Click "Refine Edge" and set the values as shown.
Cut the bird to a new layer (<Сtrl> +

Then drag the bird into our main document.

Add a mask to the "Bird Body" layer. Using a large hard brush, erase unwanted areas.

Do the same with the "Wird Legs" layer.

Step 15
Open Vird3.jpg. Cut out the bird's tail and move it to the main document.

You should get the following:

Step 16
Create a layer above the bird body layer. Paint the blue wing blue and set the layer opacity to 20%.

Now apply the same technique for the wing as for the hair: using short strokes, emphasize the texture of the feathers.


Select the "Bird Body", "Bird Legs" and "Bird Tail" folders and convert them to Smart Objects.

Step 17
Create another layer above the body of the bird, paint the body brown and set the layer opacity to 20%.

Draw the feathers in the same way as we drew the wings. Add a dark brown outline for the legs.

Paint the tree a little in the same way.

Step 18
On a new layer, fill the part of the tail with blue color, change the blending mode to "Soft Light". Draw feathers.


At this stage, the image looks something like this.

Step 19
Open Flowers.jpg file. Using "Pen Tool" (<Р>), select two flowers.

Create a selection (<Сtrl> + <Еnter>). Click

Move the flowers to the main document.

Create a layer below the flowers layer, set the blending mode to Multiply. With a hard brush at 20% opacity paint a shadow from the flowers.

Paint the flowers purple, change the blending mode to "Soft Light".

Accentuate the petals by adding white in the highlights and dark purple in the shadows.

Make a copy of the "Flowers" folder and place it behind the girl's head, delete the shadow layer.

Draw some shadows on the petals.

Step 20
Open Feather1.jpg file. Select the background around the pen with the Magic Wand Tool (

Move the pen as shown below.

Warp Image: Click<Сtrl> +

Add a "Levels" adjustment layer.

Double click on the layer thumbnail to open the style window. Select "Color Overlay".

Apply Gaussian Blur: Filter > Gaussian Blur with 1px Radius.

Step 21
Transfer the second pen (file Feather2.jpg) in the same way as the first one. Warp it and apply the same layer styles: with the "Feather1" layer selected, right-click and select "Copy Layer Style", then select the "Feather2" layer, right-click and select "Paste Layer Style". Create a 'Levels' adjustment layer above the 'Feather1' layer and while holding<Аlt>, move it above the "Feather2" layer. The black and white arrows mean that you are making a duplicate of the adjustment layer. 
Select the "Feather2" layer and adjustment layer, convert them to Smart Objects. Make a duplicate of the current layer and move it as shown below. Apply a Gaussian Blur filter with a radius of 2.5px and lower the layer's Opacity to 80%.

Step 22
Open Feather3.jpg. Separating the image from the background will be a little more difficult here, because we see a lot of small fluffy feathers. Therefore, we will use channels for this purpose.

Open the channel panel, select and copy the blue channel. Click<Сtrl> +

Holding<Сtrl>, click on the channel 'Blue copy' . Click<Сtrl> +

Now go back to the layers panel and click<Сtrl> +

Use the "Lasso Tool" (

Step 23
Move the pen and add a "Levels" adjustment layer.

Add a "Photo Filter" adjustment layer to get a more realistic feather color.

Blur it a bit with the Gaussian Blur filter.

Step 24
The last thing we'll add is some rose petals. Using "Pen Tool" (<Р>), select 3 petals, press<Сtrl> +

Click

Place petals. Copy and resize some of them to create better compositions.

Blur them a bit using the "Gaussian Blur" filter with different radius as shown below. Select all petal layers and convert them to Smart Objects.

Add a Hue / Saturation adjustment layer and make the color of the petals more saturated.

Step 25
Draw some purple and light pink dots around the bird.


Paint a few dots with white on the face, body and flowers to add a slight sparkle and shimmer effect.

And finally, let's draw freckles for the bird girl. Make them on a new layer and change the blending mode to Multiply.

Step 26
The last step is to make color correction. Merge all layers except for the background, add adjustment layers as shown in the image below. Add a "Gradient Map" layer using the colors #ffcdb2 / #fdc084 / #6f022b. Blending mode - "Color", opacity 20%.

Add a "Gradient Map" adjustment layer with colors #f1ffb2 / #ff5571 / #000b2f. Blending mode - "Multiply", opacity 20%.

Add a "Color Balance" adjustment layer. On the mask, paint over the area of the face with black so that its color does not change.

Add a Sepia photo filter.

Add a "Gradient Map" adjustment layer with colors #ffd8c0 / #eb0042. Blending mode - "Lighten", opacity 20%.

Here is what we ended up with:

The creation of the collage in Photoshop is finished. The image of the bird girl in fantasy style is ready! You can play with adjustment layers to get different shades. I hope you enjoyed my lesson.
Create a 1000x1100 px document and fill it with black. Click Cmd/Ctrl+Shift+N to create a new layer. Activate the tool brush tool (B) with color #4e1502 and size 1200 px. Draw in the center of the black canvas:
Step 2
Create a new layer, change the brush color to #f6bc2f. Paint inside the dark red area and change the mode to color dodge 100%:


Step 3
Use the same brush to paint again on a new layer and change the mode to overlay 70%:


Step 4
Open the Nebula image. We use the tool MoveTool (V) to drag it onto our canvas:

Step 5
Click on the second button at the bottom of the Layer Set to add a mask to this layer. Use a soft black brush with opacity around 40-45% to reduce the hazy effect on some parts. You can see how we did it in the layer mask and the result is in the image:


Step 6
Duplicate this layer and erase some parts with a layer mask to get the result as shown below:


Go to filter Filter-Blur-Gaussian Blur and choose a radius of 2 px:

Step 7
Open the image of the girl. First we use the tool Polygonal Lasso Tool to create a selection around the girl (no need to be too careful with the hair):

Double click on the background layer to unlock it.

Click on the layer mask button to hide the background part:

Step 8
Right click on Layer 0, select Refine Mask:

We use the tool Refine Radius Tool with a size of about 100 px to draw around the head and show more hair.

Here is our result after cleaning (we used a red background to show you this more clearly):

Step 9
We place the girl after extraction on our main canvas, above all layers:

Step 10
I want to reduce the brightness on the bright parts of the model, so create a new layer above the model with clipping mask:

Use the brush with color #e6e2e9 to paint over the bright hair, face and parts of the arms and change the mode to Multiply 100%:


Step 11
We continue to reduce the brightness of the model's face, hands, using a new layer ( clipping mask) and the same brush. We have changed the mode to Multiply 50%:


Step 12
We would like to add more detail to the model's hair, so on a new layer we used a brush with color #5a595b and a size of about 20 px. Here is the result we got:

Step 13
To add some red to the model, we used an adjustment layer with clipping mask. Go to Layer-New Adjustment Layer-Hue/Saturation:


Step 14


Step 15
Create a layer Curves to darken the model:

In a layer mask Curves we used a soft brush to remove and reduce the intensity of the darkening.


Step 16
Create a new layer and use the #f66e2b brush to paint over the hair and hands. Change the mode to color 100%:


Step 17
On a new layer, use the brush to add more bright red color to the hair and body outline. Set the mode to overlay 100%:


Step 18
We used the #f5c25f brush to paint over the outlines of the model again and add some orange tint. Change the mode to hard light 100%:


Step 19
Create a new layer and use the same brush to paint over some ends of the hair and change the mode to overlay 100%:


Step 20
Create a new layer, we used the color #f66e2b to paint inside the eyes and then change the mode to dodge mode 100%:

Step 21
Click on the brush menu, select Reset Brushes to activate the default brush settings. Now on a new layer change the foreground color to #f66e2b and click on the brushes Fuzzball:

Reduce the brush size to 80 px and create spots inside the eyes. We changed the mode to Linear Dodge 100%:

Step 22
To refine some of the facial features, we created a new layer, changed the mode to overlay 100% and filled with 50% gray:

We use the tool Dodge and Burn Tool (O) with setting Midtones Range, exposure about 20-25% to brighten the effect on the eyes, the edges of the face and nose, darken the eyebrows, bridge of the nose. You can see how we did it in the mode Normal and result in mode overlay:

Step 23
Create a new layer on the top, use a soft brush with color #bd5733 to paint over the bottom part of the image:

Step 24
To get a stronger effect here, we used a soft brush with the color #f6bc2f and changed the mode to overlay 100%:


Step 25
On a new layer, use the #f6bc2f brush to paint on the two arms. We have changed the mode to hard light 100%:


Step 26
Move the fireworks image to our canvas and set the mode to color dodge 100%:


We named the layer "sparks 1".
Step 27
Add a mask to this layer. Use the brush to remove and reduce the intensity of the fireworks on some of the parts shown below:

Step 28
On layer sparks 1 go to filter Filter-Distort-Twirl:


Apply Gaussian Blur by 2px:

Step 29
Duplicate this layer, use Cmd/Ctrl+T to rotate it and get the result shown below. You can use a layer mask to remove unwanted parts:

Step 30
We open the images of the flame. We chose the first two images to work with:

We use the tool Rectangular Marquee Tool (M) to create a selection for the part of the fire in image1:

We place it in the lower part of the girl's body, change the mode to Screen 100%:


Step 31
To remove the white edges left after changing the blend mode, double-click on this layer, select Blending Options. We hold Alt/Option and move the black slider This Layer until the white edges disappear:


Step 32
Take the other parts of the flame and place them around the model's hair and body. We applied the same settings Blending Options to all these layers and used a layer mask to remove unwanted parts.


We used 14 layers for the effect.
Step 33
Select all flame layers, then press Cmd/Ctrl+G to group them. Change the group mode from Pass Through(default mode for groups) on Screen one hundred%. On layer 14 go to the menu Layer-New Adjustment Layer-Curves:

In a layer mask Curves use the brush to erase in the arms, hair and bottom area, since we don't need to make these parts too light:

Step 34
Final step: click Cmd/Ctrl+Option/Alt+Shift+E to merge all visible layers. Go to filter
We should get something like this in the final:
For work we need:
1. Two third-party plugins for Photoshop: Imagenomic Portraiture and Nik Color Efex Pro 3.0. Finding them online is very easy. Naturally, you can do without them, using Photoshop itself, but in my opinion they make life very easy.
2. Original photo, preferably not phone quality or matchbox size

3. Photo to create a background. It can be an image of a forest, a flower garden, nettle thickets, etc. In general, something vegetable, with a fairly large number of details and a transition of tones. It doesn't even have to be high quality. I used the following stock image:
4. A couple of clipart: grass in PNG format and a snail to create horns:


So:
1. Open the original photo. It is clear that in order to substitute a new background, you first need to remove the old one. This will take care of the most convenient way for us. Usually I prefer to just simply remove the background around the object with a hard eraser at high zoom, but this time I used the Magnetic Lasso tool , selected the shape and transferred it to a new layer using Layer via Copy:

Let's hide the background layer, most likely we won't need it anymore.
2. When using the Lasso Tool, most often some extra details remain, pieces of the old background, dark unnecessary contours, and therefore we take a hard eraser and carefully pass it along the edges of the figure, cleaning up this disgrace:

3. In some places, closer to the edge, the figure is still a little dark, for example, hair, but we need it to fit better into the future, rather light background, so we take the Dodge Tool with Exposure equal to 15-20% and brighten the edges:

4. Now you can substitute the background. We transfer it to our picture, put it as the bottom layer and blur the Gaussian Blur quite strongly to an almost uniform state:


5. Let's leave the background for now and start retouching the face (in general, this is always the most painstaking part of the work). First, let's remove all the defects (just the defects, not the whole texture out of the blue) using the Clone Stamp Tool and the Healing Brush Tool:

Now you can soften the texture of the face a little, here the Imagenomic Portraiture plugin will come in very handy. Duplicate the layer with the shape (now there should be three of them, except for the hidden background layer). The plugin is applicable to the top layer, but it is advisable not to overdo it with the settings, so as not to get a completely plastic skin:

And then we lower the opacity of the top layer to 60-70 percent (but in general this is all done by eye and depending on the size of the source) and with a soft eraser we erase the areas around the eyes, mouth and other strategically important details of the face that should not become blurry. They will come through from the bottom layer:

6. Let's give the eyes some shine and color saturation. To do this, copy the irises onto a new layer, usually I roughly select them with the Rectangular Marquee Tool, put them on a new layer using Layer via Copy and apply the Color Dodge blending mode to the layer. Unnecessary parts are simply removed with a soft eraser of small diameter:


Saturate the eyes a little with color (or we can change it altogether). Go to Hue/Saturation (the layer with the irises should be selected) and move the sliders to taste. When the result suits us, click ok and we can reduce the top two layers. To give even more shine and some glow effect, you can lightly walk along the lower arc of the iris of the eyes Dodge Tool:

7. Now let's do the painting work) Let's paint the parts of the face. To do this, select a flesh-pink color with a soft brush with a low intensity (5-7%) and on a new layer with the Overlay blending mode, go over the forehead, cheeks, nose and chin, especially intensively on the cheekbones:

Do the same with the lips.

8. I wedged a little into the make-up process by using the Clone Stamp Tool with a soft brush and Opacity = 25-30% to slightly soften the wrinkles under the eyes, uneven spots above the lips and the areas of the chin and tray (a tray is not a tray on which bring, but what is under the nose):

9. We continue coloring Personally, I wanted to add shadows for the eyelids and always some fresh spring-summer colors, and light green here comes in handy. The same principle as in point number 7:

10. What I thought it appropriate to add here is freckles. I really love freckles, but I don’t have enough of my own. Here a brush helped me, which is very easy to make, but you can also find it on the net. In the form of a scattering of dots of irregular shape. I chose black for the brush and applied the freckles on a new layer, still using the same Overlay blend mode:

11. Now let's pay attention to the fact that the contours of the figure contrast strongly with the background, because it is blurry, and the contours are very clear and generally look somehow unhealthy. Therefore, we will take the Blur Tool and blur them, stronger on the shoulders and hair and not too zealous - on hands:

12. It's time for third-party details. Open the grass file, drag it as the top layer onto our document, place it as we like and simulate defocus by blurring it with Gaussian Blur. To match the grass in tone, because the original one is a bit dark, as it seems to me, I used the Photo Filter, adding yellowness:

You can not be limited to grass, add leaves, flowers, whatever your heart desires, the main thing is not to turn the foreground into a smeared vinaigrette completely
13. Finally, I decided to turn myself into a complete snail-type sheep using the shell of that very snail. /planetaphotoshop.ru/images/smilies/swoon.gif" />) and part of the base of the shell so that it blends into the whiskey as smoothly as possible (I must admit that this moment is somewhat lame for me). We slightly blur the snails, because they should not be very clear:

The snail is too dark, so I needed to brighten it up a bit and exacerbate the whole thing with the Dodge Tool with range - Highlights:

14. I tried to combine whiskey (TEMPLE - m. side of the head ... (c) Dal) and horns with some kind of hair, it turned out, however, not very well, maybe you can do better. Select the Smudge Tool, and a soft brush with a very small with a diameter of 2-3 pixels (if the photo is very small, then generally 1 pixel) we connect the horns with the hair and vice versa:

You can flatten layers.
15. In my opinion, some kind of hodgepodge is missing, as one comrade put it - pseudo-fabulous highlights
I create highlights in the following way: on a new document with a transparent background, in a mess, we put blurry spots of white color, of various sizes. It turns out a sort of peculiar falling snow out of focus:

We place this snow on top of our work and set the blending mode to overlay (again this overlay "src="http://planetaphotoshop.ru/images/smilies/nea.gif" />). The snow turns into yellow highlights, but very bright, so slightly reduce the opacity of the layer and with a soft translucent eraser erase the highlights from the face area so that they do not give the impression of some kind of exotic skin disease:

16. The picture is almost ready, but some final processing generalizing all the elements would not hurt it. This moment is my favorite. For this I use the Nik Color Efex Pro plugin. I can fiddle with it for an hour, choosing the settings and effects to my liking: