We draw a blot, create a drop, an ink blot in a Photoshop lesson. Photoshop brush - splatter and blot Shapes for photoshop splatter blot
Welcome to site site! Friends, on our site you can find a lot of interesting and useful things for yourself, your loved ones and children. We offer a huge range of brushes, frames, styles, shapes, icons and many other additions to your photography.
Photoshop frames
Photoshop frames are especially popular, with which you can decorate your photo without any effort. You just need to find a suitable frame, insert your photo, which will serve as a creative decoration for your workplace or family album. Also, you can create a fun room for your baby. A large selection of children's frames will help you with this. Even novice users can master these types of frames.
We draw your attention to the frames for wedding photos, for family photos, vignettes, for lovers, "for you", congratulations, calendars, Great Easter, February 23, Happy New Year, birthday, Valentine's Day. You can download all these frames from this link
Download templates for photoshop
It's time to talk about the main section of our site - "Photo Templates". First of all, it is popular among girls of different age categories. After all, a girl always strives for charm and beauty. It is in this section, dear girls, that you can be in the image: a stranger in the moonlight or vice versa, a good fairy. You just need to follow this link. Let's not forget about our dear men, because our site has also prepared many interesting templates for them, in the image of which a man will feel himself: a hardworking gardener, a musketeer, a knight, a pilot, a biker, a cowboy, a king, an iron man, a German officer, a race car driver, etc. .p. And all this absolutely free, just click on the mouse button and .
Dear users, the administration of our site has prepared a surprise for your children: the section "Templates for children". Your child will feel like: a sweet bunny, a little one, a pirate, a duckling, a spider, a king, an elf, etc. Click the mouse faster and follow the link and get a lot of fun.
We recommend paying attention to the section "Icons". We offer a large selection of not only "frames", but also "icons". You can use this section for different purposes - from ordinary amateur photography to a large-scale design project. Here you can find a lot of exciting things!
Our site does not stand still, we are constantly developing, filling the site with useful information and, of course, listening to the opinions of users. You can leave all your comments and suggestions in the "Feedback" section. Site administration!
Let's create a realistic blot in Photoshop.
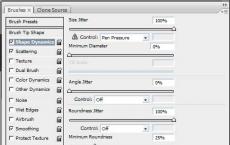
First we need a brush. It's simple - let's create a new document, for example, 30x300 pixels in size. Fill it with black and set it as a new brush. (Edit->Define Brush Preset) Then create a new document. Attention! In order for our blot to turn out not flattened, the dimensions of the new sheet must be equal both vertically and horizontally. In short, the new document must be square. (for example, 1000x1000 px) Select our freshly created brush, and set approximately (more creative freedom!) The following parameters:


Now, slightly varying the size of the brush, you need to paint something like this: (here everyone will do it differently, and that's good)

Now Filter->Distort->Polar Coordinates and Rectangular to Polar The result is this:

Now under the layer with this .. let's call it a spread, make a new layer, fill it with white. Select the splayed layer, do Merge Down (or Ctrl+E). Then we blur the result (Filter->Blur->Gaussian Blur) so that it looks something like this:

Attention! The degree of blurring is inversely proportional to the spatter of the future blot. Now Image->Adjustments->Threshold. Here, by moving the slider, you choose the shape of the blot. Select the one you like and click OK. So, almost done, but.. the edges are a bit angular. Truly a discrete blot!

Therefore, select the entire white area with a magic stick (Avadakedabra !!), invert the selection (Shift + Ctrl + I) and, hovering over the blot, create a work path. (Make Work Path) Choose the tolerance yourself, I recommend 0.5-1 pixel. If you take more - there will be no necessary smoothness of the lines, if you take less - "pixel-like" will remain. Create a new layer, go into it. Go to Paths, fill in the resulting work path. If you do not plan to reuse the contour, you can remove it so as not to interfere.

We remove the visibility of all layers except the resulting blot. You can create a layer under it with some kind of background (white, gradient, some imported image with a surface - whatever). Create a layer style with a blob.


I used such settings, but this, again, is only a general direction; customize the way you like it. That, in fact, is all!
Each of us at least once saw design work made using blot brushes. I immediately recall the extravaganza of all kinds of splashes and blots of bright and saturated colors. It looks spectacular. Also, blots are indispensable when you need to create an imitation of coffee stains on the surface. Blood smudges are very popular in thrash works. If you want to try something similar, just download the brushes and get creative. Each set contains several brushes.
To download the brushes you like, click on the corresponding picture. A download page will open in a new window. There, to the left of the picture, next to the orange icon, click the "Download" link and save the brushes to your computer.
1. Splatters By Hawksmont
2. Splats And Splatters Brushes By Redheadstock
3. Splatters And Skulls Brushpack By Kshinn
4. Splatters Brushes By Leichnam
5. New Splatters Brushes By Corelila
6. Ink Splatters By Nadineballantyne
7. Kloud nine com splatters
Brushes removed by author 
9. Splatter Set Two By Austrianmonst3r
10. Paint Spots Photoshop Brushes By Jstoltz