How to set up automatic turning on of a windows 7 computer. How to turn on a computer automatically according to a schedule. What is a socket with a timer
The idea of setting up a computer so that it automatically turns on at a given time comes to the mind of many people. Some people want to use their PC as an alarm clock in this way, others need to start downloading torrents at the most favorable time according to the tariff plan, others want to schedule updates, virus scans or other similar tasks. How these desires can be fulfilled will be discussed below.
There are several ways you can set up your computer to turn on automatically. This can be done using the tools available in the computer hardware, methods provided by the operating system, or special programs from third-party manufacturers. Let's analyze these methods in more detail.
Method 1: BIOS and UEFI
The existence of the BIOS (Basic Input-Output System) has probably been heard by everyone who is at least a little familiar with the principles of computer operation. It is responsible for testing and powering up all PC hardware components, and then transfers control of them to the operating system. BIOS contains many different settings, among which there is the ability to turn on the computer in automatic mode. Let's make a reservation right away that this function is not present in all BIOSes, but only in its more or less modern versions.
To schedule the launch of your PC on the machine via BIOS, you must do the following:

The BIOS interface is now considered obsolete. In modern computers, it has been replaced by UEFI (Unified Extensible Firmware Interface). Its main purpose is the same as that of the BIOS, but the possibilities are much wider. It is much easier for the user to work with UEFI due to the support of the mouse and the Russian language in the interface.
Setting up the computer to automatically turn on using UEFI is carried out as follows:

Configuring auto power on using the BIOS or UEFI is the only way that allows you to perform this operation on a completely turned off computer. In all other cases, we are not talking about turning on, but about bringing the PC out of hibernation or sleep mode.
It goes without saying that the computer's power cord must remain plugged into the wall outlet or UPS for the auto-on to work.
Method 2: Task Scheduler
You can also configure the computer to turn on automatically using the Windows system tools. For this, the task scheduler is used. Let's see how this is done using Windows 7 as an example.
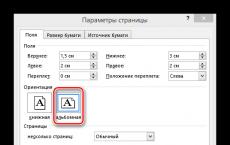
First you need to allow the system to automatically turn on / off the computer. To do this, open the section in the control panel "System and safety" and in the section "Power" follow the link "Setting the transition to sleep mode".
Then, in the window that opens, click on the link "Change advanced power settings".
After that, find in the list of additional options "Dream" and there set permission for wake timers to state "Turn on".
Now you can configure the schedule for automatically turning on the computer. To do this, do the following:
- Open the scheduler. The easiest way to do this is through the menu. "Start", where there is a special field for searching programs and files.

Start typing the word "scheduler" in this field so that a link appears on the top line to open the utility.
To open the scheduler, just click on it with the left mouse button. It can also be launched via the menu "Start" - "Standard" - "Utilities" or through the window "Run" (Win + R) by entering the taskschd.msc command there. - In the scheduler window, go to the section "Task Scheduler Library".

- On the right side of the window, select "Create a task".

- Come up with a name and description for the new task, such as "Turn on the computer automatically." In the same window, you can configure the parameters with which the computer will wake up: the user under which the system will be logged in and the level of its rights. As the third step, be sure to specify the operating system to which the action of this task will be applied, in other words, the version of your Windows.

- Go to tab "Triggers" and click on the button "Create".

- Set the frequency and time to automatically turn on the computer, for example, every day at 7.30 am.

- Go to tab "Actions" and create a new action similar to the previous paragraph. Here you can configure what should happen when the task is executed. Let's make it so that a message is displayed on the screen.

If desired, you can configure another action, such as playing an audio file, launching a torrent or other program. - Go to tab "Conditions" and check the checkbox "Wake the computer to complete a task". Add other marks as needed.

This point is key when creating our task. - End the process by pressing the key OK. If you have specified login as a specific user in the general settings, the scheduler will ask you to specify his name and password.

This completes the setting for automatically turning on the computer using the scheduler. Evidence of the correctness of the actions performed will be the appearance of a new task in the list of tasks of the scheduler. 
The result of its execution will be the daily wake-up of the computer at 7.30 in the morning and the display of the message "Good morning!".
Method 3: Third Party Programs
You can also create a computer schedule using programs created by third-party developers. To some extent, they all duplicate the functions of the system task scheduler. Some have significantly reduced functionality compared to it, but compensate for this with ease of setup and a more convenient interface. However, there are not so many software products that can wake up a computer from sleep mode. Let's consider some of them in more detail.
A small free program in which there is nothing superfluous. Minimizes to tray after installation. By calling it from there, you can set up a schedule for turning on / off the computer.

Thus, turning on/off the computer will be scheduled regardless of the date.
Auto Power-on & Shut-down
Another program with which you can turn on the computer on the machine. There is no Russian-language interface in the program by default, but you can find a localizer for it on the network. The program is paid, a trial 30-day version is offered for review.

WakeMeUp!
The interface of this program has a functionality typical of all alarm clocks and reminders. The program is paid, the trial version is provided for 15 days. Its disadvantages include the long absence of updates. On Windows 7, it was only able to run in Windows 2000 compatibility mode with administrative rights.

This concludes the consideration of ways to automatically turn on the computer according to a schedule. The above information is sufficient to guide the reader in the possibilities of solving this problem. And which of the methods to choose is up to him to decide.
Devices that turn on or off the light at a pre-set time are called time relays. They are very convenient and allow not only to save electricity, but also to bring comfort to many areas of human life. You can find such an electric or electromechanical timer in many hardware stores and appliance departments. Devices come in different types, differing in price and functions.
Main characteristics
Monoblocks, which are time timers, are most often built into a portable outlet, sometimes into an extension cord or adapter. This device controls a relay that connects input and output contacts. It opens and closes them, thus stopping and starting again the supply of electricity to the connected device. The process is controlled and the parameters are set through the control panel installed on the front of the monoblock.
Although different models of timers have the same principle of operation, they are quite different from each other. There are both simple mechanical devices and electrical ones with complex settings and many additional functions. They are designed to be used in different conditions and for different purposes. They differ in the following characteristics:

Almost all devices of this type are equipped with a built-in battery that is charged from the mains, and can work even without power for 100 hours or more. A full charge of such a battery takes 12-14 hours. In addition to switching the relay in automatic mode, most models can also be simply turned on or off manually.
Device types
Different types of timers and time relays differ in principle of operation, switching period, installation method and conditions necessary for their normal operation. All of them have their own advantages, disadvantages and features of operation that make each type of device suitable for its types of tasks.
Mechanical and electrical
 Control over the mechanical timer is exercised through the wheel divided into sections showing intervals of time, and the buttons or levers located on the front panel. Although it has a built-in mechanical clock that determines the time, the device's motor still requires mains power, so it would be more correct to call it electromechanical.
The smallest switching range on the instrument is 15 minutes. Such a timer is most often used to turn the light on and off at intervals of a day or a week, when second-by-second accuracy and the choice of response time are not important. Its advantages include ease of setup and operation, as well as a low price compared to electric models, the disadvantages are the inability to adjust the parameters to specific needs and the lack of a backup power source. This model is well suited for simple tasks.
 Among the most common breakdowns of electromechanical timers, one can distinguish the wear of teeth and gears, due to which the adjusting wheel stops working. In order to cope with this, you will have to call the wizard, but the likelihood of such a problem is much less than a variety of damage to parts and wires in electrical devices.
The control of the electronic timer for turning on and off the light is carried out by a microprocessor. It is configured by a person using a panel located on the front of the device. The parameters are displayed on a small LCD display and are stored in the device's memory when turned off. Such a timer works from a built-in battery or batteries that are charged from the mains through an outlet.
The advantages of an electric timer in comparison with a mechanical timer include a large selection of settings, the ability to set the exact operation parameters and visually see them on the display, minimal errors in calculating time and the ability to create small, up to a minute, switching ranges.
Among the minuses, it is worth noting the higher price, as well as the fragility of such devices - they sometimes fail the battery, parts and software. In addition, they are more susceptible to negative environmental influences and require additional protection from it.
On and off time
In addition to the principle of operation, timers differ in operating periods and operating ranges. On this basis, they can be divided into the following groups:

There are also universal multifunctional devices with the ability to set the parameters of any of these modes of operation and combine them. But they are more difficult to operate and configure, so you should not buy them unnecessarily.
Socket and stationary
According to the type of installation, light timers are divided into socket and stationary. The first of them are connected to the electrical network through a socket using a standard plug, the second are placed in a specially installed box or rail of a dividing shield.
The socket relay is convenient when you need to control the operation of a separate electrical appliance or lighting in one room. They are easy to install and use, are small in size, do not require auxiliary wiring for installation in the power grid, and can be moved from place to place as needed. The stationary relay does not share these advantages, but compensates for them by the ability to control the operation of electrical equipment at once in the entire residential building or work building. If this is what you need, then its installation will be much more convenient and profitable than using many mobile devices, even with all the shortcomings of this type of device.
According to working conditions
 When choosing a timer, sometimes the conditions under which they can work normally are important. For example, a device installed to regulate an automatic watering system for plants must continue to function when splashed with moisture, and a timer installed in a work shop will need protection from dust.
The security class of the time relay, like other electrical appliances, is determined by the IP system. In total, there are 7 levels of protection against dust and 10 against water, as well as additional designations for the device's resistance to weather, high voltage and other factors. They are specified in the technical characteristics of the device. You need to choose a timer in accordance with the conditions of the room in which it will then be installed.
In addition to protection against harmful influences, it is necessary to take into account the maximum power of devices that can be connected to the timer. In total, it should not exceed this indicator for the device itself. You can find it in the instructions or on the information plate on the time relay housing.
Timer functions
Electrical and electromechanical timers are used to automatically control not only lighting, but also other electrical appliances: heaters (including underfloor heating systems), air conditioners, hoods and others. Compared to the constant manual switching of devices, the use of a time relay has the following advantages:

Thus, time relays are quite common and are found everywhere in a person's daily life. They are inexpensive, but significantly increase comfort and save time and effort, which brought them popularity.
Criterias of choice
There is nothing complicated or unusual in choosing and buying a time relay. First you need to determine why such a device will be needed, what it will be used for and in what conditions it will work. Then you need to look at the following characteristics:
- discreteness of setting the switching time;
- instrument accuracy;
- the number of different programs to be set;
- the degree of protection from the effects of the external environment;
- maximum power of connected devices;
- convenience, clarity and accuracy of settings;
- the ability to connect several plugs to the relay at the same time;
- price availability.
Comparing these characteristics with the purpose for which the time relay is purchased, it will not be difficult to choose the right model. In this process, you should not chase the most expensive and sophisticated devices - if you need, for example, just turn the light on and off at the same time all the time, then a simple and cheap electromechanical timer with a clock will be enough. You can buy a timer in any electronics department or a specialized online store.
Friends, hello everyone! Today, purely by chance, I read one interesting computer setting, coupled with an uninterruptible power supply. If you remember, not so long ago we configured in the case when the UPS switched to battery power.
And now we will do everything exactly the opposite. We will customize automatic computer turn on when power is applied. Moreover, in this case it doesn’t really matter which operating system is installed on the machine (Windows 10 or 7), because nothing depends on it.
So, the first step is to go into the BIOS system settings. How to enter it in detail. Further, depending on the manufacturer, the actions may be different, but the essence remains the same, so do not worry.
Specifically, in my case, you need to open the section " Power Management Setup " and in line " PWRON After PWR-Fail " specify the value shown in the screenshot below:

Where "Power Off (Off)" - will leave the computer in the off state when the mains voltage appears. "Former-Sts (Last State)" - will return the machine to the state that it was at the time of the network break. "Power On (Always On)" - will always automatically start the computer when power is restored.
That's all, with the task we have completely coped. But let's dig a little deeper and further explore another interesting option called " Resume by Alarm " . To activate it, move the switch to " enable " :

This setting allows you to start the PC according to a specific schedule, the so-called alarm clock. The trick is that in the column " Date " you need to specify the day of the month, and in " Time " hours and minutes. The start will take place at the specified time. As you can see, everything is very simple.
Well, friends, the automatic turning on of the computer when power is applied has been studied in detail, and you can complete the article. Write your comments, ask questions, as they say, it will be more fun together. That's all for now and let's watch an interesting video.
Light on and off timers are electrical devices that can organize automatic lighting control. Are applied to household and industrial consumers. The inclusion of timers in the scheme of lighting networks can significantly reduce the cost of expensive electricity, simplify the management of outdoor lighting, because. in this case, there is no need to be on the object to turn the light on and off. There are a large number of models of timers and switches that are used for different lighting networks.
Lanterns with a timer for street lighting

Light switch with timer

Light switch with timer
According to the type of installation, there are relays for automatically turning on the light, mounted:
- On the wall. It is necessary to install on an insulating base, a protective lining of cable and wire products should be provided.
- In the socket. It is necessary to choose sockets of the appropriate size.
- On a DIN rail. Are established on all boxes intended for modular electric equipment. At the same time, it is possible to control the light from several places.
Lighting timer type TO-2

Appearance of the TO-2 timer
The timer for turning on the light of the TO-2 series is designed for continuous automatic switching on of the lighting system (turning it off at night) according to an autonomous table of the movement of the Sun. It is also used as a time relay that turns on lighting networks at a selected period of time. The maximum lighting load per 1 fixture is no more than 1 kW.

Application
- Security lighting of the territories of objects, emergency lighting of non-residential buildings. In this mode, the timer turns on the lights after sunset, turns off at sunrise.
- Illumination of plots of houses of garden associations, adjoining territories. Identical to the first mode. It is also possible to turn off the lighting load at a specified time interval.
- Billboard lighting. Hours of operation - only during the designated time period.
Principle of operation
- The controller compares the readings of the built-in clock with an astronomical table and sends signals to two relays.
- Relay No. 1 turns on the timer for light only according to the readings of the built-in clock.
- Relay No. 2 works similarly, there is also an additional function to turn off the load for a certain period of time (set by settings).
Device tincture
It consists in setting the date and time for the correct operation of the twilight relay. The settings are controlled by the buttons located on the front panel of the device.
Advantages
- The presence of a six-digit indicator;
- Possibility of installation on a DIN rail;
- Reduction of financial costs for electricity;
- Resistance of equipment to temperature changes;
- Ability to work in networks of 50 ... 300 V;
- Fast reprogramming;
- Preservation of the specified settings when the external power is turned off;
- An electronic display that shows device parameters.
Important! To connect a large load, the circuit must be supplemented with contactors and additional relays.
Preparatory work before switching on the device
- Select the electrical connection diagram (for high load values, use contactors);
- Install the device and the switch in the lighting control panel;
- Connect the device with cables or wires to the mains and fixtures through the relay;
- Apply voltage to the device.
Models of the TO-2 series are programmed for the possibility of shifting the relay operation time (up to 127 minutes in both directions).
Inspection and scheduled diagnostics of the device are recommended to be carried out at least once every six months. The terminal blocks and the fastening of the timer, the connection points of the electrical circuit elements are subject to verification.
Modes
- indications. Normal operating mode, the display in the current time shows all the parameters of the timer.
- Settings. Set current date and time.
- Checks. Test mode for checking the device's performance.
- Settings. Correction of previously set instrument operating values.
Important! Calibration and repairs of timers must be carried out in specialized service centers or at manufacturing plants.
Lighting timer type TO-47

Models of the TO-47 series are designed to automatically turn on and off lighting networks with halogen lamps and incandescent lamps on landings and other premises. The device turns on the lighting for a period of 1 to 7 minutes. The maximum load on the device is 3.5 kV.

Device connection options
The light off timer can work in three-wire and four-wire electrical networks (products are specially equipped with a switch for the number of wires).
- When choosing scheme No. 1 (three-wire networks), the circuit is assembled without the possibility of connecting an additional lighting load after the switch;
- Scheme No. 2 is four-wire with the ability to connect additional fixtures (lamps) through a switch.
Connection order
- Mount the TO-47 modular timer on a DIN rail using a special latch (for modular devices);
- Connect external buttons according to the wiring diagrams.
Manual control
The TO-47 is controlled by a switch knob, which is located on the front panel of the device.
When moving to the position with the “Lamp” icon, the contacts close and the backlight starts to turn on (until the lever is forced to move to its original position).
When the lever is moved to the “double circle” position once, a timer is activated with a set trip time setting.
If the timer is controlled by an external button, the lever must be moved to the “double circle” position.
To increase the operating mode in the "On" position, a switch is provided. When the timer switch is turned on, the contacts are constantly closed, the contacts are opened when the switch is turned to the “Off” position.
Photo relay on timer 555
The sleep timer 555 is a universal, one of the most common devices for generating single and repetitive signals (pulses), stably tied to time intervals. Based on the 555 timer and a phototransistor, it is possible to manufacture a photorelay that operates from a 12V network.
Application
A photorelay based on the 555 timer is used to automate lighting networks: outdoor, indoor, etc.

General view of the timer 555

Related videos
Perhaps many of the users of stationary personal computers wondered how to organize automatic switch on and shutting down the computer at a specified time or schedule. In this article, we will consider one of the more accessible methods.
To implement this function of the personal computer, we will use exclusively the built-in capabilities of the BIOS input-output system and the Microsoft Windows 7 operating system. The use of third-party software is excluded by itself.
Let us define a schedule that consists of necessary conditions, i.e. we need the personal computer to turn on every weekday at 07:00 am and turn off at 17:00 pm. Regarding weekends, due to a limitation in the BIOS input / output system, the computer will start at 07:00 in the morning and turn off after 10 minutes as unnecessary, because. no one is at work.
So, let's begin. When you turn on the computer, you need to enter the BIOS input / output system. To do this, press the key "DELETE", this key is mainly used in many motherboards, but there are still other uses of the keys, such as:
Esc F1 F2 F3 F10 F11 F12
After pressing the "DEL" key, the BIOS system menu will be displayed and will look something like the one shown in the figure below:

Set the value of the "Resume by Alarm" parameter to , activating the computer to turn on according to the schedule. In the “x Date (of Month) Alarm” parameter, you can select a daily execution or specify the desired day of the month, in our case we will use the first one - Everyday. Computer turn-on time "x Time (hh:mm:ss) Alarm" is defined as 07:00 am.
In this way, automatic switch on personal computer organized according to the schedule: daily inclusion at 07:00 in the morning, both on weekdays and weekends.
Computer shutdown settings
Now we need to create a schedule for automatic shutdown personal computer. The built-in console file will help us with this. taskschd.msc, the so-called "Task Scheduler", which will perfectly cope with the task. Task Scheduler can be launched using the "Search programs and files" line and "Explorer" Windows.
Method 1 - "Find programs and files"

2 way - "Explorer"

After the above commands, the "Task Scheduler" will open, in which you need to go to the "Task Scheduler Library" item and take the action to create a task - "Create a task" or "Create a simple task", as you like. We will not describe the detailed description of creating a task, everything is available and written in Russian.

As you can see, in the figure below, two tasks are created that produce automatic shutdown personal computer. The first task called “OFF PC” organizes PC shutdown on weekdays at 17:00, and the second task named as “OFF PC Weekend” performs PC shutdown on weekends 10 minutes after turning on the PC.

The detailed description of creating a task is missing, but you need to know the following, which for automatic computer shutdown you need to enable the launch of the program shutdown.exe -s in every task.

And also in the "General" tab for both tasks there are rules for completing the task only for a registered user, see below.

The created tasks will not function if you do not create an automatic user authorization in the system, i.e. when the computer starts up and boots up, the login will fail because a login password must be entered, and this is stipulated in our created tasks.
Therefore, in order to enter the "User Accounts" and set a password for automatic login without a visible password prompt, you must open the explorer and specify "control userpasswords2" or netplwiz, for an amateur.


Here we are done with the setup. automatic start and blackouts personal computer, while using the built-in functions of the BIOS and Windows 7. Try it YOURSELF!