How to reduce noise in a photo. We remove extraneous noise in the microphone on Windows. You will be interested
Frames taken in poor lighting or low-quality equipment are often covered with a grid of multi-colored dots. This unpleasant effect is called digital noise, and it significantly spoils the appearance of the picture. To save a photo, use the PhotoMASTER program. Read the article and you will learn how to easily remove noise from photos using our handy editor.
The picture is transformed, as if by magic!
Noise like never before
Even strong noise can be eliminated without Photoshop, using the handy tool of the PhotoMASTER program. This is done in just a couple of minutes, and the result will pleasantly surprise you. Let's look at the steps you need to take to turn a photo with a significant defect into a photo that is not embarrassing to show to friends.
- Step 1. Getting Started
To start editing, you will need a program to remove noise from a photo. Download the PhotoMASTER distribution kit from our website and install the editor on your computer. Double click on the shortcut to start processing the image. In the program window, click the "Open Photo" button.

The program for eliminating noise in the photo
- Step 2. Photo preparation
In a folder on your computer, select the photo you want to edit. When it appears in the working window, find the "100%" button on the bottom panel to view the image in 1:1 scale. This will allow the most correct way.

Uploading a photo with a defect
- Step 3 Eliminate Noise
Select the “Tools” section, and then find the “Photo Noise Removal” function on the right. A scale with a slider will appear on the screen. Slowly move it to the right until the noise disappears. Usually it is enough to move the slider to a value of 20-30. You should not get carried away, otherwise the image will become too blurry. When you're happy with the result, don't forget to click the "Apply" button to save your changes.

Remove noise by moving the slider to the right
- Step 4: Sharpening
When the noise removal from the photo is successfully completed, you may notice that the picture is a little blurry. This is an inevitable consequence of the work of the tool, but do not worry! The consequences are eliminated very easily, directly without leaving the editor. There are sharpness settings for this. Go to the "Enhancements" section and then to the "Sharpness" tab. Set the slider to the optimal value at which the details become clearer. Make sure the noise doesn't come out again.

Increasing the sharpness value
Ready! An unpleasant defect will no longer spoil a great photo. To compare the original image with the processed one, click on the "Before/After" icon located on the bottom panel. Now you can clearly see that the program for removing noise from photos really works wonders!

Compare before and after photos!
Let's make your photo even better
PhotoMASTER is a versatile editor where digital noise reduction is just one of dozens of tools. Necessary ? Not a problem! Want to apply filters? Please! Feel like a professional retoucher, able to pull out any, even the most nondescript picture.

These are not all the tools that the photo editor has! As you can see, in addition to the ability to get rid of noise in the photo, the program offers to take many more actions to improve the quality of the image. Now every frame will get a chance to be flawless!
An editor you like
PhotoMASTER will not scare you with a complicated interface. Even a novice user will get comfortable in ten minutes. Remove digital noise from the photo, crop, smooth the skin of the face and apply effects in just a few simple steps. No defects will make you send successful shots to the trash anymore. Let the photo albums be filled with great pictures!
In this tutorial, Maxim Basmanov will tell you how to remove noise from a photo in Photoshop. This will be the easiest way for beginners, since most beginner photographers make noise in their photos, because they set the settings on their camera incorrectly, or they just take pictures with a phone or ordinary “soap dishes”. Yes, there are more professional ways to achieve the same effect, but in this tutorial we will analyze the simplest and, in the opinion of the author, the most effective way to remove noise in Adobe Photoshop.
Let's open the photo we'll be working with today.
If you look closely at the photo, you can see that there is a little noise on it. There is both color and plain monochrome. All in one heap, as is usually the case in photographs of this kind.

Of course, when printing on some small photos, or if you post the photo on social networks where the photo size is small, then the photo will look fine. But if you have a need to use enlarged areas of the photo, then this noise will be visible.
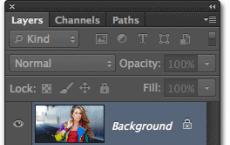
Let's start removing this noise. First of all, create a copy of the layer using the keyboard shortcut Ctrl + J.
After that, go to Filter -> Noise -> Reduce Noise (Filter -> Noise -> Reduce Noise).

There are two ways here: Primary and Advanced. An additional method allows you to remove noise in certain channels. This is useful when you have a lot of color noise in your photo and one color dominates.

But we won't go into the more complex selection of noise and everything else, so in the "Advanced" mode, go to the "Above all" tab, remove all settings to zero and figure out what we can do here.

We start working with the "Intensity" slider. Increase the value of the setting until the noise merges and removes its hard edges. The noise becomes a little blurry, but does not disappear anywhere. There is still a lot of color noise in the photo.

Next, work with the "Reduce Color Noise" slider. Start moving the slider to the right. In our case, we increase the value to 90%. With this setting, we ensure that the noise remains, but the color disappears from it.

Now we have removed the color noise, but the normal noise is still there. Now we create a copy of the layer we have been working on. Standing on a new layer, go to Filter -> Blur -> Blur on the surface (Filter -> Blur -> Surface Blur).

Now we will blur the noise that remains. But before doing this, you need to know that not always in this way we can save all the elements in the photo. It's important to understand that the noise has already killed off most of these elements and so we need to at least just make it smooth so that the photo looks better than it is now.
In the filter settings "Radius" increase to a small size. Of course, it all depends on your photo, but you shouldn't get too carried away here. In our example, it will be 4 pixels. "Isohelion" - also do not make too large numbers, as the photo becomes very blurry. In our example, the author uses a value of 15 levels.
Unfortunately, it is not always possible to achieve a clean recording without noise on the first attempt. Sometimes, instead of rewriting, the extra noise is best removed using software post-processing. There are a number of audio editors that will help you deal with this problem. However, they need to be installed on the computer, plus you will have to spend a lot of time getting to grips with the interface.
To avoid all these problems, it is recommended to use special online services. They cannot compete with professional software, but they are very easy to learn. Their functionality should be enough to carry out primitive work with sound.
Noise Removal Online
There is nothing difficult in removing unnecessary noise, if they are not very noticeable or are only on some specific small gaps in the recording. Otherwise, you will have to spend a lot of time on it. If the recording is very noisy, it is best to overwrite rather than try to get rid of the noise.
Unfortunately, there are not so many normal resources for cleaning records from unnecessary sounds. Let's take a closer look at the ones we found.
Option 1: Online Audio Noise Reduction
This site is presented entirely in English. However, even basic knowledge of the language will be enough for its comfortable use. Plus, the functionality of the service is not very large, so it will not be very difficult to figure it out. To remove excess background noise on the recording, you can do the following:
- Go to the official website of the service. Pay attention to the line "Input", here you will need to upload the file using a special button. You can also select one of the ready-made examples in the "Demo files" field to check the service's performance.
- Windows Explorer will launch. In it, you need to select the record where you want to remove unnecessary noise. After that, click on the "Open" button.
- In the next line "Noise model type" you need to specify the type of noise that is present in the recording. To choose the most correct option, you need to have at least basic knowledge of the physics of sound. Let's take a quick look at the available types:
- "Mean" is the average value. It is recommended to use in cases where it is not possible to determine the exact noise model;
- "Adapted distribution" - the distribution of noise over different playback channels, that is, the noise is distributed evenly throughout the recording;
- "Autoregressive model" - setting the linear dependence of noise.

- Now move on to more detailed settings. You need to determine by ear the approximate duration of a unit of noise in order to select the correct block size for analysis. Quite often it is not possible to immediately decide, so it is recommended to set the minimum value. Leave the "Enhancement spectral domain" item unchanged. As for the anti-aliasing settings (the last two parameters), then set the values \u200b\u200bthere at your discretion. Usually it is enough to push the slider halfway.
- If you need to process several tracks, it is recommended to check the box next to "Fix these settings for another file". This item is responsible for saving the current settings, which will allow them to be applied automatically to other loaded tracks.
- When finished with the settings, use the "Start" button to start processing. Wait for it to complete, if the record is small, then the processing will complete quickly, but you also need to take into account the speed of the Internet connection. After that, you can listen to the final version of the composition and its original, so that there is something to compare with.


Option 2: MP3cutFoxcom
The service that was discussed above is the most worthy in its field, as it allows you to remove noise from the entire composition and has an extensive list of settings. True, it should be borne in mind that such a need does not always appear. Sometimes you need to remove excess noise only from some temporary section of the composition, which, as a rule, is quieter than other sections. In this case, you can simply cut this part of the audio recording, and there are many online services for this, for example, the same MP3cutFoxcom:

In this article, we reviewed online services with which you can get rid of unnecessary noise on audio recordings. However, using them to perform high-quality noise removal is very difficult, since there is no necessary functionality and you have to be content with what you have.
Noise in a photo image is an age-old problem that both beginner photography enthusiasts and professionals face. Digital noise appears as discrete points of light, darkness, or color that can fill entire areas in a photo. Mobile phone owners who shoot with their gadgets in low light are well aware of this problem. However, owners of advanced SLR cameras are often faced with the fact that contrast points appear on photographic images, which spoil the overall impression of the pictures. In this article, we will talk about how to reduce the effect of noise on photographs when shooting, as well as how to eliminate such small image defects using software tools.
Reducing photo noise when shooting
It should be noted right away that there is always noise in digital photography and this is due to the peculiarities of the photosensitive matrix, which is the basis of any digital camera. However, in most cases the noise level is so low that the human eye is unable to see the image defects. But in some situations, especially when shooting in low light conditions, digital noise in the picture already becomes clearly visible. There are several ways to reduce the effect of noise when shooting:
- Do not use high sensitivity settingsISO
Perhaps the main reason for the appearance of noise in photographs is too high an ISO sensitivity set by the photographer. When shooting in low light without a flash, you have to increase the sensitivity of the matrix to make the photo brighter. However, excessively increasing the ISO value in the camera settings causes the images to become too noisy.
The influence of the ISO value can be assessed by an example, by the zone of the photo inside the red oval (clickable):
Noise suppression
1 of 3


While camera manufacturers are currently working hard to reduce noise at high ISOs, don't mindlessly use extended ISO ranges. It is better to choose the lowest possible or average ISO value, and only after trial photos draw the appropriate conclusions about the need to increase the sensitivity of the matrix. Thus, increase the ISO value only when there is a real need for it.
In low light conditions, try to use fast lenses or flash. As for optics, the wider the aperture is opened, the faster the shutter speed can be made. All this will allow you to take better photos in low light without having to seriously increase the ISO value and, thereby, increase the risk of noise.
- Shoot from a tripod
To reduce noise, it is advisable to use a tripod or monopod on which you can mount a digital camera. This is especially true for those situations when you shoot any static objects in low light conditions. Using a tripod will allow the camera's sensor sensitivity settings to be set to their lowest setting, which in turn will reduce the chance of digital noise appearing in pictures.
— Protecting the camera from overheating
It's no secret that digital noise starts to show up more when the sensor of a digital camera gets hot. A simple rule applies here - the higher the temperature of the matrix, the more noise in the photo image. In this regard, try not to shoot for a long time in conditions of heat, high humidity and direct sunlight, and also not to use too long exposures unnecessarily.
Also, keep in mind the fact that when using the LiveView mode in digital SLR cameras, the light-sensitive matrix works not only during the exposure of the frame, but also a little longer, which can lead to its additional heating. Therefore, do not abuse shooting in this mode, give your camera's sensor time to cool down.
— Shooting inRAW
It is preferable to shoot in RAW format. This format contains more information than JPEG, so you have more opportunities to get a high-quality image. In addition, you will be able to reduce the noise in the photo image already when converting RAW files using image processing software.
Modern digital cameras are equipped with various noise reduction functions, but the software algorithms used in them are far from perfect and do not always correctly suppress noise. Often, the use of such a function leads to the loss of fine details of the image. In addition, if your camera has already removed some of the noise, this can make it difficult to further process and refine the photo on a computer.
How to Remove Noise from a Photo in Photoshop

Using the capabilities of one of the graphic editors, you can safely remove digital noise from a photo. In Adobe Photoshop, this procedure is usually performed through the regular Reduce Noise filter (via the menu Filter - Noise - Reduce Noise). Before processing the image, you need to open it in Photoshop and duplicate it (Layers - Duplicatelayer). Thanks to this, at the end of the work on removing noise, you can always compare the original with the processed image. After opening the Reduce Noise filter, you start working in (Basic) mode, where the following parameters will be available:
- Intensity or strength (Strength). This parameter provides a reduction in luminance noise - the more to the right you move the slider, the more the noise will be attenuated. The main thing here is not to overdo it, so that along with digital noise, various small details do not disappear from the photo.
- Save details (Preserve Details). By adjusting this slider, you can restore the small details of the photo image that have disappeared, but keep in mind that noise will also return to the photo. Here you will have to find the optimal balance between keeping the small details of the photo and putting up with the presence of a certain level of noise, and completely eliminating the noise, putting up with the loss of some details.
- Reduce color noise (Reduce Color Noise). This option is used to remove color spots from a photo.
- Details of sharpness (Sharpen Details). With this option, you can try to restore the sharpness of the photo image, which, of course, deteriorates with the reduction of digital noise.
1 of 2

ISO 25600 - after noise reduction
Experiment with the settings, and then go to the additional mode of the same filter (Advanced). Here you can reduce the noise in a single channel thanks to the Per Channel tab. For each channel, you can change the same above-mentioned parameters "Intensity" and "Keep details".
Choose the optimal filter settings for a particular photo image. If you need to get rid of the so-called luminance noise, that is, small elements in the photo that have differences in brightness, then you can start with the following settings: Intensity - 9 - 10, Details Preservation - 3 - 6%. If you are dealing with chromatic noise (the presence of colored spots in the photo), then you can set the following value Reduce Color Noise - 70 - 100%.
In conclusion, it is worth noting that the extent of the problem of digital noise in photographic images is often exaggerated by the photographers themselves, who simply do not want to see any "defects" in their pictures. However, you need to remember that when viewing a picture at 100% scale on a computer monitor, you will see noise several times larger in area than in the same photograph posted, for example, in an online photo album. In addition to this, there are currently no universal noise removal algorithms. This means that noise suppression or its elimination by software somehow leads to a partial loss of fine details, deterioration in color accuracy and photo sharpness. Therefore, you should not strive to always completely remove noise in your photographic images, in most cases it will be enough to simply reduce it to an acceptable level. Although if you plan to do commercial or stock photography, then you will have to be more strict about the technical side of the pictures and similar minor defects in photographic images.

Article content:
Introduction
Not so long ago I needed to remove the noise from the sound. Previously, I did not do this, so I got on the Internet to dig out a way how this can be done with the least loss. After 10 minutes of searching, it turned out that all paths lead to Adobe Audition.
After half an hour of experimenting, I figured out the best way to remove the noise. Now I present to you a fairly detailed instruction on how to do this. I will try to collect all the information found together, summarize and write in an accessible language. I’ll make a reservation right away that there will be only instructions, and not a description of a bunch of filters for this monster (Audition). Instructions like “There is a problem - here is the solution for you.” And Audition is essentially Photoshop in the world of audio.
Let's say you recorded sound on a microphone, camera, phone. Often, these devices do not differ in special quality (in terms of sound recording). And there will always be noise - some kind of constant component. And if there is also a generator of additional noise (for example, the hum of coolers in a computer) ... Our task is to separate it from speech or music.
There are two options here:
- The audio contains a recording of the atmosphere of a room or street without a useful signal. Those. in the presence of a recording of noise without impurities. For example, you are going to record your friend's guitar playing on a computer microphone. The apartment is quite quiet, there are no neighbors, no one makes noise on the street either (hmm, a rather idealized situation, isn’t it), but a disgusting computer, which is a hundred years old at lunchtime, and besides, it has not been cleaned of dust since the day it was born, treacherously rattles with coolers throughout Ivanovo. Well, there are two options: initially record 10-20 seconds before a friend starts playing and the same amount after the end. In this case, you will have a pronounced noise, which can later be separated. By the way, professional journalists do this whenever possible. And the second option is to clean the computer. And the second is clearly preferable.
- There is no separate recording of noise in the audio. Those. your friend started playing immediately after the recording started, and after the end you instantly cut the microphone. Here is the worst option. The fact is that noise is a collection of certain frequencies. If there is pure noise, then it is safe to say that these frequencies are noise, garbage and can be removed from the entire track. If some useful signal goes along with the noise, then the selected frequencies will no longer be exclusively garbage. And, when you delete them on the whole track, some part of the useful signal will be lost. Or rather, the music and voice will acquire a metallic hue. Therefore, it is better to rewrite such a record. You can also try to find a section where the useful signal will be at a minimum, put less aggressive settings when cleaning noise and put up with a metallic echo. Or you can just write the noise sample to a separate file, unless of course you are 1000 km away from this place
There is a small original file of 5 seconds in size with a pronounced background noise. The recording was made on the voice recorder of a smartphone. And this noise is generated by the phone and at a low volume of the signal source is clearly audible.