How to enable usb ports in bios. We connect com usb port in Windows. Enabling and disabling USB drives with USB Guard
USB ports may stop functioning if the drivers have crashed, the BIOS settings, or the connectors have received mechanical damage. The second case is often found among owners of a recently purchased or assembled computer, as well as those who decide to install an additional USB port on the motherboard or those who have previously reset the BIOS settings.
The BIOS is divided into several versions and developers, therefore, the interface may differ significantly in each of them, but the functionality remains the same for the most part.
Option 1: Award BIOS
This is the most popular developer. basic systems I/O with standard interface. The instruction for it looks like this:

Option 2: Phoenix-Award & AMI BIOS
BIOS versions from developers such as Phoenix-Award and AMI have similar functionality, so they will be considered in one version. The instructions for setting up USB ports in this case look like this:

Option 3: UEFI interface
UEFI is a more modern analogue of BIOS with a graphical interface and the ability to control using a mouse, but in general their functionality is very similar. The instruction under UEFI will look like this:

Connecting USB ports will not be difficult, regardless of the BIOS version. After connecting them, you can connect a USB mouse and keyboard to your computer. If they were connected before, then their work will become more stable.
Disabling USB ports is recommended as a precaution, namely when connecting flash drives, external drives or other USB devices in order to infect your computer with all sorts of viruses or data theft. It is for these reasons that many IT people in offices and companies block access to them. Without bothering with any programs for these purposes or other settings, they simply disconnect from the motherboard.
Below I will give some examples with descriptions, how to disable usb ports on computer.
Disable USB in BIOS
We go into Bios, for this, while turning on or rebooting the PC, press the Delete key on the keyboard. Go to the Advanced (Advanced BIOS features) section, where we are interested in the next Legacy USB Support option. By default, it has the position Enabled, change to Disabled.

We save the changed values by pressing the hot key F10 and exit.
Through the registry
Using +R, open the Run window and enter the Windows command "regedit" (without quotes). In the editor, go to the branch
Microsoft Registry
HKEY_LOCAL_MACHINE\SYSTEM\CurrentControlSet\Services\USBSTOR
HKEY_LOCAL_MACHINE\SYSTEM\CurrentControlSet\Services\USBSTOR |
We find the DWORD parameter "Start" and change its value to "4".

Reboot by clicking the "OK" button.
PS: How to enable USB ports? Change the value back to "3".
device Manager
Open the "Start" menu, right-click on "Computer" and go to "Properties". On the left side of the screen, click on the "Device Manager" link. In the displayed list, look for the item “USB Controllers”, open it and deactivate it with the mouse.

Going to "Properties".

Then " Driver"And then click the button shown in the screenshot below.

Removing USB Controller Drivers
An option that also has a place to be. Just use a program, for example, Ccleaner, to remove drivers from your computer. The downside is that when you restart your PC it will check for them and install them. Which again will re-open access to the ports.
Fix It Utility
You can download it and at the same time find out how you can deny access using it at this link //support.microsoft.com/ru-ru/kb/823732.
With the help of programs
There are enough applications - there are still a lot, you can’t list them all, but I would like to become one on one. Its name is USB Ports Disabler. Download from the link. We start and then everything is intuitively clear.
First, press the button highlighted in the figure below

On some computers, when you connect HDD or a USB 3.0 flash drive, the error "Device not recognized" (USB Device Not Recognized) or " Windows stopped this device because it reported problems.(Code 43)" in Device Manager.
In this article, you will find instructions for troubleshooting the following issues:
- USB device not recognized/not detected
- USB 3.0 flash drive not recognized/not detected
- USB 3.0 not working on Windows 7/10
How to fix: USB 3.0 port not working on computer
Before we move on to troubleshoot this issue, you should try the following:
- use another USB cable if you are connecting a hard drive to a USB 3.0 port on your computer.
- Connect USB 3.0 to USB 2.0 port.
- Remove the USB device, turn off the computer, and unplug the power cord (or battery if you're using a laptop). Wait at least 2 minutes, and then reconnect the power cord. Turn on the computer and reconnect the USB device.
- If you are using Windows 7, Vista, or XP, download and run the Microsoft Troubleshooter utility.
- Reset BIOS to factory settings.
Solution 1 – Disable Fast Startup Feature in Windows 8 and 10

Note: If the fast startup option has already been unchecked, check it and restart your computer. Once restarted, uncheck the box and restart your computer again.
- Reload computer.
Solution 2 – Disable USB suspend settings

Solution 3 – Reboot your USB 3.0 device
- Open device Manager. For this:
- Press the keys " Windows» + « R" to open the window " Run".
- In the window " Run» enter: devmgmt.msc.
- Click Enter.
2. In Device Manager, expand "ControllersUSB» .

3. Right click on " RootUSB-hub(USB 3.0 ) ' and select ' Delete".
4. Windows will automatically find and install the latest drivers for your USB 3.0 port. 
Solution 4 – Install the latest USB 3.0 drivers
- Download Intel Driver Update Utility or AMD drivers.
- Run driver update utility and press " Further" on the first screen.

- Accept the license terms and click " Install".

- Wait while the driver update utility is installed.
- After installation is complete, click " Run».

- Click " Start Scan".

- When the driver scan is complete, click " Download", to download latest versions drivers for your computer.

- Finally, click " Install".

- After installation is complete reload computer.
Solution 5 – Restore Windows to a previous working state
If the solutions above did not help with the problem when USB 3.0 does not work on the computer, you should try restoring the computer to a previous working state. This can be done if you have activated a Windows restore point earlier.
Please write in the comments below if you managed to solve the problem with a faulty USB 3.0 port, and what solution worked in your situation.
Every system administrator should know how to boot computer from usb stick. Most often, this skill is needed when installing operating system. After all, a Windows distribution does not have to be on a CD. And, for example, installing Windows on a netbook in a different way will not even work, because. it usually does not have a floppy drive.
Today I will tell you how to set the boot from a USB flash drive in the BIOS of various manufacturers. Regardless of which version you have, the procedure will be as follows:
1. We insert our bootable USB flash drive into the USB port of the computer. It is advisable to insert it into the port located directly on motherboard, i.e. from the back of the system unit.
2. Turn on the computer and press the key Delete(or F2) to get into the BIOS. Depending on the manufacturer and BIOS version, other keys (Esc, F1, Tab) can be used, so you need to carefully watch the prompts on the screen.
In Bios, we can navigate through the tabs and rows only using the keyboard.
Next, I will describe this process in detail using the example of different BIOS versions.
Configuring Award Bios to boot from a USB flash drive
Award Bios: First, let's check if the USB controller is enabled. We go to "Integrated Peripherals". We go down with the arrow on the keyboard to the item “USB Controller”. Press the “Enter” key and in the window that appears, select “Enable” (also using “Enter”). Opposite “USB Controller 2.0” should also be “Enable”.
  Exit this tab by pressing Esc.
Then go to "Advanced BIOS Features" - "Hard Disk Boot Priority". Now in my example, the hard drive is in the first place, and the flash drive should be.  We stand on the line with the name of our flash drive (Patriot Memory) and raise it to the very top using the “+” key on the keyboard.
  Exit here by pressing "Esc".
Now on the line “First Boot Device” press “Enter”. We have selected “CD-ROM”, but you need to set “USB-HDD” (if suddenly the boot from the USB flash drive does not work, come back here and try to set “USB-FDD”). Let the second device be “Hard Disk”.  Exit this tab by pressing Esc.
Now exit the BIOS, saving the changes. To do this, click "Save & Exit Setup" - press the key "Y" - "Enter". 
Configuring AMI Bios to boot from a USB flash drive
If, upon entering BIOS, you see such a screen, then you have AMI Bios: First, let's check if the USB controller is enabled. Go to the tab "Advanced" - "USB Configuration".
  Opposite the items “USB Function” and “USB 2.0 Controller” should be “Enabled”.
  If this is not the case, we stand on this line and press the “Enter” key. From the list that appears, select “Enabled” (also using “Enter”).
Then exit this tab by pressing “Esc”.
Go to the tab "Boot" - "Hard Disk Drives".  Now I have a hard drive in the first place, but I need to put a USB flash drive here. We become on the first line, press “Enter” and in the window that appears, select our Patriot Memory flash drive.
  It should be like this:
  We leave from here through "Esc".
Select "Boot Device Priority". Here, the first boot device must be a USB flash drive.  Press Esc.
Then we exit the BIOS, saving all the settings made. To do this, go to "Exit" - "Exit & Save Changes" - "OK". 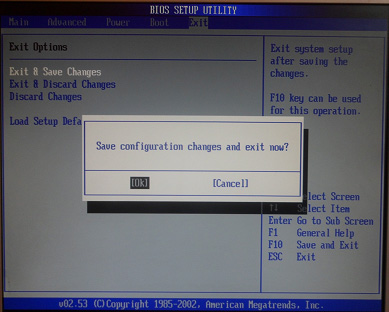
Setting up Phoenix-Award Bios to boot from a USB flash drive
If, upon entering BIOS, you see such a screen, then you have Phoenix Award BIOS: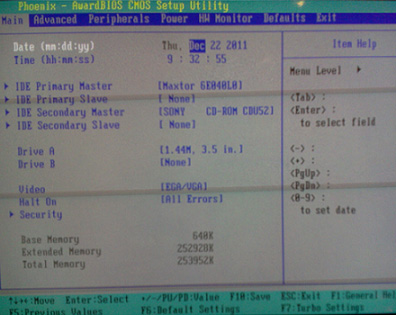 First, let's check if the USB controller is enabled. We go to the “Peripherals” tab - opposite the items “USB Controller” and “USB 2.0 Controller” should be “Enabled”.
  Then we go to the “Advanced” tab and opposite “First Boot Device” we set “USB-HDD”.
  After that, exit the BIOS, saving the changes. To do this, go to "Exit" - "Save & Exit Setup" - press the key "Y" - "Enter"
 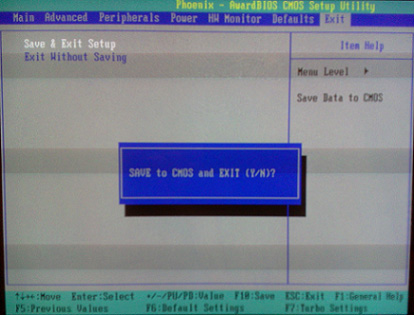 That's practically everything you need to know in order to boot from a USB flash drive. In my article, I described the process of setting up the Bios of the most popular versions: Award And AMI. The third example shows Phoenix Award Bios, which is much rarer.
In different versions of the BIOS, the described procedure may be slightly different. But the main thing is that you understand the principle of tuning itself.
By the way, I would also like to add: in order to choose which device to boot your computer from, it is not necessary to change the settings in the BIOS. You can call up a special menu immediately after turning on the computer to select boot devices (this can be done by pressing F8, F10, F11, F12 or Esc). In order not to guess with the keys, we look carefully at the monitor immediately after turning it on. We need to have time to see an inscription like this: “Press Esc to selest boot device". In my case, it was necessary to press “Esc”.  If on your computer BIOS UEFI, and you need to boot from a USB flash drive - you can familiarize yourself with.
If you need reset forgotten password user using a bootable USB flash drive - how to do it.