History of usb connections in linux. Linux forensics in the form of tracking the history of USB device connections. Fixing broken USB hardware
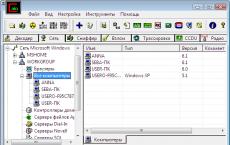
When you connect a USB flash drive or any other USB device to your computer, a set of files is created that you can use to access them. When you work in file manager everything is simple enough, but once it comes to the console, things get a lot more difficult.
It is important for every beginner to be able to identify connected devices, be it usb flash drives, SD cards or hard drives, so as not to write something to the wrong place or format the wrong disk. In this article, we will look at several ways to see Linux usb devices connected to a computer.
In the operating room Linux system a special management philosophy is used. All objects, including devices, are considered files. When a device is connected to the system, a file is created for it in the /dev/ directory.
Usually, after you have connected any USB flash drive or other storage device to a system with a desktop environment installed, the device is automatically mounted in the /media/username/device_label/ folder, and then you can access the files from the device in this folder. However, there are situations when you need to manually mount the USB and then this option will not help.
All device files are located in the /dev/ directory. Here you can find sda, hda files which are HDD, as well as sda1 or hda1 files that allow you to access disk partitions. We have already discussed this in detail in the article. You can list all devices in the /dev/ directory with the command:
Now it remains to understand which of these device files belong to USB devices and which devices exactly.
How to see Linux USB devices
To find out more detailed information about each device connected to your system and to see a list of linux devices, you can use the df command. It is used to view free disk space:

By the total size and space occupied, you can determine which device is your flash drive, but this way to view linux devices is not very convenient and it only works with an already mounted flash drive, there are several more that give more accurate information.
The lsblk command lists all block devices connected to your computer. The utility displays not only their size, but also the type (disk / partition) as well as the major and minor number of the device. Here it is already a little easier to find a flash drive, we see two disks, and if the first one with a size of 698 gigabytes is a hard drive, then the second one is definitely a flash drive:

There is another way, this is the fdisk utility. It allows you to view the partition table on all block devices connected to the computer. But the utility must be run as superuser:

Also, you can find out about the connected USB device by looking at the dmesg kernel message queue. It stores information about all operations that occur in the kernel. Including the name of the flash drive just connected to the computer will be displayed here. To view kernel messages, run:

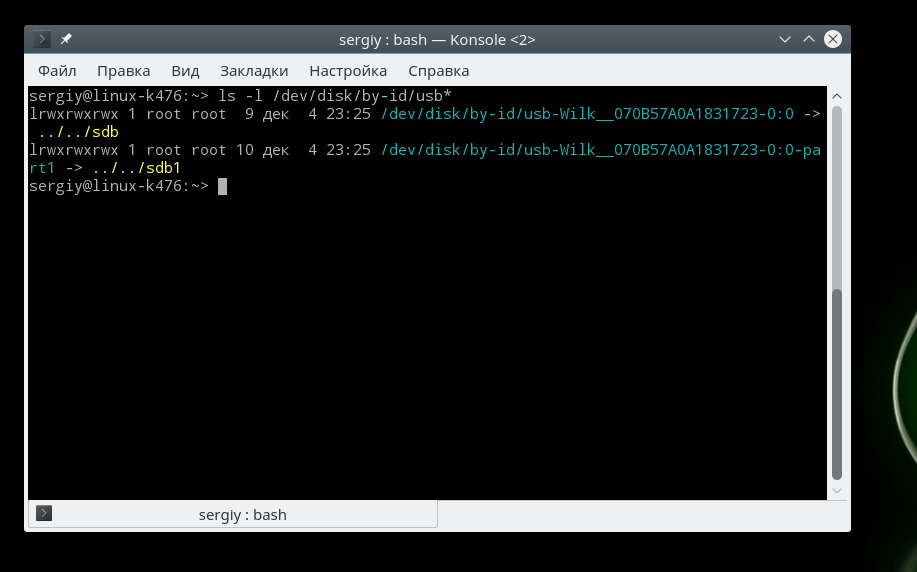
To see which of the sd devices are USB, use the following command:
ls -l /dev/disk/by-id/usb*
USB support has been included in the kernel since version 2.2.7, and we can say that this technology has already been tested and there should be no problems when connecting such devices. You just need to connect a camera, flash drive, printer or any other device, as it will be automatically recognized. And whether the printer will work, for example, depends on the availability of drivers.
To make it possible to assess the situation, let's analyze how USB support is implemented and where to look for information about connected devices, although everything has been said about partially also applies to USB. USB support in Linux is handled by the Linux USB Project (www.linux-usb.org), which is where you should go for information. In today's computers, you can find three types of controllers that differ in the interface for interacting with devices. These are OHCI (Open Host Controller Interface), UHCI (Universal Host Controller Interface) and EHCI (Enhanced Host Controller Interface). The first two implement support for USB version 1.1, the last 2.0 provides an exchange rate of up to 480 Mbps. UHCI controllers are somewhat simpler and cheaper, but require complex drivers and load more on the processor. Finding out your controller type is still very simple:
$ lspci -v
00:02.0 USB Controller: nVidia Corporation MCP55 USB Controller (rev a1) (prog-if 10 )
Flags: bus master, 66MHz, fast devsel, latency 0, IRQ 11
Memory at fe02f000 (32-bit, non-prefetchable)
Capabilities:
00:02.1 USB Controller: nVidia Corporation MCP55 USB Controller (rev a2) (prog-if 20 )
Subsystem: Biostar Microtech Int'l Corp Unknown device 3405
Flags: bus master, 66MHz, fast devsel, latency 0, IRQ 5
Memory at fe02e000 (32-bit, non-prefetchable)
Capabilities:
As you can see, I have both types of controllers: OHCI and EHCI. If you are using a self-built kernel, enable the required driver in the "USB Host Controller Drivers" item. I will not load you with all the options, all the options that are available in the kernel can be viewed by typing “cat /usr/src/linux/.config | grep -i usb".
You should also remember that working with USB is carried out by emulating SCSI, so you need to activate the parameters related to SCSI support.
To work directly with USB devices, the /proc/bus/usb directory is created in the /proc virtual file system, which is mounted via /etc/fstab:
none /proc/bus/usb usbfs noauto 0 0
If there is no such line in your file, it may mean that the developers saved you from unnecessary thoughts and mount usbfs in the start scripts. In which specific script this is done, you will find out by entering " sudo grep -iR "usbfs" /etc/*". For example, in Kubuntu, the script is responsible for mounting the USB /etc/init.d/mountdevsubfs.sh. To manually mount the USB file system to /proc/bus/usb, you can do this:
$ sudo mount -t usbdevfs none /proc/bus/usb
After that the command mount | grep usbfs' should show the presence of the line:
procbususb on /proc/bus/usb type usbfs (rw)
And the conclusion lsmod» loaded modules usbcore, driver module ohci_hcd, ehci_hcd, uhci_hcs, as well as the module corresponding to the connected device driver like scanner.o, printer.o, usb_storage.
Information about connecting a USB device can be obtained from /var/log/dmesg and directly from /proc. If directory /proc/bus/usb empty means that the USB virtual file system is not mounted. Inside the directory there should be several files with names like 001, 002 according to the number of controllers and a devices file that “knows” about all devices:
$ cat /proc/bus/usb/devices
T: Bus=02 Lev=00 Prnt=00 Port=00 Cnt=00 Dev#= 1 Spd=480 MxCh=10
B: Alloc= 0/800 us (0%), #Int= 0, #Iso= 0
D: Ver= 2.00 Cls=09(hub) Sub=00 Prot=01 MxPS=64 #Cfgs= 1
S: Manufacturer=Linux 2.6.20-15-generic ehci_hcd
S: Product=EHCI Host Controller
S: SerialNumber=0000:00:02.1
E: Ad=81(I) Atr=03(Int.) MxPS= 4 Ivl=256ms
T: Bus=01 Lev=00 Prnt=00 Port=00 Cnt=00 Dev#= 1 Spd=12 MxCh=10
B: Alloc= 0/900 us (0%), #Int= 0, #Iso= 0
D: Ver= 1.10 Cls=09(hub) Sub=00 Prot=00 MxPS=64 #Cfgs= 1
P: Vendor=0000 ProdID=0000 Rev= 2.06
S: Manufacturer=Linux 2.6.20-15-generic ohci_hcd
S: Product=OHCI Host Controller
S: SerialNumber=0000:00:02.0
C:* #Ifs= 1 Cfg#= 1 Atr=e0 MxPwr= 0mA
I: If#= 0 Alt= 0 #EPs= 1 Cls=09(hub) Sub=00 Prot=00 Driver=hub
E: Ad=81(I) Atr=03(Int.) MxPS= 2 Ivl=255ms
T: Bus=01 Lev=01 Prnt=01 Port=07 Cnt=01 Dev#= 2 Spd=480 MxCh= 0
D: Ver= 2.00 Cls=00(>ifc) Sub=00 Prot=00 MxPS=64 #Cfgs= 1
P: Vendor=1307 ProdID=0163 Rev= 1.00
S: Manufacturer=????????y
S: Product=USB Mass Storage Device
S: SerialNumber=9fe1ad57805553
C:* #Ifs= 1 Cfg#= 1 Atr=80 MxPwr= 80mA
I: If#= 0 Alt= 0 #EPs= 3 Cls=08(stor.) Sub=06 Prot=50 Driver=usb-storage
E: Ad=01(O) Atr=02(Bulk) MxPS= 512 Ivl=125us
E: Ad=82(I) Atr=02(Bulk) MxPS= 512 Ivl=0ms
E: Ad=83(I) Atr=03(Int.) MxPS= 64 Ivl=16ms
Deciphering the output is easy, look for details in the documentation ( /usr/src//Documentation/usb/proc_usb_info.txt). I will only say that the letter T indicates topology, Bus and Level show which bus the device is connected to and the level, Spd shows the speed, MxCh- how many other devices can be connected to it, driver- driver. For example, Driver=hub indicates that this is a hub, and Driver=usb-storage indicates a USB storage device.
There are several utilities in the KUbuntu repository that will help you deal with USB. So using lsusb you get even more information about USB devices, but if you don't like the console, use usbview.
That's basically all I wanted to say about connecting hot devices to a Linux computer, I hope you won't have any problems with this from today.

As part of an immersion in one of the disciplines (in the process of studying in the specialty of computer security), I worked on one entertaining project that I would not want to just bury in the bowels of the Univer folder on an external hard drive.
This project is called usbrip and is a small console open source utility for Linux forensics, namely for working with the connection history of USB devices. The program is written in pure Python 3 (using some third-party modules) and does not require dependencies other than the Python 3.x interpreter and a couple of lines from requirements.txt, resolvable in one line with pip.
In this post I will describe some of the features of this software and leave a short manual with a link to the download source.
Taken! (... in the sense of Cut!)
Note. The functionality described in the article is relevant for the version of the utility. For the latest version with many new goodies, I suggest going to the repository.
Screenshots
Getting connection history of removable USB devices:
Finding additional information about a USB device by model ID (PID "y):

Description
As is known, Operating Systems GNU/Linux based systems are very sensitive to logging various kinds of events, and connecting/disconnecting USB devices is no exception. Together with one of the points of the UNIX philosophy about "text streams as universal interfaces", information about the artifacts of such events (with varying degrees of detail), depending on the distribution, can be found in one or more of the following text files:- /var/log/kern.log*;
- /var/log/syslog*;
- /var/log/messages*;
- /var/log/dmesg*;
- /var/log/daemon.log*.

For its work, usbrip finds log files that are universal for all Linux builds based on Debian (Ubuntu, Linux Mint, etc.) and RPM (CentOS, Fedora, openSUSE, etc.), namely: /var/log/syslog* or /var/log/messages* , parses them in search of the necessary information and turns the found traces of USB device connections into beautiful signs (or lists - whatever).
usbrip can also:
- create lists of authorized (trusted) devices in the form of JSON files;
- search for "offending events" based on the list of trusted devices: such events (USB connection/disconnection) involving USB devices not marked as trusted;
- search for additional information about a USB device by its VID (Vendor ID) and/or PID (Product ID).
Reference
Get a list of available modules:$ python3 usbrip.py -h
Get a list of available submodules for a specific module:
$ python3 usbrip.py<модуль>-h
Get a list of available options for a specific submodule:
$ python3 usbrip.py<модуль> <подмодуль>-h
Syntax
$ python3 usbrip.py banner Display the utility banner. $ python3 usbrip.py events history [-q] [-t | -l] [-e] [-n NUM OF EVENTS] [-d DATE [DATE...]] [-c COLUMN [COLUMN...]] [-f LOGFILE [LOGFILE...]] View USB connection history . $ python3 usbrip.py events gen_auth<ВЫХОДНОЙ_ФАЙЛ.JSON>[-a TRAIL [TRAIL...]] [-q] [-e] [-n NUMBER OF EVENTS] [-d DATE [DATE...]] [-f LOG_FILE [LOG_FILE...]] Generating a list of authorized ( trusted) USB devices. $ python3 usbrip.py events violations<ВХОДНОЙ_ФАЙЛ.JSON>[-a TRAIL [TRAIL...]] [-q] [-t | -l] [-e] [-n NUM OF EVENTS] [-d DATE [DATE...]] [-c COLUMN [COLUMN...]] [-f LOGFILE [LOGFILE...]] Search for "offending events " based on the list of trusted devices. $ python3 usbrip.py ids search [-q] [--vid VID] [--pid PID] [--offline] Search for additional device information by its VID and/or PID in the ID database. $ python3 usbrip.py ids download [-q] Update (download) the local database of USB device ids.Options
Options supported by submodules "events history", "events gen_auth", "events violations", "ids search", "ids download": -q, --quiet omit banner output, informational (green) messages, and don't ask questions in progress ################################################ ###################################### Options supported by "events history", "events gen_auth" submodules ", "events violations": -e, --external look only for removable USB devices (that have detach information) -n NUMBER OF EVENTS, --number NUMBER OF EVENTS number of recent events to print -d DATE [DATE. ..], --date DATE [DATE...] list of dates by which events will be filtered when searching -f LOG_FILE [LOG_FILE...], --file LOG_FILE [LOG_FILE...] list of log files ( if not specified, event history will be searched for by default log files: /var/log/syslog* or /var/log/messages* depending on OS version) ############# ######### ################################################### ############# Options supported by the "events history", "events violations" submodules: -t, --table generate table output (if the terminal window is not large enough to display the table correctly, the output will be automatically generated as a list; when specifying the -t flag, the output will be generated as a table forcibly) -l, --list generate output as a list -c COLUMN [COLUMN...], --column COLUMN [COLUMN...] list of columns to be used when constructing a table (only effective when generating output in the form of a table); allowed keys: "conn", "user", "vid", "pid", "prod", "manufact", "serial", "port", "disconn". ################################################### ################################### Options supported by "events gen_auth", "events violations" submodules: - a TRAIL [TRAIL...], --attribute TRAIL [TRAIL...] list of attributes to be used when building the list of authorized devices (and also when searching for "violating events" in the case of the "events violations" submodule); allowed keys: "vid", "pid", "prod", "manufact", "serial". ################################################### ################################### Options supported by "ids search", "ids download" submodules: - -vid VID vendor ID or USB device manufacturer ID (typically 4 hex digits) --vid PID product ID or USB device model ID (typically 4 hex digits) --offline if specified, search for additional information about the USB device in the database data of identifiers will be produced without its (base) updateExamples of using
Show the connection history of all USB devices, omitting the banner, informational (green) messages, and not asking questions during execution (-q, --quite), generating the output as a list (-l, --list), including in 100 latest found events (-n NUMBER OF EVENTS, --number NUMBER OF EVENTS):$ python3 usbrip.py events history -ql -n 100
Show connection history of removable USB devices (-e, --external), generating output in the form of a table with fields (columns) "Connected", "VID", "PID", "Disconnected" and "Serial Number" (-c COLUMN [COLUMN...], --column COLUMN [COLUMN...]), filtering the search by dates (-d DATE [DATE...], --date DATE [DATE...]), while taking the information from external log files (-f LOG_FILE [LOG_FILE...], --file LOG_FILE [LOG_FILE...]):
$ python3 usbrip.py events history -et -c conn vid pid disconn serial -d "Dec 9" "Dec 10" -f /var/log/syslog.1 /var/log/syslog.2.gz
Build a connection history table of all USB devices and redirect the output to a file for further analysis. In the event that the output stream is not standard stdout ("|" or ">" for example), the output will not contain special. characters responsible for the color of the font in the terminal, so text file will not be littered with unreadable characters. It should also be noted that usbrip uses some UNICODE constants, so it would be a good idea to immediately convert the encoding of the generated file to UTF-8 for their correct display (for example, using encov), and also use Windows-style newlines for better portability ( for example with awk):
$ python3 usbrip.py history events -t | awk "( sub("$", "\r"); print )" > usbrip.txt && enconv -x UTF8 usbrip.txt
Note: get rid of special characters responsible for the color is also possible if the output has already been sent to stdout. To do this, you need to copy the received data into a new usbrip.txt file and add one more awk instruction:
$ awk "( sub("$", "\r"); gsub("\\x1B\\[*[ -/]*[@-~]", ""); print )" usbrip.txt && enconv -x UTF8 usbrip.txt
Create a list of trusted devices in the form of a JSON file (trusted/auth.json) containing the "VID" and "PID" fields of the first three devices connected on September 26th:
$ python3 usbrip.py events gen_auth trusted/auth.json -a vid pid -n 3 -d "Sep 26"
Find “violating events” among the connection history of removable USB devices based on the list of trusted devices (trusted/auth.json) by the “PID” field and generate the output in the form of a table with the “Connected”, “VID” and “PID” fields:
$ python3 usbrip.py events violations trusted/auth.json -a pid -et -c conn vid pid
Find additional information about a USB device based on its VID and PID:
$ python3 usbrip.py ids search --vid 0781 --pid 5580
Download/Update USB Device ID Database (source):
$ python3 usbrip.py ids download
Links and postscript
You can pick up the utility from Github, all dependencies for launch and correct operation are listed in requirements.txt.Thank you for attention!
P.S. yes, the style of the banner and informational messages is inspired by the project sqlmap (*^.^*)
UPD 06/13/2018. There was an investigation of a real (?) case involving my utility from a person with Codeby (he was in shock, to be honest).
As part of an immersion in one of the disciplines (in the process of studying in the specialty of Compbez), I worked on one entertaining project that I would not want to just bury in the depths of the Univer folder on an external hard drive.
This project is called
usbripand is a small console open source utility for Linux forensics, namely for working with the connection history of USB devices. The program is written in pure Python 3 (using some third-party modules) and does not require dependencies other than the Python 3.x interpreter and a few lines from
requirements.txtResolved in one line with pip3.
In this post I will describe some of the features of this software and leave a short manual with a link to the download source.
$ python3 usbrip.py ids download
Links and postscript
You can pick up the utility from
GithubAll dependencies for launch and correct operation are specified in
requirements.txtThank you for attention!
P.S.yes, the style of the banner and information messages is inspired by the project
sqlmap