Installing official firmware on Acer Liquid Z330. Installing official firmware on Acer Liquid Z330 Official programs from acer android firmware
Detailed step-by-step instructions for firmware Huawei Nexus 6P (Angler) on original firmware with unlocked bootloader in fastboot mode.
Drivers and programs
Attention!
For all further manipulations with the device, an unlocked bootloader is required. To unlock it, this instruction can help.
Installation instructions
- At the command line enter " flash-all.bat” and wait for the firmware installation to complete.
- Put your phone in bootloader mode.
- Use the volume buttons to select an item recovery mode and press the power key to confirm the selection.
- When a small recumbent robot appears with a triangle and the text " no command”, hold down the power button and press the volume up key once, then immediately release them simultaneously. The phone will be loaded into stock recovery.
- Now you should select the item " wipe data/factory reset” and on the next screen - “ Yes -- delete all user data».
- After the data deletion is completed, select "reboot system now".
-
Method 2 (Manual)
On the command line, perform the following steps one by one:
- To clean the system:
- fastboot erase boot
- fastboot erase cache
- fastboot erase recovery
- fastboot erase system
- Now you need to flash the bootloader and reboot:
- fastboot flash bootloader bootloader-angler-*.img
- fastboot reboot-bootloader
- Next, flash the modem and reboot the device again:
- fastboot flash radio radio-angler-*.img
- fastboot reboot-bootloader
- And finally, flash the system in this way (if you remove the -w parameter, then user files will be saved):
- fastboot -w update image-angler-*.zip
- Or unzip the archive image-angler-*.zip and manually flash all system components as follows:
- fastboot flash system system.img
- fastboot flash boot boot.img
- fastboot flash recovery recovery.img
- fastboot flash cache cache.img
- To completely clear user data, enter:
- fastboot erase userdata
- fastboot flash userdata userdata.img
- Wait for the operation to complete and restart the phone manually:
- fastboot reboot
- To clean the system:
Create a folder in the root of the C:\ drive named " Android».
Download the archive with the original firmware image and unpack it into the "Android" folder. You can find the current version on the official website.
Open a command prompt and go to the created Android folder with the command " cd c:\Android\” (commands are written without quotes).
Connect your phone to the computer using a USB cable.
Make sure the computer finds the device via ADB.
To do this, enter " adb devices' to the command line. On the appeared request on the phone for permission to debug by ADB on this computer you need to click " Ok", while selecting the item" Always allow from this computer". If the device is visible, the text " List of devices attached” and a list of all devices (for example, xxxxxxx device). If “offline” is written instead of “device” or the list is empty, then you need to update ADB, check drivers / cord, change USB port/a computer.
Reboot your phone into bootloader mode.
To do this, turn off the device, turn it on by simultaneously holding down the Volume Down key and the Power button, or in command line enter " adb reboot bootloader". If everything is done correctly, the inscription will be displayed on the smartphone screen start and "lying" on the back of the Android with an open lid.
The first time you connect to a computer in Fastboot mode, the system may request drivers. To install them, you must specify the path to the folder with the downloaded drivers. If this does not happen and the device is not detected, you need to go to " Device Manager", expand the drop-down menu" Other devices” and double-click on the item “ unknown device" (or " Android 1.0”) with an exclamation point in a yellow triangle. In the tab " General» press the button « Update Driver", refuse to search the network and specify the path to the folder with the drivers, while activating the item" Including subfolders". You may receive a warning that the publisher could not be verified, but you should still ignore this message and continue with the installation. After a while, the drivers will be installed.
Check the availability of the device in bootloader mode by entering the command " fastboot devices". If the device is connected correctly, then the device ID will be displayed with the word "fastboot" (for example, " xxxxxxx fastboot"). If nothing is displayed or "waiting for devices ...", then you need to update the drivers, change the USB port, or try to do these steps on another computer.
Now you can start installing the firmware in one of two ways. Both methods assume that the phone is in bootloader mode.
Method 1 (Automatic)
At the end of the operation, the device should reboot. The initial startup may take some time, but no more than five minutes. If after this time the device is still "hanging" on the boot, you must perform the so-called. hard reset. For this you need:
This time the device should boot without problems.
First of all, download and install the USB driver.
Then turn on USB debugging. To do this, open the “settings” on the phone, then select “applications”, there “development” and put a tick next to “USB debugging”. Just in case, we do.
Unpack and get the following content:
Run setup.exe and see the following:


Another warning about the need to enable USB debugging, which we have already done. And you should also have 300 megabytes of free space on the flash drive:

Then the update process will start:

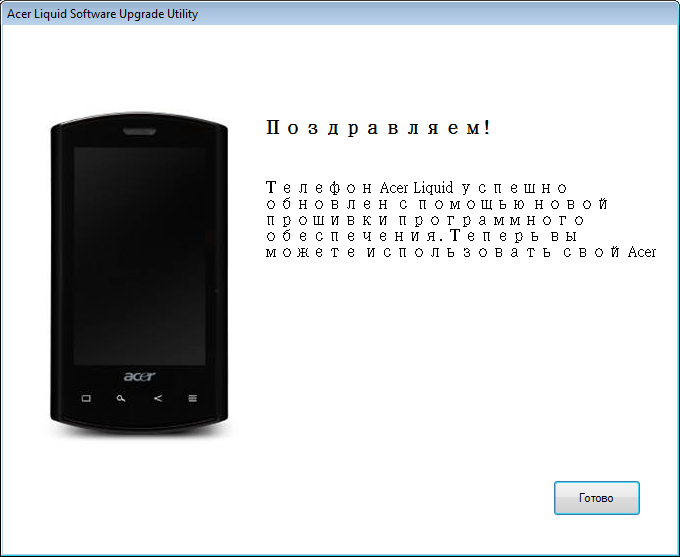
If everything goes well, you will soon see a congratulations screen:
And if it doesn’t work, which is also likely, then the following image will appear:

This, of course, is unpleasant, but not fatal, as practice shows. What follows is a little chaotic travel notes.
- Some symbols ran across the screen and the progress bar at the top, then the splash screen appeared the same as at startup with the inscription acer and android, then the screen went dark.
- An error may appear, then strictly follow the instructions and everything will be fine.
- When the progress bar reached the middle, the splash screen on the device lit up again. Again the error appeared. I didn’t want to restart, the keyboard shortcut helped - sound up+camera+turn on.
- The device vibrated and it became possible to repeat the installation.
- Apparently, at first the firmware is copied to the memory card and, when repeated, it simply appends the files. Then the installation starts.
- Then a picture appeared with a droid and an arrow from the box and a yellow progress bar.
- After I pressed the button ready on the PC screen, the android started.
- Oddly enough, almost all settings have been preserved. Preserved installed programs, on screens with pictograms everything became different.
Now the impressions of the installed firmware.
- In the market, applications have bookmarks - comments and similar ones. It became more convenient. Now there is a possibility of automatic updating.
- The interface has become more convenient to control with the thumb of one hand. Really more convenient. (This was brought in by the branded Acer interface.)
- Now in the settings in the applications section, applications that can work with the SD card have the ability to transfer to the card. A real memory saver, especially because of games.
- A working flash player has appeared, you can download it in the market.
- Pretty unusual, mind you. new phone but maybe it got better.
By the way, Universal Androot refused to give under the new android version 2.2 I had to use Malez Recovery.
After months of use, I can say that I don’t want to go back to the standard android interface :-) What else can I say. I use a pattern lock code that I have to enter after the widget screen, so after some action with the widget, I have to unlock the device, and then the action will work. Not too convenient. It also happens that the order of icons flies after you use the device as a flash drive. There are slight stumbles. But for the most part everything is great!
A series of Liquid communicators from electronics manufacturer Acer is quite popular among users. This is due to the optimal ratio of these devices in the price / quality category. And many are ready to forgive them a number of significant shortcomings. These include the use of outdated Android firmware, rather mediocre performance, and the lack of a multitouch function.
However, much of this list can be fixed by the new Acer firmware. The process of flashing a phone comes with a certain risk, so if you are not experienced enough, think carefully about how much you need it or contact a specialist. Otherwise, it is possible to kill your device for a long time. Therefore, many forums are often full of messages, like: "How to restore gt540 firmware without losing data?"
If your Android firmware still seriously does not suit you, then pay attention to the instructions below for installing the modified firmware for Acer Liquid.
So, for successful work you will need: Acer Liquid drivers , proprietary software for flashing , Fastboot + Malez Recovery 0.5.2 , test firmware for Acer , UPD new firmware(not tested for compatibility with modified ones)
Modified firmwares are provided for your choice, such as:
eVil Eclair 2.2s
Each of them has its own advantages and disadvantages, so you will have to choose for yourself.
Following this, prepare for installation new version firmware for the communicator. You should install the drivers for Acer Liquid on your computer, unpack and install the "firmware", unpack fastboot and the official firmware for the smartphone. Happened? Excellent.
Probably, it is worth reminding once again that we should not forget to "back up" everything that is possible in order to insure ourselves in case some kind of failure occurs during the flashing.
The next step is to install the firmware for Acer Liquid. Run the program for ACER installations Download Tool .exe and connect the phone to the computer. As soon as the program recognizes it, Connected will light up.
In the explorer window we find the previously downloaded firmware (Acer_LiquidE_0.010.00_EMEA_GEN1_68c4fbcaca61613d30009a8e5d7a4c36.bin).

After that, we start the installation process by clicking on the Start button.

Now it remains only to wait for the successful completion of this event. The phone will reboot itself. During installation, different characters will pop up on its screen every now and then - do not be alarmed. After the installation is complete, the phone will start up by itself, and you will be able to see all the delights of Android 2.1.
You can stop there, since most of the required functions will be available already at this stage.
If you wish to receive root permissions for a phone, then do the following:
In the folder where fastboot was unpacked, run reboot.bat;
After the phone boots into recovery mode, run install-windows.bat;
Run reboot-recovery.bat and select "System root menu", then "Root current system (new 1.1)", click on settings and confirm with the Home button;
In the root menu that opens, select "reboot system now".
This way you get root rights on your phone. Use them carefully, remembering that careless handling can lead to failure of your device.
To install modified Android firmware, you need to drop zip file, which contains the new android firmware for your device, to a memory card. Then run reboot-recovery.bat, select "Flash/Test Menu", then "Flash zip from sdcard". Then you should select the firmware, after which the process will start itself.
It is not known when Acer Liquid firmware 2.2 will be released, but many modified firmware based on version 2.1 do a wonderful job.
And in the end, I would like to note that this instruction is suitable for flashing Acer Liquid. If you are interested in modified firmware for LG KM900, then try to find the appropriate section.


