Crimean mountains. The choice and use of personal GPS navigators Oziexplorer is better for windows or android
OziExplorer overview
OziExplorer is one of the most "essential" programs for owners of any GPS navigators... The manufacturer's website is www.oziexplorer.com. Descriptions of this program are present on almost all sites dedicated to GPS navigation. One of the best in terms of describing the principles of working with OziExplorer is deservedly considered the Realbiker website. There you can find a lot of interesting information on a variety of issues - from equipment to ready-made maps and routes.
 However, I will briefly tell you about the main features of this wonderful program.
It is designed to work with raster maps. The very ones that are obtained after scanning and with which such editors as Adobe Photoshop, Corel PhotoPaint, etc. work. Formats - BMP, TIFF, JPG, PNG, GIF, CAP, KAP, OZI. As you can see, the formats of downloadable maps are quite versatile and convenient. Didn't notice the file size limitation. Navigators with which the program can work - Garmin, Lowrance, Eagle, Magellan, MLR, Silva, Brunton, Tripmate, Earthmate and others that support the NMEA data transmission format.
General sequence of work with the program.
We get in some way a raster map of the area of interest to us. We load it into the program in the mode of creating and binding a new map. We set the parameters of the datum of the loaded map. Further, the most important operation is the binding of the map using points that have known coordinates and are geographically located on this map. Save the linked map in MAP format. Now we are actually starting to work with the navigator. The program allows you to perform all the necessary operations with waypoints, tracks and other navigator data - load from the navigator into the program and vice versa, create, edit, save on the computer disk, etc. All data is displayed on the map. However, to work with the program, you just need to understand some very important points concerning many issues of cartography. You can find all the information you need on other sites. Fortunately, a lot of information on this topic has appeared over the past 2-3 years.
You may have a very reasonable question - where to get such a wonderful program. First, of course, on the manufacturer's website - www.oziexplorer.com. However, in this case, you will either have to pay the required amount, or be content with a demo version with which it is practically pointless to work with. However, some irresponsible comrades can try to download a fully functional Russified version. The choice is yours.
Good afternoon friends. In today's article we will have an overview of another good navigator program for the Android operating system. In previous articles, we - "My route" and "Androzik", talked about the possibilities and pros and cons of these programs. Now we will talk about the program, make a brief overview of it, consider the basic settings and talk about the possibilities, advantages and disadvantages of this naviprogi.
Of course, many still prefer to use only a compass in the forest and scornfully treat any navigators, but I think that one should use all the achievements of modern technology. So…
Program installation
Distribution kit
So let's get started. First, you need the OziExplorer distribution kit. At the moment, version 1.28 has already been released. I installed myself version 1.27, but then I returned to 1.20 - it turned out to be more familiar to me. You can buy the official version of the program from the developer and thereby stimulate its development and improvement, or download the distribution kit. Which way you go - choose for yourself.
Installing the program on a smartphone
So, let's say you downloaded the distribution kit to your computer (the file looks something like this: OziExplorer-1.20.apk... Now you need to "upload" this installation file to your phone. We connect the smartphone (tablet) to the computer and copy the file to the memory card. Then you need to open this file. If you have an application manager on your smartphone, find the installation file in the phone's memory and open it, after which the system will start installing. If you do not have an application manager, go to the browser and type in the path to the file in the address bar:
file: /// sdcard /OziExplorer-1.20.apk
The path may also look like this:
- file: /// mnt / sdcard / OziExplorer-1.20.apk
- content: //com.android.htmlfileprovider OziExplorer-1.20.apk

Appearance of the program
Try all the options, some should work. After that, the browser will prompt you to choose an action. We select "Open", after which we install the application on our smartphone or tablet. This is how the OziExplorer icon for Android looks like.

A brief overview of the OziExplorer program
Main window appearance
We go into the program. This is what the main (first) page looks like. A basic map of the world is included with the program. Here we see in the upper left corner on the top panel the name of our map ( world. map), in the upper right corner - scale (100). Below are the buttons " + " and " — »To change the scale. On the left, there are two more buttons - the first is responsible for automatic rotation of the map along the course (course up ON / course up OFF). The second includes a 3D perspective, if the map has such an opportunity.

There is a toolbar at the bottom of the screen. Let's take a look at the purpose of its buttons. We will talk in more detail about the settings in the next article, and now we will find out what each button of this panel is responsible for.
Toolbar buttons:
- The first button (a list with a green arrow pointing up) opens a menu in which we can go to the main menu, select the latest maps or load maps from the program's memory ("Maps" folder), create a waypoint or exit the program.
- The next two buttons (golden right and left arrows) allow us to navigate through the program's settings pages. In total, the program has 9 pages of settings, each of them will display maps with a scale and some additional menu (this can be general information, odometer, information about waypoints, route navigation, compass, elevation and speed profiles and information about satellites ). Below we will talk about each page separately.
- The next button (the same circle with a green plus sign) creates a waypoint. By default, the point is always created under the cursor, and it is automatically assigned a name of the type WP1 (WP2, WP3, etc.). To change the name of a point and its appearance, you need to go to the point settings.
- The next button on the panel (red up arrow) is to enable / disable GPS tracking. When tracking is enabled, your current position will always be in the center of the map, and you will not be able to move the map (to move the map, you must first disable GPS tracking).
- The next two buttons (pictures with golden arrows) make it possible to switch between cards. The next button after them enables the search for more detailed maps (if there are any in the "Maps" folder)
- The last button (a list with a blue letter "T") - enter main panel tools. We will talk about it in detail in the next article. Here we can go to any page, view a list of waypoints, show or hide tracks and waypoints, etc.
Program pages
So, let's now look at the pages of the OziExplorer program. The first page does not show any settings. We pass to the second page "Movement on the map" (the third button is a golden arrow to the right) Here in the lower panel we can find out information about the number of satellites, movement speed, altitude and our coordinates.


We go to the third page ("Odometer"). Here in the bottom panel we see the odometer (a tool for measuring the distance traveled). A useful thing for hiking!

The fourth page is Waypoint Navigation. Here we can see a list of the nearest waypoints, go to the general list of points, see information about the PT (distance and direction to the selected point are shown), etc.

The fifth page is “Route navigation”. Here you can switch between PTs, create a new route, load routes from the list and view information about routes.


Page six - Compass. Page seven - general information (date, time, speed and altitude, free phone / tablet memory, etc.) On page 8 we can see a graph (profile) of heights and speeds. And finally, on the last (ninth) page, we can find out information about satellites.
Well, we briefly reviewed the OziExplorer program for Android. Let's now look at the pros and cons of this program:
Advantages and disadvantages of OziExplorer for Android
Advantages:
- flexible program setting. There are a lot of information pages, you can quickly switch between them and choose the one you need;
- ease of control (there are a minimum of buttons on the main page, but you can always quickly go to the desired settings);
- the ability to quickly create your own maps (how to create maps for Androzik and OziExplorer, I wrote in;
- cards of the same format (ozf2, ozf3) as Androzik's. You can work with two programs and load maps from one source;
- personally, my OziExplorer on my smartphone did not bug or crash, as it was with Androzik (although, most likely, this is due to Androzik's compatibility with some versions of Android);
Flaws:
- there is no possibility of quick editing of waypoints, as in Androzica (there you can simply poke at a point on the map and go to the PT properties editing menu). Here you have to go to the menu, which is not always convenient, especially while driving;
- the program is a little more difficult to install than Androzic (you have to download and install it manually);
- for a beginner, the program may seem complicated at first (because there are a lot of settings), but in fact, everything is learned by typing in one or two evenings;
- Do you want to know how not to get lost in the forest and in an unfamiliar area?
- Do you want to know more about orienteering, cartography and navigation?
Subscribe to our Instagram page! Useful Tips on orientation, use of maps and navigator.
- a navigation program that allows you to use raster maps for navigation purposes. Designed for Windows CE- and PocketPC-compatible devices, such as navigators and PDAs, and belongs to the OziExplorer family of programs.
OziExplorerCE program ( Ozi Explorer CE) shows the location of the GPS receiver on a raster map and provides a range of additional opportunities that make navigation using raster maps visual and convenient.
You can create raster maps yourself - by scanning a paper map and linking it to geographic coordinates, or use ready-made maps in digital format.
The OziExplorerCE program implements the ability to lay your own routes in manual mode - by specifying intermediate points of travel and subsequent guidance by the OziExplorerCE program along the laid route with voice prompts about approaching the next point of travel. Due to the peculiarities of raster map storage formats, it is impossible to implement the function of automatic routing (automatic routing) from point A to point B in raster map navigation programs. If you need to use the automatic routing function, you must use navigation programs for vector (routable) maps.
The car navigator with OziExplorerCE can be used while traveling as an electronic map displaying your current location, facilitating visual orientation and helping to choose the direction of further movement. Also, on OziExplorerCE maps, you can mark points of good fishing, mushroom spots, forest paths, fords, dangerous swamps, the location of the car in the forest, the route through the forest or around a reservoir. The OziExplorerCE program is indispensable for those places where there is no cartographic coverage of roads with navigation programs for vector (routable) maps.
To use all the features of OziExplorerCE, you must have a registered copy of OziExplorerCE and a registered copy of OziExplorer for a personal computer (PC). Unregistered versions of OziExplorerCE and OziExplorer for PC are functional, but have limited capabilities.
What is a map for programs of the OziExplorer family?
A map for OziExplorer is a graphic file with a map image, calibrated (anchored) in such a way that each pixel on the map corresponds to real geographic coordinates.
Thus, the map for OziExplorer is two files:
- graphic file in raster format with a map image (in one of the graphic formats .ozfx3, .ozf2, .ecw, .sid, .rml, .tiff, .jpg, .png, .bmp, etc.);
- .map file - calibration file, contains the following information:
- Link to the graphic file.
- The type of map projection used.
- The coordinate system used.
- Calibration information for the card.
Loading a map into OziExplorer means copying graphic and .map files to the folder with maps for OziExplorer, opening a .map file in OziExplorer (for example, World.map). At the same time, OziExplorer will read from the .map file:
- The name of the graphic file and opens it;
- Map coordinates format;
- Map projection;
- Calibration information and will calculate geographic coordinates corresponding to image pixels.
Requirements for maps for programs of the OziExplorer family:
- You can create maps for OziExplorerCE yourself, download them for free on the Internet, or purchase them in digital format.
- OziExplorerCE understands maps in many different graphic formats. However, when using maps of large size / volume, in order to increase the performance of the program, graphic files in the formats, .jpg, .png, .bmp should be converted to the .ozfx3 format using converter Img2Ozf(the converter is available on the official website of OziExplorer). The .ozfx3 format is specially designed for use in OziExplorer, this format loads an image page by page from hard disk and requires a minimum of RAM.
| Card Format Converter "Img2Ozf" |
|

- The ecw format, like the .ozfx3 format, allows you to load an image into RAM one page at a time, but for OziExplorer this is a third-party format and the program's performance with it is slightly lower than with the .ozfx3 format.
- The .ozf2 format, as well as the .ozfx3 format, was developed specifically for the programs of the OziExplorer family, but at present it is considered obsolete and the OziExplorer developers recommend using only the .ozfx3 format.
OziExplorerCE compatibility with car navigators and other devices
OziExplorerCE navigation software is compatible with the following platforms based on operating system Windows CE:
- Car Navigators (PNA), Handhelds (Handhelds), Personal Navigation Devices (PND) - with operating room Windows system CE versions 4, 5, 6.
- PocketPC-based devices - PC2000, PC2002 (with Windows CE versions 3.0 and higher)
- PocketPC-based devices - (Windows Mobile 2003) PC2003 (with Windows CE versions 4.2 and higher)
- PocketPC Devices - Windows Mobile 5
- PocketPC devices - Windows Mobile 6, 6.5 Classic and Professional. But devices based on Windows Mobile 6 Standard (phones without touchscreen) are not supported.
As part of the above platforms, the following types of processors are supported: ARM (SiRFatlas), MIPS, SH3, SH4, Intel PXA2xx (Xscale). It should be borne in mind that executable files of the same version of OziExplorerCE for different types of processors differ and an executable file incompatible with your type of processor will not start.
Main features of the OziExplorerCE program
- Ability to use maps in a variety of graphic formats: .ozfx3, .ozf2, .ecw, .sid, .rml, .tiff, .jpg, .png, .bmp, etc .;
- OziExplorerCE can use any maps created in OziExplorer for a personal computer (PC)
- Support for various communication protocols with GPS-receivers from different manufacturers
- Automatic map movement according to the movement of the navigator
- Automatic selection and use of the most detailed map for the current position of the navigator, automatic loading of the next map
- Use of several maps with different levels of detail and automatic change of them depending on the scale selected by the user
- Search for all existing maps in the navigator for the position indicated by the cursor
- Mode "Rotation of the map in the direction of travel"
- 3D Perspectives for increased visibility of the map:
- Support different types objects on the map - Waypoints, Routes, Tracks, Comments, Symbols of objects:
- Creation of various Events when approaching a zone of objects, creating the boundaries of Dangerous zones
- Laying and editing a route on the car navigator screen using a stylus
- Automatic guidance along the route laid by the user, using sound prompts: turn left, turn right and others
- Loading and simultaneous display of up to five user tracks (points of the previously traveled path)
 |
- Automatic recording of tracks to a file
- Display on the screen of the auto-navigator of speed (speedometer), direction of movement (compass), distance traveled and time (odometer)
 |
 |
 |
- Sound indication of exceeding the preset speed thresholds: Minimum speed, Set speed, Maximum speed
- Search for objects by name, maintenance of search history:
- Using different "Toolbars" to facilitate operations:
- Designing an interface for OziExplorerCE using the OziExplorerCE Screen Designer software for PC:
- Much, Much More
Where can I download the OziExplorerCE program?
The latest version of the navigation program OziExplorerCE can always be downloaded from the official website of the developers: http://www.oziexplorer.com.
How to install OziExplorerCE on the auto navigator?
You can install the OziExplorerCE navigation program on the autonavigator yourself. For this you need:
1. From the OziExplorer official website (http://www.oziexplorer.com) download the archive with the OziExplorerCE installation package and the executable file corresponding to your processor type.
2. Unpack the archive with OziExplorerCE system files to the root directory in the internal Flash memory or the navigator's memory card into the "OziExplorer" folder (instead of the "OziExplorer" folder name, any other name can be used, you just need to reconfigure the configuration accordingly). All additional files (common files) will be installed in internal subdirectories located in the OziExplorer directory.
3. Copy the executable file for your processor type to the "OziExplorer" folder.
4. Copy the required raster map (in one of the graphic formats .ozfx3, .ozf2, .ecw, .sid, .tiff, .jpg, .png, .bmp + calibration.map-file) to the "Maps" subdirectory in the " OziExplorer "(or any other folder, then set up the paths to graphic files with map images in the OziExplorerCE program settings).
5. Buy a license key and register the program to remove all limitations of the demo mode.
6. If necessary, russify the program.
7. Launch the OziExplorerCE program and configure it by specifying the paths to the graphic files in the "Image File Path (s)" and "Map File Path (s) & Data File Path" sections.
Other program settings are optional.
How to register OziExplorerCE and remove demo mode restrictions?
To remove the restrictions of the OziExplorerCE program, you need to enter a license key (registration). Buy OziExplorerCE license key It is possible both in our online store (for rubles, without the need to issue an international plastic card), and directly from the program developers (you need an international plastic card and registration in the electronic payment system PayPal).
After entering the license key into the program, all restrictions of the demo mode will be removed and you can use OziExplorerCE without any restrictions.
OziExplorerCE program interface
The OziExplorerCE program is controlled using the "Menu Bar" located at the bottom of the screen:
OziExplorerCE is based on multipage concept... In the standard version of OziExplorerCE, the program developers have designed 17 pages. Each page is a "blank canvas" on which different objects are placed: Map, Menu, toolbars, Indicators of various "sensors" (geographic coordinates, date, time, speed, altitude). The appearance of each Page can be created or changed to your liking using the OziCE Screen Designer program - you can add additional indicators of “sensors” to each page or remove unnecessary indicators, change the location of objects. You can also add or remove entire pages.
The pages are accessed using the Page Select menu:
Pavel Borovsky
[email protected]
December 2006
Techniques for working with OziExplorer
Introduction
Currently, more and more of our fellow citizens choose travel as a vacation pastime - hiking, horseback riding, cycling, automobile and across our vast expanses of water. Being a car travel and sailing enthusiast myself, and at the same time having quite a lot of experience using electronic navigation aids, I decided to write this article. The time for this work was not chosen by chance. The fact is that as I communicate with people like me, I have to meet with the ignorance of travel enthusiasts with the available technologies associated with the use of GPS receivers, and often I have to explain the basics to my colleagues. A decent soreness is full, I will report to you. And so I decided to do it "in the right way" - having written such a manual once, I save myself from having to repeat the same thing to different people from time to time. So let's start in order.
Technology Brief
First, let's define the terminology right away. There will be a little of it, but I will allow myself to focus on it. This will save us from further confusion.
Global Positioning System. This system is based on the presence of a constellation of satellites, each of which has clearly defined coordinates at any given time. Much has been written about this system on the Internet with varying degrees of detail. Currently, there are two systems - the American NAVSTAR and the Russian. Due to the fact that at the time of this writing, the Russian system is not yet sufficiently accessible to civilian consumers, we will dwell on the American NAVSTAR in the future, and it is precisely this system that we will call the term GPS for brevity.
This is a device that allows, using a constellation of satellites, to determine the location of an observer with an accuracy sufficient for most amateur navigation tasks. Now on the market there are many professional and amateur GPS receivers with different capabilities, but they all have one thing in common - the ability to determine the coordinates of the location of the receiver.
Classes of GPS receivers
I would like to highlight three main classes of GPS receivers. I divide them not so much by cost, but by the opportunities provided. I assure you that the receivers in each of the classes I have identified can differ in cost at times, therefore, from my point of view, it makes no sense to classify by this parameter.
1. Modular receivers. They are characterized by compactness, lack of their own means of displaying information, that is, they cannot be used separately from a computer. They differ in the methods of connecting to a computer - via a USB port, via a CompactFlash slot, via a wireless BlueTooth interface, etc.
Figure 1 Example of a modular GPS receiver with USB output
2. Receivers without the ability to download a map. It was with such receivers that the "era of GPS" began. Can be used as a stand-alone device. They often have an outdated interface for connecting to a computer via a serial (COM) port, which makes it necessary to purchase additional conversion devices, for example, COM-USB, in the absence of a COM port in the computer. They have several important functions that facilitate autonomous navigation - the ability to store waypoints and routes in the receiver's memory, the ability to go back along the traversed route, and some other functions
|
|
|
|
Figure 2 Garmin GPS Receiver 12 |
Figure 3 Screen layout (example of Garmin 12 receiver) |

3. Progress does not stand still, and here is the third class of receivers - with the ability to load a map into the receiver's memory. These receivers include serious stationary systems called chartplotters. Such receivers themselves represent a full-fledged navigation complex that does not require additional hardware and software. These receivers have the same functions as described in paragraph 2, plus the ability to work with vector maps loaded in a certain way into the device's memory. Such receivers, as a rule, are more expensive than those described in clause 2, and, in addition, the market for cards for them, especially in Russia, is not yet sufficiently developed to ensure their full use, although progress is evident. This class of devices also includes cell phones equipped with a GPS receiver.
Figure 4 Magellan SporTrak Color GPS Receiver
4. GPS-receiver paired with a PDA. The main difference from class 3 devices is the ability to independently select software that will be responsible for processing signals from a GPS receiver.

Figure 5 PDA with built-in GPS receiver
So, having a GPS receiver provides us with determining our coordinates in terms of latitude-longitude-altitude. But knowledge of coordinates alone will give little to the user. Our main task is to overlay the coordinates received from the receiver onto the map. By the way, pay attention - in our case, the task differs from the classical problem of orientation on the ground. In the classical problem, we are faced with the need to determine our coordinates on the map using the available landmarks, and in the case of using GPS, we know our coordinates a priori, and this greatly simplifies the solution of the problem.
There is nothing difficult in plotting a point on a map with coordinates obtained from a GPS receiver, it is enough to have a paper map, basic knowledge of cartography and a set of necessary tools - a compass, a ruler and a pencil. But any task, formalized with sufficient accuracy, can be automated. Automation requires some hardware and software. In particular, in class 3 GPS receivers, according to our classification, the entire complex, as we have already said, is built into a single device. In addition to the navigation complex itself, electronic maps are required.
Types of electronic cards
Traditionally, electronic maps are of two main types - raster and vector, let us consider each of the types in more detail:
JPG, GIF, etc.maps (from the word raster - a discrete image presented as a matrix of dots on the screen; important characteristic raster - resolution - the number of dots per unit length). Such cards represent a common image, like a photograph taken from a digital camera. Typically, such maps are obtained by scanning a paper map and then referencing a certain coordinate system on the Earth's surface. The main features of such maps are exact correspondence to the original map (if you do not take into account the scanning error) and low manufacturing costs. The disadvantages include the relatively large volumes of the graphic file of the high-resolution card, and the inevitable loss of the quality of the image when it is enlarged when working with the card. Such cards can be made independently at home, it is enough to have an original card and a scanner connected to a computer. Raster maps are saved as a regular graphic format file -
Maps do not consist of points, but of objects - a river, forest, road, settlement, road sign and much more. Objects are described by their characteristics, such as size, location on the ground, and others. Vector maps, unlike raster maps, do not have resolution characteristics. This means that the map is scaled without loss of image quality. The main problem of such cards is the complexity of manufacturing, hence their high cost. You will hardly be able to make such a map on your own - this is the work of entire teams. One of the advantages of vector maps is the ability to update the collection of maps online, for example, via the Internet. But at the same time, the probability of human error in the manufacture of such a map is much higher than in the manufacture of raster maps. The main difference between vector maps and raster maps is that during navigation, the system can understand where you are at the moment - whether on the water, on the road, how many feet under your keel, etc., and can signal the helmsman about reaching, for example, threshold depth. This is the main and indisputable advantage of vector maps.
For each of the types of electronic cards there is a corresponding software, capable of combining the signal received from the GPS receiver with a map, displaying your current location, and allowing you to solve the basic tasks of orientation - laying a route, controlling deviation from a given route, calculating the estimated arrival time to the final point of the route and much more.
I would like to tell in this article about the navigation system that I have been using over the past several years. The complex is built using a Garmin 12XL GPS receiver, a Fujitsu Stylistic 3400 tablet computer and software OziExplorer. Below are the main reasons for choosing this kind of hardware and software:
- Garmin 12 XL - receiver without the ability to download maps (receiver of the 2nd class according to our classification). It can handle 500 waypoints and 20 routes at the same time, each route can contain up to 30 waypoints. In addition, at the time of choosing a GPS receiver, it was the most affordable GPS receiver with the ability to connect an external antenna, which was a critical condition for me. The receiver is extremely unpretentious in terms of external power supply, and operates normally at the voltage of the on-board network in the range of 6..36V. At the time of purchase, the cost of the receiver was about $ 150 plus an external antenna of $ 35. I abandoned the idea of purchasing a modular receiver, since the possibility of its autonomous use is lost, for example, for walking excursions. The purchase of a chartplotter was not considered for two reasons - the high cost of the receiver itself and the absence of a normal market for vector maps of Russia for loading into the receiver;
- The Fujitsu Stylistic 3400 Tablet PC is an ordinary laptop, but with the ability to disable the keyboard. Has a touch screen for stylus control. The choice fell on him, since similar devices at auction ebay was quite a lot, and the brand of the manufacturer is well known. Together with the delivery from the USA, the computer cost me about $ 500. The main advantages of such a device are its versatility (this is a regular computer with the MS operating system Windows 2000, which can be used to solve a wide range of tasks, including specialized ones, for example, pairing with new devices, such as a meteorological complex, log, echo sounder, etc.), the resolution and screen size are larger than even modern PDAs (800x600 pixels, 10-inch screen). The characteristics are as follows: Intel Pentium III 400 MHz, RAM - 192Mb, HDD - 5Gb. I abandoned the idea of using a regular laptop due to its bulkiness, although it sounds a little strange. In addition to the operating system, the MS package is installed Office, Internet browser, mail client, and, in fact, with a set of maps.
- is the de facto standard software for working with raster maps. According to the manufacturer (www), more than 500,000 people have already downloaded trial version this program.
This navigation complex has been used by me for several years, it has survived several trips in different water areas without any problems, as well as a number of road trips in Russia and abroad.
Such a navigation complex, of course, is not ideal, it is given as an example, as one of the possible options. My navigation system also has disadvantages. For example, I do not like a lot of wires, and the brightness of the computer screen seems insufficient, which manifests itself in bright sunlight, etc. But everything is in your hands - there is always room for improvement in our imperfect world.
Let's better dwell on the details of use. I will list its main functions:
- Recognizes a number of the most common graphic file formats (BMP, JPG, TIF, PNG) plus several specialized map formats (MrSID, ECW);
- Provides the ability to import maps from such navigation systems as Digital Raster Graphic (DRG), BSB, NOS / GEO, Kompass, Maptech (PCX, RML, Terrain Navigator, AER), QuoVadis;
- Interacts with GPS-receivers that support the exchange via the NMEA protocol (this number includes the majority of currently produced receivers);
- Supports most of the common projections, including the Mercator projection (as a rule, this projection is used in the production of nautical charts), Transverse Mercator (often used to represent topographic maps, in particular, maps of the General Staff of the Russian Federation use this projection), and many others;
- Supports most of the common coordinate systems (more than a hundred), including those used in the preparation of domestic maps "Pulkovo 1942", and the most common GPS receivers, the WGS 84 system;
- Allows you to calculate the magnetic declination anywhere in the world. Magnetic declination can be manually set by the user for each map, or can be obtained from a GPS receiver, or calculated directly by OziExplorer based on built-in algorithms;
- Able to exchange information about points, routes and the distance traveled with receivers of several dozen models, including many common receivers of the 2nd and 3rd classes. Data exchange can be done in both directions;
- In real time, it displays the location of the GPS receiver, its current speed, direction of movement (true and compass courses), altitude. Speeds and distances can be displayed at the user's choice in various units of measure - km / h, knots, miles per hour for speed; kilometers, miles, nautical miles for distances;
- Allows you to take measurements on the map, replacing navigator's tools such as a ruler and compasses;
- Records and displays the distance traveled, which allows you to subsequently analyze the parameters - speed, direction of movement - at different stages of the route traveled;
- Allows you to supply maps with additional information in the form of comments and photographs;
- Allows you to use the means of searching for geographic objects by name;
- Provides ample opportunities for printing the selected map with various scale options, with printing of selected types of objects (points, routes, comments, etc.);
- In the latest versions, a number of functions for joint work with the program have been developed. Google and Google Earth, and the exchange of waypoints and tracks between the two programs;Earth- it is possible to view the current location simultaneously in OziExplorer
- Provides the ability to create three-dimensional maps based on elevation data and navigate through them using the separate software OziExplorer3D;
- Allows you to control the onboard autopilot of the vessel;
- And many other useful functions, some of which I use all the time, and others I use as entertainment - for example, three-dimensional maps and the function of integration with Google Earth;
- Finally, there is a whole family of programs, both from the OziExplorer developer himself, and from third-party manufacturers, designed to implement additional functionality, often not directly related to solving navigation problems..
Working with OziExplorer
Let's consider the typical actions of the navigator when working with.
Pre-laying
- Launching OziExplorer. The main window of the program will open with an empty area of the map (unless it is indicated that it is required to automatically load the last used map or the option to automatically load the Project is not specified);
- The map is loaded in one of the ways at the user's choice:
· Loading manually from the menu "File - Load from File - Load Map" (File - Load from File - Load Map File)
· Automatic loading of the map after starting a session with GPS receiver. In this case, the program itself will select the most detailed map.
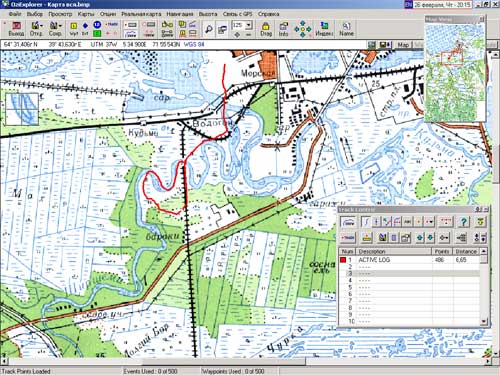
In our case, if we are talking about preliminary plotting of a course at home, it is most convenient to use the second method of choosing a map - using an index map. The index map window is invoked by pressing Index buttons(Index) on the standard toolbar.
- Once the map is open, you can begin to plot a route. The route consists of waypoints, lined up in the order you want. First, let's place the waypoints. Usually these are places of turns or prominent places on the route:

To add waypoints, I usually use button "Create"(Position & Set Waypoint on Map) on the standard toolbar. When creating waypoints, keep in mind that all GPS receivers capable of working with waypoints have limitations on their number. If this limit is exceeded, you may lose some points when uploading them to the GPS receiver. OziExplorer itself can work with 10,000 points at the same time. Another annoying limitation GPS receivers - in point name length. For example, Garmin 12 allows point names to be up to 6 characters long. OziExplorer removes this limitation, but if it is necessary to load points into With a GPS receiver, you should remember that out of two points of the same name, the receiver will be able to store only one. For example, if you have mapped two waypoints named STOYANKA NA OSTROVE and STOYANKA POD GOROI, then one of the points will not be loaded into GPS receiver, although in OziExplorer both will display correctly. I have not yet found a reliable way to combat this unpleasant phenomenon, so I have to control the process of loading points into GPS-receiver by the number of sent and received points - if less received than sent, then there are points of the same name.
In this example, I would rename one of the points, using the number “0” (zero) instead of the letter “O” or replacing the letter “S” with the number “5” in the first word. By the way, you can create waypoints not only by marking each of them on the map, but, if necessary, you can use the possibility of creating one point relative to any previously created one. This feature can come in handy when the description of the future route sounds like "get out of point A and go a course of 337 degrees 5 miles." You can then use the Calculate New Waypoint or Trackpoint tool (Project new Waypoint) from the "Options" menu of the same name 
Here you can select any available waypoint or the last point of the traveled path, and specify the bearing (true or magnetic) and the distance from it to the new point.


It is not necessary to add all the points you just entered to a particular route. There is no relationship between the number of points on the map and the number of points in the route - each point can be included in the route plan any number of times, or not at all.
The route can be renamed and provided with a short description by calling the route properties edit window double click on the selected route or by clicking the "Properties" button:

GPS receiver - not all receivers can display Cyrillic fonts correctly.
As with points, there are restrictions for routes. can work with 100 simultaneously loaded routes, each route can consist of a maximum of 300 points. GPS receivers have similar limitations, and for supported OziExplorer devices knows and controls these limitations;
Be careful when using Cyrillic in the names of objects, if you plan to load objects in
Route navigation
- Run and download the map. Usually, during navigation, I use the automatic map selection function, in which case OziExplorer selects the most detailed map available;
- Load previously saved waypoints and routes from a file. To do this, select the menu items, respectively File - Load from file - Load waypoints from file (File - Load from File - Load Waypoints from File) or File - Load from file - Load routes from file (File - Load from File - Load Routes from File)
- Make sure your The GRP receiver is configured to communicate with OziExplorer using the protocol. Garmin 12XL is configured in the same way as described above, but in the list of available protocols, select the NMEA / NMEA protocol
- We start receiving data from the GPS receiver. To do this, I usually use the (Start / Stop NMEA Communication) button, which for convenience I previously brought to the user toolbar. Alternatively, use the Moving Map - Start NMEA Communication with GPS menu item.
- Usually I use two very convenient panels "Moving Map Control" and "Navigation Control", which are called from the items of the same name in the menu "Moving Map Control" and "Navigation »(Navigation) respectively. I call these panels with pre-configured buttons and:

The first panel contains information about the current parameters of movement - speed and direction of movement (true and magnetic headings), altitude. This data is supplied by the GPS receiver. The second panel is used to work with points and routes. With its help, you can start moving along the route. To do this, you need to click on the "Route navigation" button (Navigate Along a Route). After clicking it, in the window that appears with available routes, you need to select the desired one and click "Select" (Set)
Then the Navigation Control panel will display the name of the first waypoint on the route, the distance to it, the estimated arrival time and the estimated travel time, as well as the deviation from the specified route and the true heading to the point. As you approach a point, the system beeps and selects the next point on the route as the next point. Please note - after the route was selected and activated, the program displayed the distances and courses on each of the route sections;
- In some cases, it is convenient to use the regional map screen (Moving Map - Show Regional Map Window menu). Usually, a large-scale map such as a general map of the water area or area is chosen as a regional map.

- For quick measurements of distances and bearings, I often use a tool that does not use a ruler and compasses.
Press the buttons:
- a line will be displayed between the place of the last mouse click on the map and its current position;
- a window will be displayed showing the length of this line and its angle.
Select the menu item "Navigation in real time - Attach Cursor Line to Position", this will provide a distance and course measurement relative to your current location
- It is also convenient to use the function of displaying the distance traveled. You can display the path on the screen using the button on the toolbar. If your computer does not have sufficient computational resources and, when navigating in real time, starts to "slow down" when redrawing the map, try reducing the length of the displayed path. To do this, on the "Real-time navigation control" panel in the "TT" field, set a value other than 0, then the displayed length of your covered path will be reduced in accordance with the specified value of the number of displayed points. In this case, the information itself about the path traveled is not lost, the restriction applies only to the display of this path.
- As you move, the program automatically shifts the map so that the pointer of your location remains on the screen. This feature can be turned off when you need to view a different area of the map or download a map of a different area. To disable the function, release the button on the Real-Time Navigation Control panel. Now you will be able to plot a new route or solve other problems without hindrance, and the program will not try to "take away" your map while you are working with it;
- selects the most, from his point of view, suitable card from the available ones. The criterion for choosing a map is simple - the program calculates how many units of length (meters, yards, ...) are contained in one pixel of each map, and selects the one for which this indicator is less. This will be the most detailed map. On the one hand, this is true, but it may happen that in the coastal strip the program will download a more detailed, but inappropriate at that time topographic map. To avoid this, it is enough to prohibit the program from searching for more detailed maps (button) or force it to search for more detailed maps only in the same directory as the currently loaded map (button). Both of these buttons are also found in the Live Navigation Controls panel. Agree, a convenient panel!
- When you approach the border of the map and cross it, the system will automatically load the next map, also the most suitable from its point of view. The method for choosing a card in this case is the same as described above.
- For a more detailed view of the map, you may need to temporarily hide all objects displayed on the map. To do this, I usually use the context menu, to call which you need to right-click on the area with the map and select the menu item "Hide - All Map Objects". Another way is to simply drag the map with the mouse, then all objects are automatically hidden from the screen for a while while you drag the map.
- Sometimes it is convenient to use the feature of displaying concentric rings around the current location marker to quickly estimate the scale of distances. To display the rings, call the menu item "Moving Map - Range Rings Setup", after which the dialog box for configuring such rings will open. In addition to rings, you may need to display the bearings around the cursor. This function is activated in the system settings window "File - Configuration" on the tab "Navigation" with the button "Compass".

- When approaching the danger closer than the specified distance, the system will automatically open the file specified in the Proximity / Route Attachment parameter and display the picture specified in the Proximity / Route Symbol parameter:

In my case, a picture in the form of a "brick" road sign was displayed on the screen, and music began to play. The hazard zone is indicated by a shaded area around the new waypoint. This waypoint may not belong to the current route - the behavior of the system will not change from such belonging. - The traversed path can be automatically saved to a file on disk. This feature guarantees the safety of information even if your computer for some reason turns off. To save the traversed path, select the menu item "Navigation in real time - Log-file" (Moving Map - Log Track to File). The file name for saving the information can be specified in the same place, in the "Change Track Log File" menu (Change Track Log File). Please note that if you travel for a long enough time, this file may "swell" to such a size that further work with it becomes uncomfortable. Therefore, we recommend that you change the name of this file at least once a week. Then the traversed path will consist of several fragments, which, if desired, can subsequently be glued into one file.
- If the situation developed in such a way that your computer was still turned off (for example, I happened on long crossings, when the capacity of the on-board battery was not enough for the entire transition and there was no way to recharge it), depending on your model With the GPS receiver, you can restore the distance traveled from the receiver's memory by downloading it to your computer after turning on the latter. Of course, for this, the GPS receiver must be turned on all the time while the computer is turned off.
"Debriefing"
Here we will look at homework techniques at the end of the route. Debriefing is convenient when, for example, you need to clarify at what time your ship was at a particular point on the route, or to analyze the speed at different stages of the route.
- Open the desired map and load the file containing the route traveled. Loading the traversed path is made from the menu "File - Load from File - Load track from file (Multi)" (File - Load from File - Load Track from File (Multi))
- Open the "Tracks Management" window by selecting the "View - Tracks - Track Control" menu item. In the window you will see a list of all loaded tracks. In this window, you can:

Here I would like to end the overview of the main functions, since, in my opinion, this is quite enough for solving everyday navigation tasks. In addition, it offers a simple enough to learn and understandable interface to focus on all the provided functions.
The supplied help file is quite comprehensive and detailed, but the user should have basic knowledge of English, although there are several Russian-language translations of the help file on the Internet. But it is difficult for me to judge their quality, since I use the original reference. In this review, we have not touched on the topics related to the production and use of 3D maps at all, but, as I mentioned earlier, I perceive them more as entertainment, and not as a serious tool suitable for navigation. Also, no attention has been paid to the issues of self-production of electronic maps, but I would like to highlight this topic in a separate article, since the subject itself requires a different, more academic, presentation style, and does not fit well into the concept of this article, which is designed to give general ideas about the use ...
Original article
Additionally by.