We prohibit the installation of drivers from windows update. Disable automatic driver installation in Windows. Delete the device and delete it from the system memory
After fully installing Windows and connecting your computer to the Internet, you are faced with a new problem - where to get the driver. The OS has a function that automatically downloads and installs drivers for all connected devices. There are times when this action gets in the way and you need to disable it. In this article I will tell you how to remove this feature in Windows.
How to disable automatic installation of Windows XP drivers
Let's start with the very old version OS Windows XP. First you need to disable the system update. Right-click on the "My Computer" shortcut and select "Properties" in the window that appears. Next, click on the "Automatic Updates" tab and disable it.
In order to install the drivers yourself, you need to do the following steps. Go to the "Hardware" tab and select "Device Manager".

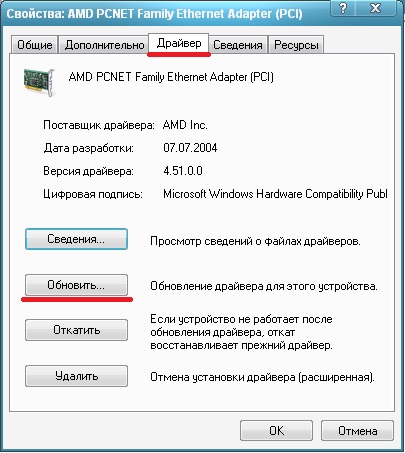
This manager lists all PC hardware. I decide on the desired device, right-click, open "Properties" and go to the "Driver" tab. In this tab, click "Update".

Once in the "Update Wizard" menu, click on the "Browse" button and look for the place where the software is located and install the required driver.

How to disable automatic installation of Windows 7 drivers
When working in Windows 7, you need to configure the "Add New Hardware Wizard". We press the "Start" button, which is located on the desktop. In the open menu, point to the "Computer" tab by clicking the right mouse button, a window appears, select the "Properties" item


The transition to the properties of the system is carried out. In this menu, click the "Hardware" tab, and then "Device installation parameters".

A window appears that provides two options, I chose the "No" option. With this option, a menu appears where you need to confirm the refusal to install drivers from the Update Center.

To take effect of all actions, we reboot the system.
How to disable automatic installation of Windows 8 drivers
If the computer is equipped with Windows 8, in this case, you need to right-click on the Windows icon at the bottom left on the Windows icon and select the System item.

In the window that appears, click on the Additional system parameters.


In the device settings, check the box next to No, provide a choice and Never install drivers from Windows Update.

You can also disable automatic driver installation by disabling Windows updates. To do this, go to the "Control Panel". In the window, select the "System and Security" tab, and then click on the "Windows Update" item. All you need to do is select an item that is not recommended to be selected and uncheck the boxes that are just below. Then I click "OK" and, as always, I reboot.
By disabling the automatic installation function, this provides the ability to use drivers from the manufacturers' official websites. These sites contain licensed software that is ideal for connected PC devices.
It's very common for Windows 10 to install driver updates for your computer's hardware components even when you don't need to. However, you can always prevent the installation of Windows updates or block or hide individual updates using the Show or hide updates utility. Pro or Enterprise users can also use Group Policy Editor to prevent device-specific drivers from being installed.

Note that configuring Group Policy on a per-device basis allows you to block both automatic and manual driver updates. Therefore, if you want to update the driver yourself, you will have to disable the corresponding policy, update the device, and then reinstall the Group Policy.
In order to block the installation of drivers for a device, you need to perform two main steps. First, we will use the hardware ID to look up. We will then work with the Local Group Policy Editor to define an update blocking rule that matches the device ID. Before starting the setup, make sure that the stable version of the driver is installed on the computer and the device is working correctly.
1. Find the device ID
- The first step is to find the identifier of the device whose driver updates you want to block. To do this, we will use the Device Manager. Enter the Start menu in the search bar or use the "Device Manager" item of the context menu of the Start button (invoked by the right mouse button).

- In Device Manager, find the device that you want to block driver updates for. Right click on it and select Properties.

- Go to the tab Intelligence.
- In the drop-down list, select the option Equipment ID to display device-related identifiers.

- Now all that remains is to copy the identifier values so that you have access to them when configuring Group Policy rules. The most in a simple way will copy the ID to a text file. Select all values while holding down the Shift key and use the familiar Ctrl + C and Ctrl + V shortcuts to copy and paste, respectively. Remember to save your changes to text file to have access to this information in the future.

2. Block the installation and update of device drivers
Now that we know the device IDs, you can use the Group Policy Editor to make changes. We remind you once again that this method works only in Windows Pro and Enterprise versions. Group Policy Home Editor is not available on Windows.
Is a powerful tool that, if used improperly, can disrupt the performance of a system. So use with caution. If your computer is part of a corporate network, then it is likely that it is running domain rules that have a higher priority than local rules.
- Sign in account Device Administrator and open the Group Policy Editor by typing gpedit.msc v search string Start menu and pressing Enter.

- In the editor window, follow the path Computer Configuration> Administrative Templates> System> Device Installation>... Select the entry on the right and double-click on it.

- In the policy settings window, select the option Included and then press the button Show.
- In the window Content output in the Values column, enter the device IDs. Only one identifier is allowed at a time, so copy each ID one by one from a text file and paste it into the "Values" column. When you have finished entering the identifiers, click OK. If you are blocking updates for multiple devices, you can add hardware IDs for all devices to this window.

- Then on the policy settings page, click Apply and OK to save your changes. The only way to test if the rule is working is to try to update the driver manually, or wait while Windows Update tries to install available updates. An error message will appear when trying to update.
Since the device is registered with the system, Windows Update can download driver updates for it. However, the updates will not be installed, instead an error message will appear in the Update Center window
If at some point you change your mind and want to update the device again, go to the group policy editor and disable the policy. This will need to be done even if you manually install driver updates.
When the policy is disabled, all identifiers are removed. If you re-enable it, you will need to re-enter all the ID values. Therefore, if you need to install updates only for a specific device, you can exclude its identifier and leave the policy active. Also, don't forget to save all IDs to a text file.
Of course, this is not the easiest solution, but using the Group Policy Editor makes Windows 10 updates more flexible than turning them off altogether.
Note: Alternatively, you can use ABC-Update, a powerful tool for managing Windows updates.
Perhaps not everyone knows that Windows 10 by default after a clean installation downloads drivers for your hardware in automatic mode. On the one hand, this is very good for those who are not very versed in computers and do not know how to properly install the drivers themselves, but for more experienced users this function will be completely unnecessary. Since the download takes place in the background and the user does not see which driver is being loaded. Well, or you already have the necessary drivers that you prepared in advance, then you also will not need Windows 10 to download something itself.
Therefore, in this article I will tell you how to disable the automatic installation of drivers in Windows 10. We will analyze the most convenient methods, and you will choose the best one for yourself. As always, I will show all the methods using the example of the latest build of Windows 10. Well, as always, I recommend updating to the latest stable build of Windows 10.
Method 1. How to disable automatic installation of Windows 10 drivers
This means that Windows 10 will not automatically download manufacturer apps and custom icons available for your devices. This method is simple and fast. But I also recommend using another one with it from the following methods.
Method 2. How to cancel the automatic installation of drivers using the Group Policy Editor

Method 3. How to disable automatic installation of drivers using Registry Editor

If there is no such section or parameter, then just create it. Well, of course, to get everything back, just change the value back to 1, which should be the default.
Method 4. How to disable driver installation in Windows 10 using a utility from Microsoft
Since many Windows users 10 thought about it ever since the transition to a new operating system, then Microsoft released the Show or Hide Updates utility. This is essentially the troubleshooter we are used to seeing in Windows. It looks for all the drivers with which you may have problems and allows you to disable the driver update, you can also disable it one at a time.
You can download it on the Microsoft website at the link.

In this article, we looked at ways to disable the automatic installation of drivers in Windows 10. I myself, in principle, think this innovation is interesting. Since in most variants Windows 10 downloads good drivers, but if you have problems with the drivers, then this article will be interesting for you. Don't forget to subscribe to updates and share the article on social networks.
In all latest versions operating systems from Microsoft, by default, automatic installation of drivers is enabled for most used hardware devices, be it a chipset, SATA controller, sound or video card. But not everyone knows that identifying, searching and updating system libraries of hardware devices can lead to unstable operation of the OS, to the appearance of frequent crashes, disruption of stand-by and sleep mode, BSOD screens, and other troubles fraught with inconvenience and unreliability of work in system. In today's article, we will tell you how to disable automatic installation. Windows drivers 10 so that your interaction with the latest OS from the Bill Gates company is pleasant and not uncomfortable.
How do I disable Windows 10 driver updates using an exclusive system developer utility?
To protect the user from possible difficulties in updating and installing drivers, Microsoft has released a special software tool that allows users to give a detailed and comprehensive answer to the question: "How to disable automatic installation of Windows 10 drivers." By choosing hardware devices from the list suggested by the utility, you thereby block the automatic update of system libraries, which will warn you against the unplanned appearance of new software modules and DLL files in the system, and this, in turn, can directly affect performance. The utility function implies disabling only those drivers, the appearance of which can cause problems in the operation of the equipment. The actions of this application will not touch safe libraries, so you do not have to worry about the operations performed by stable and reliable drivers, whose behavior will not lead to a crash and fall of the operating system. You can download the presented software tool here by this link.
How does the described utility work? When you install a new hardware device, the system immediately loads the appropriate driver in the background from the online library or from the distribution disk. If you start to feel problems when working in an operating environment, then you know that the appearance of this particular device is the cause of all the troubles. In this case, using the utility proposed by the author, you disable the automatic driver update function for it as when updating software device, and during the subsequent installation of updates to the system.
After launching the utility, the shell will offer us to make a choice from the list of those devices, the preinstallation of libraries for which should be blocked. However, first, you will need to perform initialization and search for drivers in the OS. To carry out this action, press the "Next" button on the initial form of the application.
When the initialization is completed, click the “Hide updates” button to go to the list of devices, in case of updating the DLL libraries for which difficulties and unpleasant moments may occur in the system.

Let's make the choice we need from the list, and then click on the "Next" control.

In fact, we do not choose the drivers, but the updates, the installation of which you intend to block. But, as you yourself know, the list of updates also includes drivers from hardware devices that are offered for installation. Therefore, by choosing updates from the catalog, you will thereby prevent their installation into the system, ensuring yourself uninterrupted and efficient operation for a fairly long time.
How to disable automatic installation of Windows 10 drivers using gpedit and editing the registry?
In the current part of the article, we will tell you how to block the installation of DLLs for a discrete hardware device by hardware ID.
Before our description begins, we need to determine what is the identifier of the device for which the blocking of the driver update is scheduled. To determine the ID number, go to the device manager by right-clicking on the start button, select one of the devices, the installation of drivers for which you intend to block, and get into its list of properties, again holding down the right key of the manipulator on one of the devices in the list.

In the properties form, go to the Information tab and open the Equipment ID category. Let's copy the ID-number of the desired device to the clipboard and save it there. To do this, hold down the right button of the manipulator on each of the corresponding parameters and click on the "Copy" option in the pop-up menu that appears.

Let's save all the ID numbers in an external text file by inserting them there one by one from the buffer. In the case when you want to enter the parameters with your own hands, you can also do this. To do this, do not close this window, otherwise we no longer need it.
Now let's use the services of editing group local policies. To call it, we will apply the combination “Win + R”, after which we will set the parameter “gpedit.msc” in the appeared field. In the left subform, open the Computer configuration -> Administrative templates -> System -> Device installation -> Restrictions on device installation folder. Among the many sections presented, we will give preference to the option “Block installation of devices with the following device codes”.

By pressing one of the radio switches, set the parameter "Enabled", and then click on the "Show" control.

In the window that appears, set the ID numbers obtained in the device manager and previously saved in a discrete TXT file, after which we will apply the changes made by clicking the "OK" button.

After following the instructions given earlier, the installation of new drivers for the selected device will be permanently blocked both in manual mode and automatically until you undo the changes made in editing group locale policies.

If your edition operating system does not contain the snap-in described above, a similar operation, how to disable the automatic installation of Windows 10 drivers, can be performed with the participation of editing the registry. First of all, we have to transfer the ID numbers of the corresponding devices from the manager in exactly the same way as we did earlier.
Next, open the registry edit using the "Win + R" combination and enter the "regedit" value in the mini-form that appears, as a result of which the required snap-in will open. In the window that appears, open the directory “HKEY_LOCAL_MACHINE \ SOFTWARE \ Policies \ Microsoft \ Windows \ DeviceInstall \ Restrictions \ DenyDeviceIDs” (if the directory given in the previous line is missing, generate it yourself in the left part of the working window).
After that, it is worth recreating the string DWORD values, the names of which will be ordinal numbers with an increment of 1, starting from one, and the values will be those ID numbers that we managed to extract from the properties in the device manager.

How to disable Windows 10 driver installation using system options?
A very convenient way to block the preinstallation and update of system libraries of PC hardware devices is to use the configuration settings for the installation of Windows 10 devices. To access these parameters, you can use two methods (each of them assumes that you have administrator access level):
1. hold down the right mouse button on the start, select the "System" option. On the form that opens, click the "Change settings" control in the "Work-group configuration and computer / domain name" category.


2. the second method: by right-clicking on the start and selecting the item "Control Panel" in the menu, and then the subsection "Devices and Printers", right-click on the manipulator on your PC in the list of devices. Next, in the drop-down menu, give preference to the option "Device installation options".

After completing one of these iterations, only one question will appear on the screen: "Download manufacturer programs and custom icons that are relevant for your devices?" Choose the answer "No" and save the performed operations. After performing this action, the receipt of new DLLs from the Win 10 update center will be discontinued.
In this article, we have described 4 methods on how to disable the automatic installation of Windows 10 drivers. We hope that you will have at least one of them in time and will help to preserve the integrity of the operating environment and the graphical shell.
The article describes an example of how to prevent the installation of a device in Device Manager Windows times and forever.
Sometimes a situation occurs when, after installing drivers in a hurry, a device is registered in Windows that does not allow the system to work normally. And sometimes just start up. It is firmly "stuck" in the Manager Windows devices, and even after uninstalling with each subsequent boot, the system continues to install it. The user either has to roll back through the system restore (if he managed to create a point), or each time delete the device in the Manager. And the driver is known, and you see the device, but it seems that nothing can be done. And Windows is completely new ... But every time the system boots up, it is accompanied by an annoying window:
If you know the situation, read how to prevent device installation in Windows Device Manager.
The work will be carried out in several stages. To be sure. The next 4 points work for Windows Vista / 7/8, the last one for Windows XP (and here's a lot of hard work). Don't forget about system recovery!
Delete the device and delete it from the system memory
We now have to clean up a little Windows memory... We will delete the corresponding device .inf a file that is located in the root directory of Windows % windir% \ inf... In a Windows search engine, you can type. There she is:

and here are the device files
Almost every such file has a file of the same name with the extension .pnf... He'll get it too ... Then we'll tweak the Windows Group Policy settings. Finally, let's remove the annoying warning. But first we have to make sure that:
- this device does not depend on other devices and is not connected in any way with them; and to be sure of this, remember that ...
- removal of the "extra" sound or video card is sometimes accompanied by the removal of ALL, and then installation of only the cards you need
- if you delete unnecessary Bluetooth, disconnect first WiFi map
- the operation is best done in Safe Mode
How to prevent device installation in Windows Vista / 7/8/10: remove it from Device Manager
- To find desired file unnecessary device, we need to isolate it in the Windows Device Manager. We go there using WIN + R, the command devmgmt.msc.
- Double click on it with the mouse, calling its properties.
- For example, I have a “left” speaker registered in the system, which constantly conflicts with the working driver Realtek... Sound may drop out right in the middle of a Windows session. Now I can cope with it (you, of course, have your problem devices):

I selected the tab Intelligence... And in the drop-down window Property find INF name... Here it is:

- I decided on a name in the Windows directory. We go there, look for the required files - there are two of them, and delete:

- now Disable and Delete device in tab Driver
Prevent Windows from installing devices: everything you need is already worth it
Enough, really. The system is installed, now it's up to the native drivers. Those downloaded from the Update Center like to come into conflict with native drivers. So let's go to the Group Policy Editor. WIN + R command gpedit.msc... We need a path:
Computer Configuration - Administrative Templates - System
Here we are interested in two settings: Driver Installation and Device Installation. I will limit myself to setting the second one, find the following items and turn them on in the properties:

click to enlarge

click to enlarge
Remove the software installation message
Windows will continue to search and find the device. And every time she will report that. This means that in the lower Taskbar at the bottom right, in the notification area, click on the up arrow and select Disable and Delete its in the tab Driver Tune:

It's easy to find the corresponding settings there and disable them:
How to remove a device from the list of Device Manager, I have not yet come up with (damn function Plug and play). It will hang there in the form of an unidentified device with a yellow icon, but it will no longer interfere with the operation of another device.
How to prevent the installation of a device or driver in Windows XP?
It's a little different with this version. And, of course, more difficult. The INF name item is not included in Device Information, and Group Policy items and settings are not as rich as in future versions. And the cherished items that are now directly responsible for installing devices and drivers are not yet available. So the method to remove and prevent permanent installation of the device and driver in Windows versions XP looks like this:
- we go into the system in Safe Mode
- move on Computer – Properties- tab Equipment- choose Never use Windows Update ...

- in line Execute we type the command to launch the Device Configuration utility msconfig and in the autorun tab, we will remove all services that are associated with starting the conflicting device (when I removed the video driver, I found two of them)
- go to the Device Manager, double-click on the unnecessary device
- in the properties and go to the tab Driver... Find the button Intelligence…

- the last window displays all information related to the device and its drivers. The latter are the ones that end in sys, and sometimes on exe... And now you have to remember them somehow and then delete them. Manually. And you have to search in folders Windows, Windows \ system32 and Windows \ system32 \ Drivers- so good luck ... But that later, but now ...
- back to Device Properties and go to the tab Intelligence... There you need to hook two parameters in the drop-down list of information: Instance code and Service:

just remember before the &

- we stop the service in the list of running services in the Computer Management console, but the device instance code is useful for finding a device in the folder inf Windows: this is the most dreary process that awaits you (from itself - the built-in search engine copes with this extremely badly, I advise you to download it from the outside) - enter this same code from the field by the file name and make it look for it in the files:
- and only now, in the Device Manager, we select the now unnecessary device, Disable it and Delete it:

- do not forget to force Windows not to climb for updates (although what updates are there - this is the old XP ...) and set to prohibit the installation of the device through the update node: