Installing Windows 10 to partition the disk. Programs for working with hard disk partitions. Partitioning hard drives using standard Windows tools
Operating room Windows system 10 lets you create partitions hard disk using standard utilities or through third-party programs. This separation allows data, games, and other files to be kept separate from the system. As a result, you will be able to reinstall the OS without deleting all data stored on the second partition. Let's see how to create a D drive on Windows 10 in different ways.
If a hard drive with sufficient memory is installed in the computer, you can divide it into several local drives and use it at your discretion.
Remember that to install OS Windows 10, you must leave at least 30GB of free space. Based on this rule, divide the space on the PC hard drive.
So, Microsoft offers users the following methods for dividing the hard drive into partitions:
- using a standard utility;
- on the command line;
- when installing operating system on PC;
- through third-party programs.
If you have not yet started installing the OS on a laptop or computer, then you have the opportunity to divide the disk into partitions before starting to work with the system. Let's analyze each of the methods separately.
Separation on installation
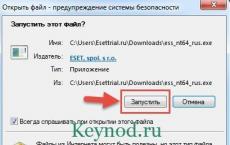
After you have downloaded the installation menu from a USB flash drive with an ISO image, you need to do the following:
- Click on the second button in the window.
- You will see a display of all connected hard drives. The list contains all created volumes. They can be merged, restored, formatted, divided or distributed as you like. Click on the "Create" button.
- Specify the desired size and click on the "Apply" button. It is important that the volume of the partition does not exceed the amount of unallocated disk space.
- Next, the installation application prompts you to allocate space for the backup area. If you have unallocated space, you can create another volume with the entire remaining space.
This is how disk D is created when the operating system is installed.
This option will not work for everyone, as it can only be used once. Also, it does not have a visual display of volume in the form of bars or graphs.
Now we will consider all the methods that are relevant for dividing the hard drive from under the interface of the OS itself.
Standard utility available for Windows 10 Pro (x32-bit / x64-bit). You can open it in the following ways:
- Right-click on the "Start" icon on the taskbar and find the "Disk Management" item in the menu.
- Start the Run application and enter the command "diskmgmt.msc". To run with administrator rights, use the combination Ctrl + Shift + Enter.
This method is very simple and will not take you much time:
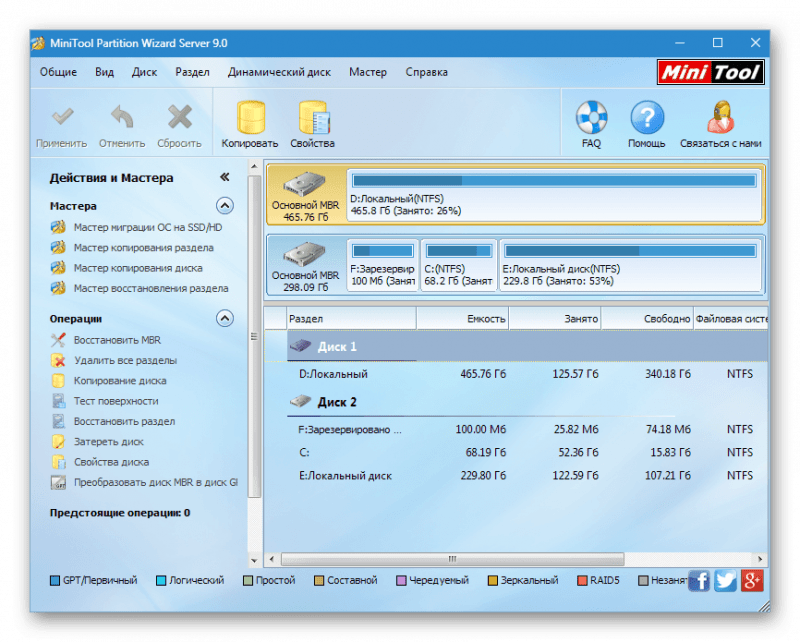
- In the main window of the program, you will see a list of all volumes (1) and all connected drives (2).
- If you do not have enough space to create the D partition, then you can delete the unnecessary network drive... Make sure it doesn't contain information that is important to you. Click on the RMB section and select "Delete volume".
- You can also reduce the volume. To do this, right-click on the disk with the OS and select "Shrink volume".
- Specify the size in MB and click on "Compress".
- The specified amount will be added to the unallocated space. It is this that can be added to the future section. Right-click the unallocated space and select Create Simple Volume.
- On the first screen of the wizard, simply click Next.
- Specify the desired size of the future volume D.
- Select the desired drive letter and click Next. You can also leave the section unchecked by selecting the checked item.
- Now make basic settings: select file system, cluster size and name.
To start the procedure, click on the "Finish" button.
In this way, you can join or split multiple volumes using the Disk Management utility. Let's take a look at some of the useful features of this application.
Additional features
Using a standard utility from Microsoft, you can also rename an existing volume to drive D:
- Right-click on the required section and select the marked line from the menu.
- In the window select the "Change ..." button.
- Select a letter from the list and click OK.
To change the drive letter you need to restart your computer.
The utility also allows you to format individual logical volumes:
- Right-click on the desired volume and select "Format".
- Specify a new label, file system and cluster size, then select the type of formatting and start the procedure with the "OK" button.
- After that, you will see a completely free section. It can be divided into new volumes, connected to another partition, etc.
Creating a virtual volume:
- Click on the top Action bar and select the checked item.
- Specify the location of the future virtual hard drive. It is in the specified folder that you can find it and enable it. Next, enter the size and format. A description is attached to each format.
- Finally, click on "OK".
Command line
The operating system from Microsoft allows you to perform most of the procedures without using a graphical interface. In order to mark up a new section via the command line, you must follow the instructions provided:
- Open a command prompt through the Run application. Enter the command "cmd" and run the program as administrator using the Ctrl + Shift + Enter keys.
- Now enter the commands "diskpart", "list volume", "select volume N" (the letter N is the number of the volume from which the partition D will be created). Press Enter after entering each command.
- Next, type in “shrink desired = size in megabytes”.
- Now we enter the command "select disk M" (partition number). Then you must sequentially apply the commands "create partition primary", "format fs = ntfs quik", "assign letter = D", "exit".
The command line can also be used to merge or restore partitions. However, this will require other commands.
Third party software
Let's take a look at one of the popular utilities that allow you to partition, reset and merge partitions - Aomei Partition Assistant Standard. It can be downloaded and installed from the official website of the developers.
After installation, the application will open through a shortcut on the desktop. In the main window, you will see an interface that closely resembles Disk Management:
To create a new partition D, follow these steps:
- Create an unallocated area first if you don't have one. To do this, click on the unnecessary volume and select "Delete section".

Conclusion
Using the methods described, you can create a separate volume for playing games or storing movies. Thus, you will separate the system partition and be able to reinstall the OS without losing personal files during formatting.
Video
Check out the video that clearly demonstrates all the steps described in the instructions from the article. If you have any difficulties, you can ask for help in the comments.
Splitting or manipulating hard disk Is a very important task, especially for those who have just installed or reinstalled Windows 10. And this can really be a problem for ordinary inexperienced PC users. Here we will introduce you two ways to help you quickly partition your hard drive in Windows 10 ().
One solution is to try the disk management tool that Microsoft offers. The second is to use it on purpose software to manage partitions. Of course, we are only interested in free versions of similar solutions.
Solution 1. Partition the hard drive using standard Windows 10 tools
Solution 2: Partition Windows 10 hard drive for free using third-party software
- If the stock utility in Windows 10 may seem daunting to you, professional partition management software is what you need. We will consider this operation using the example of EaseUS Partition Master Free, which allows you to easily solve all the problems of partition management.
- Download EaseUS Partition Master Free from the official website and launch it on your computer. Select an unallocated area on your hard drive in Windows 10 and right-click it by choosing New Partition. If you need to perform another operation, select the corresponding button in the section control menu. Select Apply. That's it, now your partitions will be successfully created. After you complete the above steps, you can use these sections to manage data and store files.
Video: How to Partition or Partition Windows 10 Hard Drive
Often the standard tools offered by the system are not enough to work with the hard drive. Therefore, you have to resort to more efficient solutions that allow you to get detailed information about the HDD and its partitions. The solutions discussed in this article will help you become familiar with the operations applied to the drive and its volumes.
Thanks to its toolkit, AOMEI Partition Assistant is one of the best programs of a kind. Wide functionality will allow you to efficiently configure hard disk volumes. In addition, the program makes it possible to check a specific section for errors. One of the interesting features is the transfer of the OS with all the installed software to another hard drive or SSD.

Writing an image file to a USB device is also supported. The interface is endowed with a nice graphical shell. Despite the large number of useful functions, the program is available for free use, which makes it even more popular. At the same time, it is possible to download the Russian-language version.
MiniTool Partition Wizard
This software has powerful functionality that allows you to combine, split, copy sections, and a number of other functions. MiniTool Partition Wizard is completely free and available for non-commercial use only. The program provides the ability to change the disk label, and when creating a partition - the size of the cluster.
The surface test operation detects unhealthy sectors on the HDD. The ability to convert is limited to only two formats: FAT and NTFS. All tools for working with disk volumes are arranged in a very convenient way, so even an inexperienced user will not get confused.
EaseUS Partition Master
A program that opens up many possibilities when working with a hard drive. Among the main ones: disk cloning and OS import from HDD to SSD, or vice versa. Partition Master allows you to copy an entire partition - this function is suitable for the need to create a backup copy of one partition to another.

The program has a convenient interface in which all operations are in the left block - this allows you to quickly find the desired function. The peculiarity of EaseUS Partition Master is that it can be used to hide a specific volume by deleting a letter on it. Making a bootable OS is another interesting and useful tool.
Eassos PartitionGuru
The convenience of working with Eassos PartitionGuru is achieved primarily due to its simple design. All tools are located on the top panel. A distinctive feature is the ability to build a virtual RAID array. To do this, the user only needs to connect drives to the PC, from which the program itself will construct the RAID.

The existing sector editor allows you to search for the desired sectors, and hexadecimal values are displayed in the right block of the panel. Unfortunately, the software comes in an English-language trial version.
Macrorit Disk Partition Expert
Nice interface displays functionality, which is divided into sections. The program allows you to scan your PC for bad sectors, and you can configure the scanned disk space. Conversion of NTFS and FAT formats is available.

Macrorit Disk Partition Expert is free to use, but only in the English version. The software is suitable for people who need to quickly configure a hard disk, but for more efficient work, it is recommended to use analogs.
WonderShare Disk Manager
A program for performing various operations with a hard disk, which allows you to recover data with high quality. Compared to other similar software, Macrorit Disk Partition Expert allows you to deep scan partitions for lost information.

You can trim and merge hard disk volumes without losing the files stored on it. Other tools will allow you to hide the partition if necessary or convert the file system.
Acronis Disk Director
Acronis Disk Director is one of the most powerful programs with a set of functions and operations for managing hard disk partitions and more. Thanks to the capabilities of this software from Acronis, users can recover lost or deleted data. Among other things, it is possible to defragment the volume, as well as check it for file system errors.

The use of mirror technology allows you to save backup section selected by the user. Acronis Disk Director offers to use the disk editor, which makes it possible to find the lost cluster, taking into account the fact that the execution environment for this operation displays hexadecimal values. The program can be safely used in order to carry out the most efficient work with the HDD.
Partition Magic
A program that allows you to carry out basic operations with a hard disk. The interface is very similar to the standard Windows Explorer application. At the same time, among the tools located in the graphical shell, it is easy to find the necessary one. Partition Magic's advantage is that it allows you to select multiple active partitions, each with its own separate operating system.

You can also use the services of converting file systems, among them two are supported: NTFS and FAT. You can resize volumes and merge partitions without losing data.
Paragon Partition Manager
Paragon Partition Manager pleases users with an interesting set of functions and purposes of their use. One of them is connecting a virtual disk image. Among them, image files of VirtualBox, VMware and other virtual machines are supported.

Noteworthy is the function that allows you to convert HFS + file system formats to NTFS and vice versa. Other operations are basic for partitions: trimming and expanding. A large number of settings provided by the program will allow you to customize all the functionality to your liking.
Considered software solutions have unique potential, each in its own way. The powerful toolkit of the developed software makes it possible to save disk space and prolong the hard disk's performance. And the function of checking the HDD for errors allows you to prevent critical errors in the operation of the drive.
In this beginner's guide, we'll take a look at how to split (split) and merge hard drive partitions in Windows 10 using the built-in snap-in.
Sometimes you just need to create, delete or modify disk partitions in Windows 10. If you have only one disk and you would not like to keep operating system files and your files on the same disk, creating logical disks will help you. Each of the logical disk partitions can have its own file system and will allow multiple operating systems to boot from one hard disk. In this guide, I will show you how to manage disk partitions in Windows 10 simply using a snap.
For the convenience of the readers, this guide is divided into two parts. The first part will show you how to divide your hard drive into two partitions and assign a drive letter to the newly created volume.
In the second part, we will delete the new volume and consolidate the reclaimed space, returning it back to the original size of the C: drive. So let's get started ...
How to split and merge disk partitions in Windows 10
Part 1 - splitting and creating a new disk partition
In the first half of this tutorial, we will see how to split the existing disk space into two partitions. Let's say you bought new windows 10 pcs and disk size C: is 500 GB. Obviously Windows will already be installed on the disk C:... But there comes a point when you need to move some of your data to some other disk. Or in another case, you want to create a new partition to boot a different operating system. You need to create a new partition by partitioning the disk WITH into two parts. Here's what you need to do:
To open the snap - Click Win + R and in the window line Run and enter. Click on OK or Enter .
In the window, right-click on the partition of the disk you want to partition and select Shrink volume... In my case, this is a disk WITH:

Then in the window that appears in the line Compressible space size (MB) enter the desired size of the disk to be created. I indicated 26000 (MB) (this is about a sixth of the capacity of my hard drive) It will be about 25 GB in size. In other words, you will get this size from an existing partition if there is free space on it, and then click Shrink.

In a few seconds, and you will see the area you freed up under the future disk partition marked "Not allocated", the same space will be taken from the existing disk partition WITH:.
 So the drive WITH: divided into two volumes. Right-click on the unallocated space and in the context menu click Create simple volume, will automatically start


In the window Volume Size Specification you can change the size of the created size by clicking Further.

In the next window, set the letter of the new disk partition and click Further

Now you need to format the disk, there is no need to change the default settings here.

If your plans include installing a new OS on this disk, make sure Apply file and folder compression is not enabled otherwise you will face an error while installing the OS - Windows cannot be installed because this computer uses compressed….

The wizard exits by showing you a summary of the information. Click the button Ready.

The created logical drive will appear in the snap-in window and Windows 10 Explorer, ready to use.
Part 2 - Merging Disk Volumes
You may need to merge disk volumes by returning the disk WITH: previously selected space for disk Z:
Here's how to do it:
1. Open Select the disk partition you want to merge and right-click on it by selecting from the context menu Delete volume... This will remove the drive letter and partition.

Note:This will also delete all data in the disk partition (In my case, from the Z: drive, I previously transferred all the necessary information to another disk).
Click on Yes to confirm the deletion of the volume.

Recently on laptops with installed Windows 10, you can often find a situation where the entire hard drive is represented by only one local drive C. This causes some inconvenience, especially if in the future you have to reinstall the operating system, completely formatting the hard drive. In this article, you will learn how to split a hard drive into 2 parts in Windows 10 without losing data. And we will do it by standard means operating system without installing additional programs.
The process of splitting the system drive C into two local drives
It is worth noting that you can divide the C drive into two drives by an amount equal to the free space on it. For instance. If you have 200 GB free on disk C, and the entire disk has a volume of 465 GB, then after splitting the size of disk C will remain about 265 GB, and the new disk D, which will be obtained by dividing disk C, will be about 200 GB in size.
So let's get started.
First you need to go to " Disk management". To do this, right-click on the "Start" menu and select " Disk management«.
We go into disk management
The second way to get into " Disk management"- through" ", where you need to choose" Administration» -> « Computer management"And on the left in the menu" Disk management«.
Here we find the C drive, right-click on it and select “ Shrink volume ...»

Find and select drive C
A window will open in which you need to select the amount in megabytes that will be cut from drive C to create a new local drive. This amount will be almost equal to the free space on the C drive.

Specify the amount of cut space from drive C
Do not cut off all the available space from the C drive. Leave at least 10 GB of the available space for the C drive, otherwise it will be almost completely full after the partition!
Specify the size and press the button " Shrink«.
After that, an area titled "Not Allocated" will appear in the Disk Management window. Right-click on it and select “ Create Simple Volume ...«.

Selecting the unallocated area
A window with the wizard for creating a simple volume will open. We press the button " Further«.

New Volume Wizard in Windows 10
Then there will be a few more dialog boxes in which nothing needs to be changed. Just press the button " Further«.

We indicate the volume of the new local disk

Ending the process of splitting drive C into two drives without losing data in windows 10

Specify the label of the new local disk

Selecting a drive letter
As a result, you will have a new local disk created after partitioning the C drive. Now you can copy the data from the C drive to the new drive.
In such a simple way, within a few minutes, you can split drive C into two drives without losing data in Windows 10 or the Windows operating system.