How to run a Windows program in an OS X environment on a Mac. Run Windows Programs on Mac with Wine Emulator, Virtual Machines, Boot Camp Commercial Virtualization Software
Mac is beautiful in every way. Usually they fall in love with him at first sight. However, it is worth recognizing that programs on Windows have undeniable advantages: prevalence and universal recognition. It is for this reason that Mac users are periodically (less and less fortunately) forced to contrive and come up with ways to run programs that only go to Windows.
Some services (bank clients and other sites that work with EDS) support only (!sic) Internet Explorer, they may send you a file in some prehistoric format that can only be opened by a Windows program that does not have a Mac version. Be that as it may, such situations arise. And further in the article we will consider all the ways to resolve such situations and summarize in a way that suits almost everyone and always.
1. Virtual machines
Virtual machines allow you to run an entire operating system inside another operating system. On MacOS, three large virtual machines can be distinguished:, and. The latter has already been discussed in a recent article about.

We can say for sure that if you are ready to shell out, then Parallels is the best virtual machine of these three. Especially for beginners. You don't need to configure anything during installation (and you don't even need to download Windows) - the program will do everything itself. Parallels supports the so-called Coherence mode, which runs Windows in a Mac window. Moreover, ordinary Win-applications can be pinned to the dock. And run win-files directly from Finder. In this case, files and applications are highlighted with the Parallels logo.
I must say that I personally use Parallels. I won’t talk about VMware for the reason that while choosing a virtual machine for myself, I realized that “Parallels” in this moment head and shoulders ahead of VMware and there is no particular choice among virtual machines.

The only downside is, of course, the price. The program has only paid versions and the cheapest (home) will cost you (at the time of this writing) 3.990 ₽
At the same time, the same VirtualBox is free. But to install it will have to strain a little. In addition, the result in VB will not look as beautiful as in Parallels, because the latter was made specifically for the Mac, and VB is a cross-platform program. If you are ready to get confused and save money, then about installing Windows 8 in VirtualBox.
If in doubt (and there is not much time), then put a 14-day trial version of "Parallels" and during this time decide whether it is worth the money. If you definitely don’t have money for paid programs, then VirtualBox is the best choice. For VirtualBox, at the same time, look at articles about and, in fact,. Recall that Win10 can now be installed simply and without activation (with a little uncritical limitation of functionality).
| Advantages | Flaws |
|
|
2. Boot Camp
While virtual machines allow you to run Win inside a running macOS, Boot Camp allows you to install Windows directly on the Mac itself. Also known as “dual boot”, Boot Camp allows you to have a Mac and Windows on the same hard drive.
MacOS requires Boot Camp Assistant and this wizard will guide you through the entire installation process. What is the installation itself: an additional (bootable) partition will be created on the hard disk, where Windows will be located and you can then boot the computer from it.
How to install Windows 10 through Boot Camp Assistant
You will need:
- Flash drive or external HDD 8 GB or more (information on them will disappear, so do not use a USB flash drive with your dissertation)
- The Mac must be plugged into an outlet. It will not be very cool if it turns off in the middle of the process
- Need a license for Windows 10
- Connected internet
1. Download Windows ISO
Microsoft on its official website offers Windows ISO files for download for free.
Be sure to read the list of minimum hardware requirements. If your poppy does not match them, then you should not even try. After reviewing the minimum requirements, select the version ( Windows 10) press the button “ Confirm“.
Next, select the language of the product (for example, Russian), press the button “ Confirm“. After that, your system will be checked for compatibility and if successful, you will see download links on the screen.

Choose the version with your processor bit depth (in my case x64) and download the ISO file with Windows.
2. Insert a flash drive
Disconnect all USB devices from the computer during installation. Insert the prepared flash drive or external hard drive.
3. Launch Boot Camp Assistant
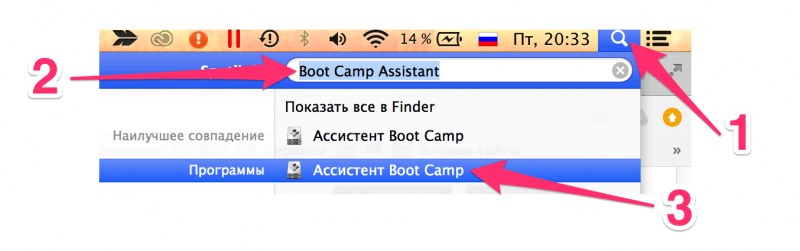
MacOS X has a built-in BCA (Boot Camp Assistant) and it will do everything by itself, so you don't need any third-party utilities. In order to launch BCA, open Spotlight (there is a magnifying glass icon in the upper right corner of the screen, click on it), and there enter Boot Camp Assistant. Choose a program Boot Camp Assistant.
4. Select installation type
Select the first item " Create a Windows 7 installation disc or newer“. Second checkbox ( Download the latest Windows support software from Apple) in theory will be checked by default and it is impossible to turn it off. But the third item can be enabled or disabled by default. Turn off third point ( Install Windows 7 or later). Next click " Proceed“.

5. Burn Windows to a flash drive
Select the Windows ISO file you downloaded in the first step.
Make sure that the prepared USB flash drive is selected as the disk for installation.
Please note that the flash drive will be formatted in the process and all data on it will be lost.
Press " Proceed“. Another window will appear asking if you are sure you want to continue. the flash drive will be formatted and the data will disappear. If you are sure - click again " Proceed“.
If you are doing the operation on a MacBook, do not close the laptop lid. This will put the Mac to sleep and interrupt the write process.
After everything is over, you will see the message “Windows has been saved”. Click " Exit“, unmount and disconnect the flash drive.
Congratulations, you have a windows flash drive for mac.
Run the installer from a flash drive
In order to boot from a USB drive, you need to hold down the Mac boot ALT(a boot menu will appear, where you need to select a USB flash drive). Or when booting a Mac, hold down C, then the computer will immediately boot from the USB flash drive.
After you boot from the flash drive, .
So, sir, it was a small lyrical digression on the topic of installing Windows 10 as a second system on a computer. Now let's get back to where we started: is it worth it and who will suit it.
The main downside to this whole dual boot thing is that you won't be able to run Win and Mac programs side by side. Every time you switch between systems, you need to reboot and select an OS. This has its upsides, of course, and they are more system performance, because Windows can use all the resources of your Mac.
3.Wine
Both solutions above (virtual machines and boot camp) involve installing a full-fledged Windows with all the nuances that follow. Wine is something else. This is a “shim” that allows you to run Win-programs on MacOS and Linux. In this regard, Wine is a much easier solution than Windows installation, especially if you need to use 1-2 popular programs. But as is often the case, compromise options have a whole set of limitations and pitfalls.
That's the problem: Wine does not work with all programs. Some start up and work great, others may give an error while running, and still others won't start at all. To get started, you can check for program compatibility and search there for the applications that you need.
And another problem lies in the fact that this is not quite a “boxed solution” and finishing can cause a form of embarrassment for new users.
The second problem can be slightly simplified. For this, the WineBottler program was created, and we'll talk about it.
choose stable version, download the DMG file.
After opening the DMG file, drag and drop Wine and WineBottler into Applications (just like you do when installing any other software not from the App Store).

Once installed, launch WineBottler and you'll see a list of programs that you can install on the fly, such as Internet Explorer.
In order to run other Windows programs through Wine, download the executable files of these programs (.EXE) and run them as follows: right-click and Open -> Wine. Yes, once again I repeat that not all programs will work through Wine.
Below is a video about WineBottler in broken English, in principle, everything is clear in it and without translation 😉
Wine is good when you need to work with 1-2 programs that are guaranteed to be compatible. If the list of programs is wide and changes regularly, then you should choose another way to work with them.
crossover
CrossOver is a paid solution that is also based on Wine.
The application offers a high-quality interface that allows you to simply enter the name of the required Windows program and it will be found and launched. Since this is commercial software, you can count on the help of a support if something goes wrong with you or you need support for some program that is not on the list.
But compared to the options above, CrossOver is a complete compromise and won't work for most users. Again, if you need to run various programs, it is much easier to do this using a virtual machine. If performance is important to you (for example, in games), then it is better to use Boot Camp. In general, with a price tag of $ 40, this option can be recommended for highly specialized applications.
Remote access
If none of the options above suits you, then why not try to deal with the problem in a different way? If you have another computer that has Windows installed, then you can use remote access to work on it from your Mac.
TeamViewer is a free and powerful remote access tool. About remote access, by the way, was.
All you have to do is choose a communication method, install it on both computers (Win and Mac), log in to your account on both machines, check the “easy login” box on Win. And after that, you can connect to a Windows computer at any time.

Depending on , you may experience some delays and slowdowns in your work. Oh, and also, the lack of cross-support for hotkeys is slightly annoying. You try to switch the language on the Mac in the usual way, but instead of changing the language, all sorts of windows pop up. But on the other hand, if you need relatively fast (and free) access to Windows, then this option may suit you!
| Advantages | Flaws |
|
Above we have explored all possible options ( if not all, then write in the comments, we will supplement the article). The option with the least number of evils for most people is installing Windows in a virtual machine (option #1). The exception is users who need Windows to play games. Using a virtual machine allows you to open Windows programs at the same time as opening Mac applications, all without restarting your computer. And it works much more reliably than Wine. Use Parallels or VirtualBox - it's up to you. If you don't mind paying for a boxed solution, you're not a computer specialist, and you want the best results, choose Parallels. If you are “on a short footing” with a PC, there is time and a desire to get confused + you want to save money - choose VirtualBox. Results:In fact, if virtual machines are the best choice for the average user, then in general, this does not mean that this is the best choice for you and your tasks. So let's go over all the options again: |
Many home computer users, having played plenty of modern games, in search of "thrills" install the so-called alternative operating systems (read, not Windows). Most likely, this is one of the many variations of Linux and it is installed on a separate partition after repartitioning the hard drive.
Pragmatic users prefer to use virtual machines (for example, VMware Workstation) to experiment and work with operating systems, which allow you to safely run several guest operating systems, each in its own virtual machine, without leaving the host OS environment. The advantages of this approach are obvious - this is both security (there is no potentially dangerous operation to repartition the disk into logical partitions, the virtual machine uses large files as disks; any failures of the guest operating system will not affect the host one), and functionality (for example, in Linux there are problems with installing soft-modems, and it is difficult to solve them without access to the Internet, and here a host OS with Internet access comes in handy).
Disadvantages of using CrossOver
We all love our Macs, even people who don't have it crave it! Screen, resolution, unique neat design, functionality; the list of attractive traits could go on and on. Sometimes these applications are so important to launch that we think about switching to another operating system. Difference between virtualization and emulation.
Installing windows applications
There is a fine line between virtualization and emulation. We've selected the top 10 from the lot and hope you find the one that's perfect for your needs. Close all open programs and follow the on-screen instructions to install boot camp. To find out which version is supported by your boot camp, check out this article.
Distinctive features of fully software emulation
Regarding the software requirements of PearPC, that's all, a little about the "iron" appetites of the emulator. Requires a processor with a frequency of at least 1 GHz and 256 MB of RAM. Those who value their own mental health are advised to multiply the above numbers by 2, especially the amount of RAM. A modern, fast hard drive would also come in handy.
All applications are stored, stored and can be accessed from the database. Probably the best thing about this app is that it works even when the user is offline. This is the most complex of the applications among our list. The application is completely free! The app is also constantly evolving, so if something on your system isn't running smoothly, expect it to be resolved soon.
Thirdly, the synchronization between the hardware and operating system is close to perfection. The best emulator for users who are more "network oriented". This is obviously one of the benefits. There are some minor differences between the way each program handles these modes, but they work essentially the same.
After formatting, turn off PearPC, start it again and start a normal installation.
So that during the installation process you don’t have to “juggle” the distribution’s disk images, so that the system has enough space for a 3 GB virtual partition, you should select only the basic components, including disabling printer support, localization, and Asian fonts. Everything you need can be delivered in a relaxed atmosphere already in a working system. In the meantime, it's better to do as shown in the screenshot:
This is the perfect solution if you just need to run one application and don't really want to mess around with everything else. In this case, it may fail or not work at all. Although it is a built-in tool, it must be installed. Close all applications before starting the installation. Follow the instructions on the screen to complete the installation. In fact, it will allow you to access any type of application on any device. Applications are stored in a database and centralized.
When the user needs to use the application, it will be streamed on any type of device. The developers of this app are constantly looking for ways to improve it. Also, if you need help with this program, there are several contributors to help you with your care.
After installing the system, you should get something similar, although this screenshot has already changed an important interface element - desktop wallpaper :) By the way, the emulator switches to full-screen mode using the + combination (in the best traditions of video players).
And finally - a general perspective (again, due to a pathological passion for "screenshotting"). What I wish you - not in the sense of pathology :), but in the sense of a similar result:
Thus, this means that two or more operating systems can be running on your computer. Follow the on-screen instructions to install and you're ready to use them in a few minutes. In this list, you will find the best options available. It is simple and can be easily customized giving you access to a lot of functionality. This virtualization software is suitable for business and home users. With this practical solution, you can access any kind of application on any device.
When moving from Windows to Mac OS, perhaps the most common first thought is how will I live without my favorite Windows programs?
There are a sufficient number of ways to solve this issue, and this cannot but rejoice! Each method is good in its own way and there are both paid methods and free ones. To begin with, it is worth deciding whether you really want to use Win programs under Mac OS? Perhaps now you think that way, but over time, I assure you, windows on the background of Mac OS will seem miserable to you and a search for alternatives will begin in order to move away from Windows systems and forget it like a terrible buggy dream.
It is ideal for new and home users. The reasons for this are manifolds, including mid-range integrated graphics chips and less custom hardware, but it shouldn't be different. Luckily, there is a way to do just that.
So smart, those open-minded people source code. Wine enjoys a large open source community for support, which means it will continue to improve and improve compatibility for a lot of games along the way. Install it just like any other package file.
Well, in the meantime, you don’t have such thoughts yet and the feeling of some uncertainty in the selection of alternatives remains, let's look at one of the good options for running programs for Windows under Mac OS.
Let's take a look at the Windows emulation options and figure out together which of the options the utility solves in the review.
- Boot Camp- installs windows with a second operating system and does not allow the use of two operating systems at the same time. This method is good because Windows uses all the resources of the computer to the maximum, in particular, it makes it possible to play.
Apple BootCamp - Windows OS on a separate hard drive partition
You will also need to be comfortable using command line through the application "Terminal", an Internet connection and a couple of hours to work on all stages. It's not rocket science, but there is a certain level of patience that will be needed. Next page: Your game works!
Having said that nature - means complexity will arise. Wineskin, of course, won't help you avoid everyone. Having said that, it's wonderful when it works. There are a few steps, and depending on the program you want to run, it might not work at all, but it's worth it if you want to combine the speed of a dual boot with the convenience of a virtual machine.
- Installation virtual machines Windows/Linux etc... This method allows you to run Windows in a separate window or organize it as a separate desktop. This method is good because we can use several OS at the same time and even switch to Unity mode, which allows you to open Windows programs like normal Mac OS programs, i.e. you will have on the screen open programs, no windows desktop. This method is very good and suitable for owners of powerful computers. The disadvantages include the impossibility of installing "heavy" 3D games. the emulator does not fully support your video card. Also, the disadvantages of this method include the excessively occupied space by the emulated system and the “guzzling” of a certain percentage of your computer resources (RAM, processor).
Before we begin, you should research the application that interests you. Be careful: if an app is rated "Trash" by most users, you will almost certainly not be able to run it. Ready to see everything and still want to continue?
Step 3: Installing the software
Don't worry, it will all make sense in the end. After that, you can create a new empty shell, which you must name after the program you want to emulate. Run the wrapper you created and you will see the first menu. This is the easiest way to get something working. If your program requires installation, don't panic! When the setup is done, you will need to select executable file, which will run by default. Of course, setting something up doesn't guarantee it will work.
- Installing Windows emulators. This option is the best if you need to constantly run some kind of non-resource-intensive program, which has no alternatives for Mac OS, although today emulators also allow you to run "heavy" 3D games (but I have not tested this). Emulators are good because they create a kind of “bottle” for each program, in which the program itself is located, as well as vital files to run it. This method allows you to significantly save space and resources on your computer.
Can't set up a certain program or game correctly? You will be able to show the contents of the package: do this and you will be able to see advanced options. There are even automatic scripts for certain games and apps to work properly. It is also worth changing the video settings. For example, some full-screen applications will crash if you don't take them to a virtual desktop.
Installing Windows Applications on Mac OS X Using WINE
For me it was actually more stable than the stable release, but your mileage may vary. "You contradict yourself." Have you finished this paragraph? How is Wine different from a virtual machine? So why does anyone use virtual machines at all? Well, first of all, see how long the above tutorial is. Virtual machines are tricky, but they are great at simulating running an application in their native environment - because they are actually running the application in their native environment.
Today we will get acquainted with the third option "Installing emulators in Windows"(later everyone else).
There are options for paid emulators and free ones. Free ones usually require a lot of gestures and discussions on how to use them. In paid ones, it all comes down to simple mouse clicks.
One such emulator is CrossOver ($60) and is still considered the best tool today!
Commercial virtualization software
Note. This is a no-frills option, but the price is attractive. File fragmentation between two operating systems. . Software for virtualization should not cost money. There are many free utilities such as. Great for getting you out of a bind, but performance is poor, especially graphics performance.
- Performance is low.
- The software is not particularly user friendly.
The first huge plus of the program is the support of the Russian language. You will not have any difficulties using the program, and now I will show and tell you everything.
The program does not have outstanding interfaces (outwardly, it reminds me of the good old one), because. you know what its main task is. After installing and running the program in the system menu, we see:
Because of the learning curve, to get the most out of the software.

- Excellent performance.
- Lots of high quality features.
- Money spending.
Installing and configuring PearPC for Windows

Many modern, patched versions of software, such as web browsers, don't even install on it. The downside of a dual boot system also shouldn't be dismissed out of hand: operating systems can only run one at a time.

Let's try to take any sample program, for example the VKMusic program under Windows. Downloading setup file VKMusic_4.45.exe

Next, in the system menu, select "Configure" and "Install software"
Launching an art gallery. Grand Cross: Compatibility. Especially new programs based heavily. In addition, the first setting for many programs is not suitable due to layman's settings. The first option gives you the best performance you can get while the last option is much easier.
So which installation method should you choose? This utility contains a set of drivers for almost every piece of hardware. Since it comes with a set of useful disk management tools, you can be sure that it will quickly become one of the most popular applications on your computer. This means that not all programs will work on both.

This window opens. In the list of supported programs, there are many things. You can bother and pay attention to it. Even if the list does not contain the program that you want to install - you still install it and it will work, but for this it is important to scroll down the list and in the " Unsupported Applications" choose " Other Application"
In this article, we'll take a closer look at each of them, helping you understand when and how to apply them. Virtualization is a technique that allows one system to run inside another.

Important: While this is a great feature, the virtualizer tends to consume a lot of computer memory.
When we talk about an emulator, everything seems perfect, but as we mentioned, there are still many incompatibilities that need to be taken into account during the adoption of the system. Some emulator tips. Unfortunately, there is no guarantee that it will work. To find out which one is best for your needs, we ran tests comparing them to general performance and specific tasks.

Next, go to the "Choose an installer" section.

I think comments here will be redundant. Just specify the path to the installation file of the program, in our case VKMusic_4.45.exe in the Finder.

pay attention to the label exe file, it is in the form of the CrossOver logo. In fact, to install the program, you could immediately click on it and it did an automatic installation, however, my task is to introduce you to the program so that you can navigate it.
Installing Linux on a MacBook
specific types of performance. While they were roughly the same in general usage, there are three specific situations where the biggest differences arise. Both programs support "downloadable" virtual applications of pre-configured operating systems, usually bundled with specific applications. Purchase and license Both have house prices of 180 reais, but in both cases the values are a kind of moving target.
There is a huge hidden cost at these prices: the software license. Installation and general work. Most importantly, when exiting the software, the extensions are disabled. So which virtualization solution should you buy? Therefore, it is recommended that you download a trial version of each and see how they handle your specific needs. At the end of the evaluation period, the system will prompt you to enter a license key. Enter purchased license key when prompted to unlock the "unlimited" full version of the software.

so, you have chosen the installation file. Now you can safely press the "Install" button in the very bottom right corner and CrossOver will create separate bottle and will install it. However! before installation, you have the opportunity to select the axis under which the program runs (xp, win2000, etc.), as well as rename the bottle itself. To do this, go to the section "Select a bottle into which to install"

Here you choose under what OS your program works and enter the name of the bootle.
If you have installed games before and want to store them in one bottle, then select a ready-made bootle with the installed game and program.
What is the best way to create new bootles or store everything in one?
when creating a bootl, as I wrote above, vital system files from Windows are added to it. Of course, a program that takes 12 MB will weigh 300 megabytes, due to the added system files. If you create new bootls, they will waste your HDD disk space, but again, all these are trifles. I prefer not to bother and every time I create new ones, so that later I can delete the excess with peace of mind.
And here is the installation process:

1. A bottle is created

2. The installation of the program starts in the same way as on Windows. I did not recognize the encoding of Russian words, it's okay.

just install it like a normal Windows program. the path in this case is inside the bottle itself, there is no point in changing it.

Ready.
Now we try to run the installed Windows program:

That's all love.
P.S
1. A shortcut to the installed windows program is also added to the "Mission Control" Mac OS and looks like a normal Mac OS application:

2. if you need to manually change the internal files of the program in the bootle, for example, transfer game saves to the program folder or something else, this is done simply:


3. Where does CrossOver store bootlies?


4. Is it possible to install programs that do not have an installation?
Possible!
Hello Khabrovites. Recently, I needed to write in Objective C under Mac OS X. My hardware is not the most suitable for any assemblies, and religion does not allow me to sit completely in this OS. I decided to install Mac OS X on a Qemu virtual machine in Linux.
Here is a list of everything I have used:
-Gentoo Linux 64bit
-Qemu 0.10.5
-KVM (Kernel-based Virtual Machine) 88-r1
-KVM support in the Linux kernel
-Processor supporting Intel Virtualization Technology(in my case it is Core2Duo E6400)
-Linux kernel>=2.6.20
-Assembly Mac OS X iATKOS v7 (Leopard 10.5.7)
Let's move on to setting up, in the kernel you need to add KVM. Download sources, unpack, run make menuconfig:
Processor type and features->Paravirtualized guest support
Note:
-KVM paravirtualized clock
-KVM guest support
-Paravirtualization layer for spinlocks
Further, a new Virtualization option appears in the root of the kernel configuration
We go there and note:
-Kernel-based Virtual Machine (KVM) support
-KVM for Intel processors support
-KVM trace support
-PCI driver for virtio devices
-Virtio balloon driver
We collect, install, and reboot with a new kernel.
Now install Qemu with KVM support, and KVM itself
USE="kvm" emerge qemu
emerge kvm
Now let's move on to shamanism with a virtual machine.
Create a virtual hard disk:
qemu-img create -f raw macos.disk 30G
If we are going to run Qemu not as root, we need to give permission to other users to read / write to the device /dev/kvm:
chmod 0666 /dev/kvm
We launch:
kvm -boot d -hda macos.disk -m 900 -net nic,model=rtl8139 -net tap -usb -no-reboot -no-shutdown -vga std -cpu core2duo -cdrom 10.5.7.iso
-hda the path to our virtual hard disk
-cdrom let to the image
-no-shutdown -no-reboot necessary so that in case of an error, the emulator window “freezes” and you can read the error
-net nic,model=rtl8139 emulate Realtek 8139 network card
-net tap in order for the guest system to see the host system on the network, a TAP device is required
-m 900 the amount of memory given to the guest system
-boot d loading from sitiroma
-usb USB support
-cpu core2duo Core2Duo processor emulation
We load the disk. Partitioning a hard drive with Disk Utility(choose from the menu above).
Driver setup.
Before pressing the button Install pay attention to the button Customize
Things we need to choose:
x86 ACPI
Disabler
OHR
Remove TyMCE
CardBus
USB
Intel SATA/IDE
Kernels
Apple PS/2
Can be installed. We are waiting for about 30 minutes.
Mac OS X installed, set up.
Now in the line to run we change -boot d with -boot c to boot from the hard drive.
We are loading. Now we need to come up with something with the network.
Searching on the Internet PCGenRTL8139Ethernet.kext, install it, it is very easy to install using the kextinstaller program. While there is no network, you can transfer the necessary files to the system via a USB flash drive, for example, add -hdb /dev/sdb(path to flash drive device)
Reboot the guest OS.
Now, in order for the network in Mac OS X to work, you need to go to the network management, select the Ethernet device, turn it off (Off), and then turn it on and configure the desired IP (for example, 192.168.1.1), and configure the tap0 device on the host system:
ifconfig tap0 192.168.1.2
macOS is an advanced yet reliable operating system that many PC users prefer over Windows 10. Unfortunately, installing the Apple platform on a computer from another manufacturer is not so easy. The easiest and most convenient way is to boot a virtual machine.
Requirements for installing macOS on a Windows PC
For Mac installations OS X (10.5 and above) on a Windows PC will need a virtual machine. You can use VMWare, which allows you to run the macOS operating system in a Windows environment. As for the hardware requirements, they are as follows:
- 8 GB of RAM.
- Intel Core i3, i5 or i7 processor.
- 128 GB hard drive.
Apps required to install a Mac on a Windows PC or laptop
You also need to download the macOS image. The password is "xnohat".
How to Install Mac OS X on Windows
Step 1 Install latest version VMWare Workstation.
Step 2. Unpack Unlocker 2.0.8 and run the "win-install.cmd" file as an administrator.
Step 3. After starting, you need to wait until the patch is installed and unlocks the ability to install macOS in VMWare. Open VMWare and create a new virtual machine (automated method). In the window that appears, select "Apple Mac OS X". In the Version list, select Mac OS X 10.7 or any newer version.
Step 4. After clicking the "Next" button, a virtual machine will be created. In order for macOS to work properly, you need to configure Hardware. To do this, select "Edit Virtual Machine Settings".
Step 5. Click the "Add" button, then double-click "Next" and select "Use an Existing Virtual Disk" and click "Next" again. Now select the operating system image you downloaded earlier and click Finish.
Step 6. After completing all the settings, click on the blue start button and follow the instructions on the screen to install OS X.
Windows program, you will have to use third-party software. The most popular solution is the free Wine emulator. It is characterized by high performance, thanks to which programs do not “slow down”. cons Windows emulator for mac OS is that it is not friendly with some applications.
How to use the Wine emulator on macOS?
- In order for the emulator to work on a PC with macOS, you must first download and install the XQuartz utility.
- After installing it, the computer must be restarted.
- Next, download the emulator itself. This can be done on the official website.

- During installation, you will be asked if additional components need to be installed. Agree.

- Wait for the installation to complete. After that, the software can be found in the following directory: /Users/your_account/.wine. It will be hidden, so use the guide on how to find hidden folders.

- For Windows startup you need to enter the command "wine program.exe" or run the installation file hidden folder in the previous paragraph.

Advantages and disadvantages of Wine
Advantages of emulators for Windows:
- No licensed software required.
- This method significantly saves system resources.
- Complicated setup. Before using any software, it must first be configured. This is especially difficult to do with games.
- Compatibility. Some "heavy" applications that take a lot of system resources may not work correctly or not work at all.
Virtual machines
The output is a full-fledged operating system, only it is located on the "virtual" hardware. It turns out that another OS is created inside one, which, when launched, takes part of its RAM.
At the moment, there are several such virtual machines. They are paid and free. For the most part, they are indistinguishable from each other. Unless, in free, the functionality is limited.
How it works:
- Installing an additional OS from removable media or a boot disk image.
- Specifies the number of resources that the secondary OS can use.
- Installing and using applications.
- Switching between systems.
What are virtual machines - top best
- - the most popular paid program. Thanks to it, a hybrid of systems is created. Any applications run immediately, regardless of which system they belong to.
 Photo: Parallels Desktop

Advantages and disadvantages of virtual machines
Positive points:
- Ability to work with two systems at the same time.
- Easy to access files.
Negative:
- Loss of performance due to simultaneous operation of two systems.
- Some applications (usually games) do not work.
What is BootCamp?
This is a program that allows you to install "windows" on your Macbook. The system will take a separate place on the hard drive and will work regardless of the "apple".
For this you will need:
- 50 GB of free space in internal memory.
- Windows boot disk.

Advantages and disadvantages of Boot Camp
- This method is not resource intensive, because only one OS can be used at the same time.
- All applications and games are seamlessly installed and working.
- To switch between OS, you need to restart your computer every time.
- There will be no access to files of different systems.
What to choose: Wine emulator, virtual machines, Boot Camp?
If you cannot decide which method to use, then the following recommendations are for you:
- Boot Camp is needed, first of all, for those who will use games.
- A virtual machine is needed when you need to use two operating systems at the same time.
- The emulator is suitable for simple tasks and infrequent use.
Conclusion
There are no such people who would not deal with the Windows OS. Over time, some "windows" users are moving to an "apple" system. But they still have programs on their “windows” that have no analogues on the Mac, and without which they cannot do without.
There are several solutions for such a problem: running Windows programs in MacOS using the Wine emulator, virtual machines, or Boot Camp. Each has its own characteristics and disadvantages, and only you will determine what suits you best.


