Virtual machines. Overview of virtual machines. Best Virtual Machine UCS Virtual Machine Manager
Sometimes it becomes necessary to simultaneously or alternately use several operating systems on one personal computer. If there is no desire to use dual boot, then you can use the one remaining option - to install a virtual machine for the Linux operating system.
With a sufficient amount of RAM and virtual memory, the required processor power, it is possible to simultaneously run several systems at once and work with them in full mode. However, this requires choosing the right software.
If you decide to use a virtual machine in the operating system, then you first need to find out which one is right for you. Now five of the most popular representatives of this type of software will be considered.
virtual box
This application is a versatile product that can be used for Linux virtualization process. Thanks to it, a number of other operating systems can be supported, which include Windows or even MacOS.


This software is practically no different from VirtualBox, but in some ways it surpasses the last mentioned program. Experts emphasize that their performance is about the same, but VMWare allows:
- create virtual or local networks between machines installed on the computer;
- organize a shared clipboard;
- transfer files.

However, it was not without drawbacks. The fact is that it does not support recording video files.
If desired, this program can be installed in a fully automatic mode, select the required parameters, which is often very convenient.
Qemu
This program is designed for devices based on ARM such as Android, Raspbian, RISC OS. It is very difficult to set up, especially for an inexperienced user. The fact is that work with a virtual machine is performed exclusively in "Terminal" by entering special commands. However, with its help, you can run absolutely any Operating Systems by setting them to HDD or by writing to a special file.
A distinctive feature of the Qemu machine is that it allows you to apply hardware acceleration and install programs online. To install such software on a Linux kernel-based OS, "Terminal" you should run the following command:
sudo apt install qemu qemu-kvm libvirt-bin
Note: after pressing Enter, the system will ask you for the password that you specified when installing the distribution. Please note that when you enter it, no characters will be displayed.
KVM
The name of the program stands for Kernel-based Virtual Machine (virtual machine developed on the basis of the kernel). Thanks to it, you can provide quite high speed work, largely due to the Linux kernel.
It works much faster and more reliably than VirtualBox, but it is much more difficult to configure, and it is not so easy to maintain. But today, for installing virtual machines, this program is the most popular. In many ways, this demand is due to the fact that with its help you can place your own server on the Internet.
Before installing the program, you should determine whether the hardware of the computer is capable of supporting hardware acceleration. To do this, you need to use the utility cpu checker. If everything in this regard is in order, then you can proceed to installing KVM to your computer. For this in "Terminal" enter the following command:
sudo apt-get install emu-kvn libvirt-bin virtinst bridge-utils virt-manager
When the program is installed, the user will have absolute access to creating virtual machines. If desired, you can place other emulators that will be controlled by this application.
XEN
This program is almost completely identical to KVM, but it has some differences. The main point is that the XEN VM needs a kernel rebuild, otherwise it won't function properly.
Another distinctive quality of the program is the ability to work even without hardware acceleration when starting the Linux/Ubuntu operating system.
To install XEN on your computer, you need to execute a series of commands in turn in "Terminal":
apt-get install \
xen-hypervisor-4.1-amd64\
xen-hypervisor-4.1-i386\
xen-utils-4.1\
xenwatch \
xen-tools\
xen-utils-common\
xenstore-utils
It is worth noting that after installation, it is necessary to configure, which for the average user will seem overly complicated.
Conclusion
Virtualization in the Linux operating system has been developing very rapidly lately. New programs appear regularly aimed at this. We regularly monitor them and recommend them to users to solve their problems.
Today I will tell you how to install a virtual machine in the ubuntu operating system. What is it and why? A virtual machine is a software environment that is installed on your operating system and allows you to virtually create a space for working with various operating systems from under yours. In this case, we have the ubuntu operating system installed. By installing a virtual machine on it, we can install several operating systems on the virtual space inside our operating system. Why is this? Lots of options. For example, I didn’t install it under ubuntu right away photoshop. I'm lazy to remove the tambourine from the wall, and I solved the problem by installing Windows XP on a virtual machine, and installing photoshop on the Windows XP. You can also try for informational purposes to work with various operating systems of the linux family. With a virtual machine, there is no need to install an operating system on your hard drive next to your main operating system. Installing a new operating system in a virtual environment and experimenting with this, a virtual machine will help us.
After downloading the environment, complete the four steps of the installation wizard. It's the only thing you need to view your desktop in full screen mode, as well as better support for all hardware in general. As you can see, there is no need to install any external packages or anything at all.
First of all, obviously, we will need to collect the necessary tools for the tutorial. It's important to leave all the default options unless we're quite sure what we're doing. We will specify the machine name and define which operating system we will be installing, as shown in the following figure. In the next step, we will be asked about the hard drive. If we need to install an operating system, that is, no one has gone through our virtual hard disk and we need our computer with hard drive, we will now select the "Create Virtual Hard Disk" option.
Consider an example of using a virtual machine virtual box
Installing the virtual machine virtual box-- open ubuntu app center
In the search bar enter
Virtualbox and install the virtual machine virtual box

At this stage, we are given the format that we want to provide to the virtual hard disk. If you want to use this hard drive in other virtualization software, we will choose the option that suits us best. To complete the creation of the machine, we will give the virtual hard disk a name and an initial size, we can usually leave both default values, but if you need to vary the size of the disk, it is advisable to always set a larger one. It is smaller.
You can find all these architectures in the following links. When you have a file. After running it, you can run the bootloader, which will display the installation options shown on the previous page. Important note. Now we will create a new virtual machine for which we will right-click on the server, in the pop-up menu we will select "New virtual machine".
A launch shortcut will appear in Applications -- Standard -- VirtualBox OSE
Before the first launch, we need to add the user to the group to work with the virtual machine virtual box. For this we go System -- Administration -- Users and Groups We fall into
User Options

The New Virtual Machine Wizard will show you the options. Typical: Create a virtual machine with general device and configuration settings. Custom: Create a virtual machine with additional configuration options. Select "Custom" and click "Next".
Now we will choose the type of virtual hard disk, options. We will indicate the size of the virtual hard drive and type of collateral, parameters. The space required for the virtual disk will be allocated during creation. Thin Provisioning: A small VHD will be created, it will use the minimum space initially required and it will grow to the maximum value specified as needed. Store with VM: This is the normal option, the hard drive will be created in the same folder and datastore as the rest of the VM files. Specify a datastore or datastore cluster: if we want the VHD files to be stored in datastore storage down to the VM level, we can select this option. This hard drive will be reset to zero the first time the VM is written. . Select "Save using a virtual machine" and click "Next".
Click
Group management, go to Group settings

Finding a group vboxusers, go to its properties. Check the box next to our username
Everything, now you can run a virtual machine, install various operating systems on it

The default option "Independent" is not set and we should not check it unless we are clear about its effects. We check the option "Edit virtual machine settings until complete" to change the settings of the virtual machine after it has been created. Click Continue to create the virtual machine.
After creating the virtual machine, the wizard will display the virtual machine settings window. We will indicate the type of installation, possibilities. This option is recommended for novice users or if we have data on a hard drive or other operating system. Something else: the wizard will allow us to select the pagination options manually, this option is recommended for advanced users. We will be sure that we do not have data on the hard drive, because this process will eliminate it, we will click "Install Now".
And enjoy life

If your laptop falls or your screen breaks or cracks in some other way, it's not really a problem. The screen of a laptop, which is correctly called a matrix, is not at all difficult to change by yourself. It is enough to order and buy a matrix for a laptop of your model, and replace the broken one with a new one. In this case, you do not need to carry a laptop for repair and pay money for the work of a third person.
With the text Installation completed. This gives us the advantage of being able to test different systems without having to format our equipment or back up information that took time. We install them with the following commands. We install it with the following command. We have two ways to install the application on our computer. The first is to add the repository to our system and install. This is how we do this step.
Now we are going to download public key and installing it into the system. We have updated the repositories and installed the application. To install this method, we must go to the official page. Now we just open a terminal and install the downloaded package with the following command.
In one of the previous articles, I told. Now let's try to make a virtual machine on which we will install Ubuntu.
First you need to download the Ubuntu installation image. I recommend the LTS (long-term support) Ubuntu 14.04 distribution, which can be downloaded from the official Ubuntu website.
Launch Virtualbox and click the "Create" button:
Finally, the installation is complete, we can find the application in the menu of our system to launch it and start testing the various systems that we find on the net. First, we will briefly outline what it is, besides its advantages and disadvantages, and then the appropriate installation of the application and the creation of a virtual machine. A virtual machine is a computer program that mimics the behavior of a complete computer. That is, it is a program that allows us to have multiple simulated computers on one computer.
You can have several separate operating systems running in parallel. You can use it to do things you wouldn't do on your computer.
- They are easy to create and erase.
- You can turn them on or off at any time, and even pause them.
- The virtual machine receives its resources from the host computer.
- Thus, it slows down the underlying operating system.
Enter the name of the virtual machine, select the Linux type, Ubuntu 32bit version (Of course, you can also use Ubuntu 64bit):
 Specify the allocated amount of RAM. By default, Virtualbox offers 768 megabytes for a virtual machine with Ubuntu, you can allocate more if possible:
The first thing to do is create our first virtual machine. When opening the program, we will see the following window. To do this, click "Create" and we will start interacting with the creation assistant. When we run the wizard, it presents the program and we give "Next".
The first step is to name the machine to distinguish them from others, and from the operating system we are about to install. This last part serves as an application for the minimum operating system requirements for the next steps. But we must take into account the requirements of the operating system.
 The next step is to create a hard drive. Select "Create a new virtual hard disk".
 You can leave "VDI" as the type of virtual hard disk.
 Storage format: Dynamic virtual hard disk
As in the previous section, we must take into account the advantages that our computer has. It is enough for installation, but depending on what we will provide to the virtual machine, we will adjust. If we have already created a virtual hard disk, we will simply specify the path.
But in this tutorial, we will create a disk from scratch. We select "Create a new virtual disk" and clicking "Next" opens another virtual disk creation wizard. Now we need to select the type of virtual hard disk. There are several programs for creating virtual machines, each using a different format, viz.
 Specify the name and size of the virtual disk (10-20 gigabytes is enough for Ubuntu)
 The virtual machine has been created, but we need to configure it a bit, in the Virtualbox window we select the created machine and open its settings.
 In the "Display" settings, you can increase the amount of allocated video memory, and enable 3D acceleration
The next step in creating a virtual disk is choosing how to take up disk space. Dynamic: The hard drive starts to take up as little space as possible, and as the virtual machine needs more space, it will expand until it reaches the limit we want at the next point. Dual boot allows you to determine at boot time which operating system you want to use. Advantages of virtual installation.
The virtual machine will set up its own video configuration so you don't have to worry about installing proprietary graphics drivers to get a reasonable screen resolution.
- The installation size should not be predefined.
- It can be a dynamically modified virtual hard disk.
 Mount the downloaded Ubuntu image
 The sound can be turned off, at your discretion:
 In the simplest case, one network adapter is enough for us, the connection type is "NAT" (then the virtual machine will not be "visible" to other devices on the network) or "Network Bridge" (the virtual machine works as a full member of the network that can be accessed from any device online). If you selected "Network Bridge", then you must also specify the "NAME" of the network adapter of the real computer through which the network connection will go:
In theory, a dynamically expanding virtual hard drive is best because it will only take over what you actually use. Read them, and then you'll also want to mark them so you don't see them again. We start with a base that has a computer with an installed OS, regardless of the version. More than enough left with the default settings. Keep in mind that if you exceed the resources of the virtual machine, your computer will suffer. In addition, you always have time to change these settings when the virtual machine is turned off.
 You can also connect a shared folder for easy file sharing between the main computer and the virtual machine. Specify the path in the shared folder and I recommend enabling the "Auto-connect" item
 After that, start the virtual machine and install ubuntu. How.
Unlike a real installation, we have nothing to worry about. You will find it on the virtual optical disc. To do this, simply go to the main window and click "Create a new virtual machine". The virtual machine creation wizard will ask you to virtualize the operating system installer. We will only be prompted for a name and a user to create a basic user account. Later we will change the settings if we see that the virtual machine is not running as fast as we would like.
The options panel will show "Create a virtual machine" or "Create a virtual machine". We can leave the default options. If something does not work, we will only have to change it in the virtual machine configuration until it finds a suitable option. However, there is a lot of fine print in this ad. For the average user, this option is of little use.
 Installing Guest Additions
The next step is to install add-ons for the guest OS, they are necessary in order for the guest OS to support usb devices, shared folders, dynamic screen resolution changes, RDP servers, etc.
With what's running internally, you can use it whenever you need it without the need for a reboot. On the program launch screen, click the "Create" button. On the first screen of the New Virtual Machine Wizard, enter a name for the new machine.
On the next screen, select the amount of memory that will be used by the virtual machine, and then click the Next button. In the "Hard Disk" section, select the "Create a new virtual hard disk now" checkbox. Under "Physical storage on hard drives» Select the 'Dynamic Assigned' checkbox, so the file on disk will take up little space and grow as needed.
To install add-ons for the guest OS in the window of a running virtual machine, open the menu item "Devices" - "Mount Guest Additions Disk Image":
 After mounting the image of the Guest Additions, the disk autorun will work and you will see a suggestion to install add-ons, install them:
 Next, enter the superuser password and the installation of add-ons for the guest OS will begin. After the installation is completed, you must press Enter and the console window in which the add-ons for the guest OS were installed will close:
 To apply the additions for the guest OS, restart the virtual machine.
Configuring Shared Folder Access Between Host and Guest OS
The shared folder between the host machine and the guest OS is located at /media/sf_shared_name. But there is no immediate access to it. To make access to the shared folder in the guest OS, you need to run the following command in the terminal:
sudo adduser current_username vboxsf
This command adds the current user to the vboxsf group, whose members have access to shared folders for the guest OS. After executing the command, you must restart the virtual machine to apply the rights.
This concludes the article on setting up a virtual machine with Ubuntu. See you on our blog pages!
Post navigation
It happened a little less than two... Oracle VM VirtualBox is a popular virtualization tool on the Linux platform for one reason: of all the virtual machines available, it is one of the easiest to use. The program has an excellent set of features and is widely available on many operating systems. Linux systems. However, Oracle is not exactly a great tool and many Linux users have problems with their business practices.If you're looking for a Linux replacement for VirtualBox with equivalent features, look no further than this list! Here are the five best alternatives to VirtualBox on Linux!
1. Gnome Boxes

Gnome Boxes is an attempt by the Gnome Project to make simple virtualization operations on Linux simple. Many people in the Linux community praise the quick setup wizard tool, the ability to download an OS image directly from a URL, etc.
This application is very useful, even for advanced Linux users with complex needs. The application is very similar to other Linux virtualization programs and is quite competitive in features despite its basic appearance.
Known Features:
- Intuitive, clear user interface that allows even completely new users to create and manage virtual machines quickly.
- Boxes can automatically detect the OS based on which ISO you choose during installation. During the discovery process, the program will automatically assign the correct amount of space to virtual disk and allocates RAM.
- The useful "cloning" feature allows users to instantly create complete copies of existing virtual machines.
- Gnome Boxes has an unrivaled search feature that, when connected to Gnome Shell, can be used to launch virtual machines directly from the desktop.
- The Boxes app has a robust user interface command line which scratches the itch of more advanced VM users.
2. Virtual machine manager

If you work with virtual machines a lot on VirtualBox for multiple jobs on a server, the most logical alternative is Virtual Machine Manager.
What is Virtual Machine Manager? This is a graphical user interface for Libvirt on Linux. It can handle the standard Linux KVM VM as well as other VM types like Xen and even LXC containers.
The VirtManager tool works great, especially for those running Linux virtual machines in the enterprise.
Known Features:
- The Virtual Machine Manager can interact with KVM, Xen, or QEMU virtual machines.
- The Virtual Machine Manager application can not only manage virtual machines locally, but also remotely.
- Although Virtual Machine Manager is primarily for virtual machines, users can also interact with LXC containers using the same interface.
- In addition to stellar support for many Linux features (KVM, etc.), Virtual Machine Manager can also interoperate with FreeBSD's hypervisor technology.
- Virt-Manager allows users to add and remove physical hardware on the fly using a simple user interface.
3. VMWare Workstation Pro

VMWare Workstation Pro is a commercially developed virtualization platform for Linux, Windows and other operating systems. Users must pay for the software, and as a result, it is among some of the most useful tools virtualization in the market.
This program is not free and you need to pay to use it. However, if you don't have enough free tools virtualization such as VirtualBox, VirtualBox may be the answer.
Known Features:
- VMWare Workstation has a leading network editor programming tool that allows users to customize how their virtual machines interact with networks and with each other.
- The Scan for Virtual Machines wizard makes setting up preconfigured virtual machines refreshingly simple.
- VMWare works with both remote and local virtual machines on different hypervisors.
- The program has a great set of easy-to-access ESXi Host options (that's getting better with every release), and makes working with VMWare ESXi servers a breeze.
- VMWare Workstation Pro has one of the best systems snapshots in virtualization. This allows users to instantly create and restore a snapshot without excessive downtime.
- Users can quickly test and share virtual machines in a "simulated production" environment.
- Virtual machines VMWare are in the same standard format and ecosystem. Having a single ecosystem allows users to run VM devices on Linux, Mac and Windows computers effortlessly
4. UCS Virtual Machine Manager

UCS Virtual Machine Manager is a tool Linux control VM for Linux, which specializes in working with cloud virtual machines, clusters and other virtual systems at the enterprise level.
The software is free and open source code, and while its main purpose is the enterprise, average users can take advantage of it for things like Amazon Private cloud, etc.
Known Features:
- Support for boxes for cloud nodes like Amazon EC2 and OpenStack.
- UCS supports private clouds through Amazon AWS.
- UCS Virtual Machine Manager has its own unique Linux distribution built to run in clusters and UCS style virtual machines.
- The tool has a web-based control center that simplifies the management of virtual machines.
- Virtual machines are managed through Libvirt and KVM, ensuring that almost every Linux distribution has excellent support.
- UCS supports paravirtualization, which uses hardware much more efficiently.
- Users can rapidly redirect running instances from server to server.
5. AQEMU

While not the first choice in the "easy to use" section of Linux virtualization tools, AQEMU is still a great alternative to VirtualBox due to how much it allows users to customize and customize their virtual machines.
Known Features:
- AQEMU has a useful folder sharing feature that simplifies and speeds up access to directories on the host machine.
- With AQEMU, users can add/remove devices from any virtual machine on the go, thanks to the Device Manager feature.
- The hard disk imaging tool can also convert images to other formats.
Conclusion
VirtualBox is a great Linux virtualization tool, but it's not the only choice. If you're trying to get away from Oracle, the alternatives on this list are sure to satisfy your virtualization needs.Oracle VM VirtualBox is a program that allows you to create operating systems on virtual machines. This will allow you to use Windows programs in Linux in a 100% working way. If a Windows program does not work under , then it will work in its native Windows environment. Using VirtualBox will be an easier and better alternative than installing Windows on a separate partition on a Linux machine as a .
First install VirtualBox
VirtualBox operates as a "single computer" on which operating systems can be installed.
I'm assuming you already have a Windows CD or DVD, or perhaps a virtual optical disc format file.
- Open the main window of VirtualBox, click the "Create" button.

Using the running wizard to create virtual machines, we enter the name of our future Windows 7 or Windows 8 machine, or maybe someone wants to install Windows XP. Depending on the input of the name of the operating system, VirtualBox automatically selects the pre-installation details for the future virtual Windows machine, which can be changed a little below for your purposes. For example, select the 64-bit version. In accordance with the choice, the wizard for preparing virtual machines, prepare the required amount, which can also always be corrected in the direction of increasing or decreasing system resources. - The next window allows you to select a certain amount of random access memory from the real RAM of your computer.

Do not allocate too much RAM, the more RAM you give to the guest system, in our case installed by Windows, the less RAM the host system will have, causing the entire system to crash. - Create a new hard drive. After clicking "Next" you get to the step "Select hard drive". This step will allow you to select a hard disk size, dynamically expanding or a fixed size for your virtual machine. Here I will draw attention to the fact that it is better to choose a dynamically expanding disk, as this will allow you to save space on the real hard disk of your computer.

To put it simply, stick to the already established choice of the virtual machine creation wizard. After clicking the "Create" button, the wizard completes its work. - Now it remains to select the disk image for the installed Windows by clicking on the "Configure" button. Select the "Media" section on the left side of the window. Click on "Empty" talking about an empty CD, DVD environment.
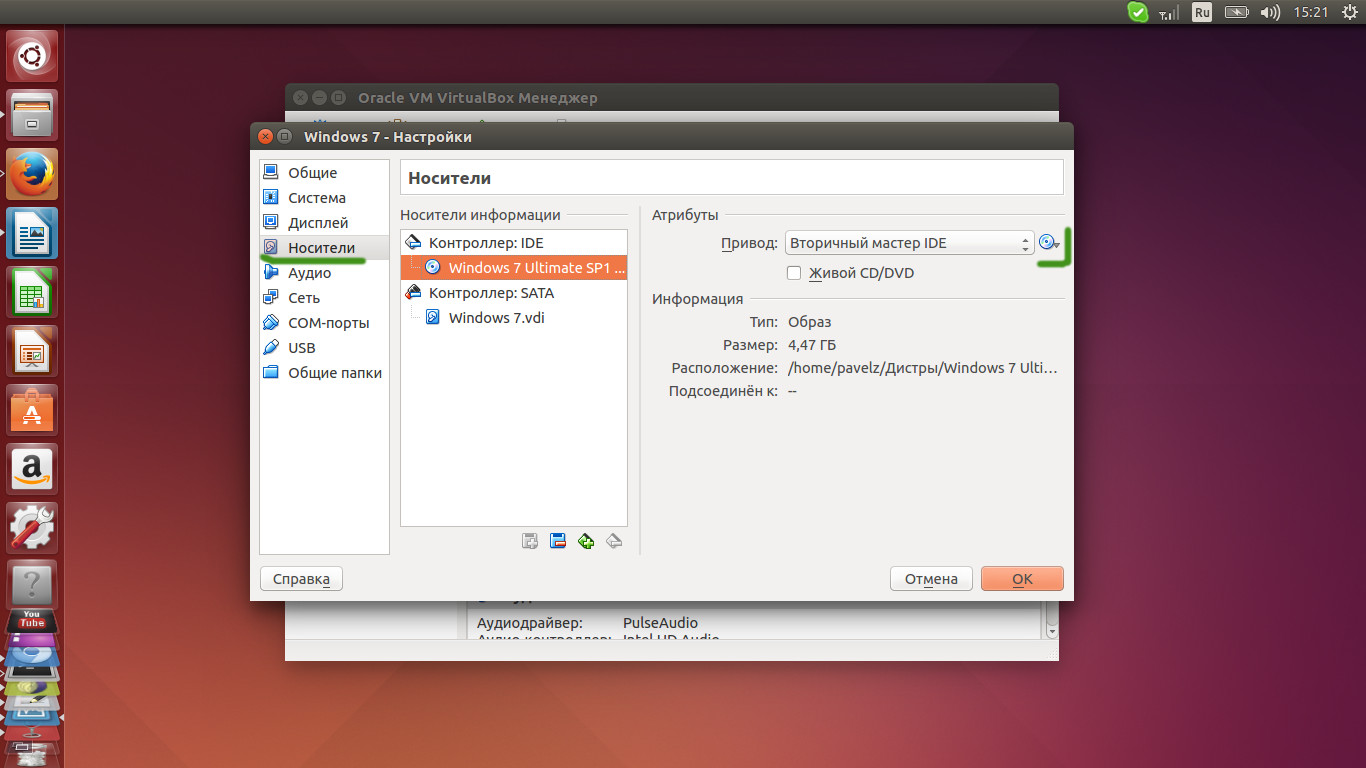
Opposite the word "Drive", click on the disk icon, which will allow you to select your computer's existing disk drive or a disk image that was previously saved to your computer. Click OK. - Now for Windows installation everything is set! You can run a virtual machine and do a standard Windows installation.

After installing Windows in VirtualBox, we disconnect the installation media so that VirtalBox starts from a virtual hard disk. Also need
You need to run a different operating system on your Linux PC. But should you double boot systems, or is it better to use a virtual machine? And if you choose the second option, what kind of virtual machine software should you use?
Virtual Machines for Linux vs. Dual Boot Mode
Earlier, we have already talked about how you can install Linux alongside Windows 10 on a single device. This is done very simply. But what if you want to run Windows directly in a Linux environment and still have everything run smoothly and quickly? Let's figure it out. The so-called virtual machines for Linux will help us with this.
You are running Linux - maybe Linux Mint or Ubuntu - along with Windows? Or do you have two or more Linux distributions installed on your computer? How does it all work for you? For some, this dynamic works well, and quite quickly. For others, rebooting can be a problem.
Reboot timing, selecting a different OS on the GRUB bootloader screen, and then booting can be problematic. This is especially true on systems where Linux is installed alongside Windows.
On slower systems or systems with many applications trying to Windows boot, you can wait 5-15 minutes before you can start working. Install an antivirus solution and you'll boot even slower. But this applies to older devices, because on new ones everything works very quickly.
However, running your second OS in a virtual machine may solve this problem. Virtual machines for Linux are very useful in many situations and can greatly increase productivity.
What is a virtual machine?
We've looked at virtual machines - known as VMs - several times in the past. Simply put, these are applications that create a software environment that mimics computer hardware. The operating system can then be installed into this environment. We call this the "guest OS" and the operating system installed on your physical computer is the "host system".
In addition, virtualization can be enhanced with dedicated system hardware.
To put it even more clearly, virtual machines for Linux are programs on which you can run additional operating systems.
How to enable virtualization on your PC
Although the guest OS of your choice can run without hardware virtualization, if the option is available, then it is worth using. Not least because it will reduce the drain on your computer's system resources.
To enable hardware virtualization, you need to restart your computer to access the BIOS. How this is achieved will depend on your device, but is usually done by pressing Del or F2 after restarting the computer.
Find the screen " Additionally" in the BIOS and look for one of the following:
- Virtualization
- VT-x (Intel - older systems will have VT-d)
- AMD-V (AMD systems)
The BIOS is controlled using the arrow keys. Once you've enabled virtualization, press F10 to save and exit.
Once that's done, you'll have a choice of three open source VM applications, which we'll cover below (VMWare is also available for Linux, but is not open source).
1.VirtualBox
Offering universal virtualization, VirtualBox can create a virtual machine with almost any operating system (with the exception of those designed for ARM devices). It also offers software and hard virtualization by storing virtual machines as disk images. It simplifies backup or transfer to other PCs or VM applications.
VirtualBox is especially good for running 32-bit and 64-bit Linux distributions as well as Windows. You can even run OS X on VirtualBox, maybe test it out before setting up your PC as a Hackintosh. Find a copy for your distribution at virtualbox .org/wiki/Downloads.
2.QEMU
If you want to run an ARM-based operating system (such as Android, Raspbian, or RISC OS), then this is the command line tool of choice.

In short, for the program "Quick Emulator" you can make a productive virtual machine, QEMU is easy to set up, and some guest operating systems can even be loaded with QEMU built-in.
Although the unnamed name for QEMU is "Quick Emulator", it is actually a hypervisor, a tool for managing hardware virtualization. You can install QEMU with:
sudo apt-get install qemu qemu-kvm libvirt-bin
3. KVM
Reducing the kernel-based virtual machine, KVM is a fork of the QEMU project and works in conjunction with this tool to provide additional options(e.g. close speed) outside of native VM functions.

This means that KVM offers great speed and stability than VirtualBox, but KVM is a bit more difficult to set up. However, if you can get around the para-virtualized drivers, you'll be well on your way to understanding why KVM is a popular option for hosting virtual machines.
To use KVM, start by confirming that your hardware is suitable for hardware virtualization:
sudo apt-get install cpu-checker
If the answer is “KVM acceleration can be used”, proceed with installing the software:
sudo apt-get install qemu-kvm libvirt-bin virtinst-bridge-utils
You will be able to launch KVM through the desktop using Virtual Machine Manager, which you will find in the desktop menu.
What distributions work best in a VM?
After you have chosen the right application for the virtual machine, you will need to choose your own version of the guest OS. For example, you can easily run Windows on VirtualBox, although Windows 7 is probably the safest option.
Conversely, QEMU is suitable for running distributed ARM distributions such as Raspberry Pi's Raspbian or Android.
Meanwhile, something lightweight like Lubuntu will run on any of these VM tools.
Which VM tool should I use?
In this article, we looked at the three most popular options and talked about how they work. You can choose any of these programs, especially since they are all of high quality and work quite productively. But still, you need to choose the most interesting, convenient and fast VM.
VirtualBox is a great program to run a virtual system. The interface is very easy to understand, which is a huge plus for beginners. Also worth noting is the excellent optimization and overall speed, which improves with each update.
If you have any questions on the topic "Virtual machines for Linux" then write to us about it.
If you find an error, please highlight a piece of text and click Ctrl+Enter.


