How to make a screen resolution on Windows 10. How to change the screen resolution. Why change the screen resolution in Windows
By default, Windows selects optimal settings screen display for your PC. If you want, you yourself can change the screen resolution for each display on your PC. In today's article, we'll take a look at how to change the screen resolution in Windows 10.
Change the screen resolution in the options.
1. Right-click on an empty spot on the desktop and select "Display Settings" (you can also go to the "Start" menu => Settings => System =>

2. In the right column next to "Resolution" select the desired resolution from the list (if several monitors are connected to the computer, first select the monitor for which you are changing the resolution above).

The screen resolution will be immediately changed and if it suits you - left-click on "Save", if not - left-click on "Undo changes", then select a different resolution.
Change the screen resolution in the properties of the graphics adapter.
1. Right-click on an empty spot on the desktop and select "Display Settings" (you can also go to Start Menu => Settings => System => on the left side select "Display").
2. In the right column, select "Graphics adapter properties".

3. In the "Adapter" tab, open the "List of all modes".

4. Select the desired resolution and click "OK".
The screen resolution will be immediately changed, if the selected resolution suits you - left-click on "Save changes", close the rest of the windows.
You can also change the screen resolution in the program that comes with the drivers for your graphics adapter. There are different graphics adapters and the programs go to them are different, we will take a look at "Intel Graphics and Media Control Panel". Click on the program icon in the taskbar with the right mouse button and select "Graphics Options".
Put a point in front of "Main Mode" and click "OK".

In the left column, select "Display" => Basic settings => on the right side next to "Resolution" select the required screen resolution from the list and left-click on "Apply".

If the selected screen resolution suits you, left-click on "OK".

That's all for today, if you know other methods or just have some additions - write comments! Good luck 🙂
vynesimozg.com
How to adjust the screen resolution in Windows 10
The developers of the new Windows 10 have hidden some functions that are easily accessible in earlier versions of the OS so that users cannot even find them without special instructions. For example, many computer owners who have switched to new system, immediately face the problem of how to change the screen resolution in Windows 10, because there is no longer the usual menu that allows you to set the display resolution. In the "Ten" it can be set by a completely different modified method. Here are the specific steps you need to take to change the screen resolution on a Windows 10 PC, and recommendations for how to deal with the complications that come with adjusting settings.
Through system settings
First, let's consider the quickest and easiest method for solving the question: "How can you adjust the resolution settings for displaying images from the computer screen on the Windows 10 operating system?"
It is required to carry out the following sequential actions:

Note: it often happens that after the adjustment, the picture on the PC monitor disappears completely (empty black display). In this case, it is recommended to just wait about 20 seconds, as a rule, provided that there is no action taken by the owner of the PC, the system automatically restores the original state of the monitor.
Using Control Panel Tools
Below are the steps on how to change the screen resolution through the control panel:

Associated difficulties during parameter adjustment
Windows 10 supports 4K, 8K image quality. The OS automatically selects the appropriate parameter that matches the characteristics of a particular monitor. But sometimes the "Ten" cannot cope with this task on its own, and at the same time, there are no optimal indicators in the list of available values for the number of display pixels.
If the user is faced with such a problem, then how to change the screen resolution in this case?
There are the following solutions to the problem:

WindowsTune.ru
Instructions: How to change the screen resolution in Windows 10 using the operating system and third-party utilities
 The interface of Windows 10 has a number of serious differences compared to previous versions of the system, and it is not so easy for a beginner to understand it. Even the most frequently used settings have become strange to look for, and the process of changing the screen resolution in Windows 10 can turn into a real torment if you do not know where the necessary settings are located. As part of the material, we will tell you how to change the screen resolution in Windows 10 using the built-in capabilities of the operating system and software video cards.
Why change the screen resolution in Windows

It is important to select the correct resolution displayed from the computer to a stationary computer monitor or laptop screen in order to use the capabilities of the hardware with maximum comfort. Most often, users are accustomed to setting the maximum resolution immediately after installing Windows and all the necessary drivers. In most cases, this decision can be called correct, but there are situations when it is necessary to intentionally lower the resolution of the displayed image. For example, this is relevant if:
- The computer hardware cannot handle the high maximum resolution of the connected monitor;
- It is necessary to expand the application to full screen, which runs in a fixed resolution, noticeably lower than the set one;
- The text on the screen is too small, and it is inconvenient to use the maximum resolution.
In these situations and some other specific tasks, it may be necessary to lower the resolution of the image displayed on the screen by the Windows 10 operating system. This can be done in two ways.
How to change the screen resolution in Windows 10 using the operating system
The most convenient way to change the resolution of the displayed image is to use the basic settings of the operating room. Windows systems... This requires:

Note that if the screen resolution in Windows is set below the recommended value, and the aspect ratio is not observed, the image will be “soapy”. It will become almost impossible to read the text on it, and before installing a deliberately lower resolution than the maximum one, you need to choose the right option.
How to change the screen resolution in Windows 10 using the graphics card software
All modern video cards have their own utilities through which you can "finely" adjust the parameters of the image displayed on the monitor. Most often, they contain a lot of options useful for professionals, and an ordinary user can change the screen resolution through these applications. 
To adjust the image, the largest manufacturers of graphics video chips AMD and Nvidia use different utilities, which may have additional add-ons from the companies that produce video cards. That is why there is no single way that would explain how to change the screen resolution in Windows 10 using a program from the hardware manufacturer. In most cases, to access the utility settings, you need to find its icon in the notification area or right-click on the desktop and navigate to the corresponding menu item. 
By adjusting the screen resolution through third-party software, you cannot find the recommended value for the monitor connected to the computer. That is why configuration using the utility is recommended for professionals.
Windows itself chooses the optimal screen resolution based on: the size of the monitor (display), video adapter, installed drivers... The article will tell you how to change the screen resolution in Windows 10, 7, 8, if you notice any deviation in the display (fuzziness, inconsistency in size, the appearance of black bars on the sides).
Screen resolution is measured in horizontal and vertical pixels. At low resolutions of LCD monitors (displays), for example, 800 by 600 objects on the screen will fit less and they will appear larger. At higher resolutions, such as 1920 x 1080, the objects will appear smaller, thus you will see a larger amount of displayed items. Modern monitors (displays) allow you to set a resolution lower than native without loss of quality. Follow the guidelines below to customize the picture as good as possible.
Changing the screen resolution manually
To change the screen resolution to Windows 7, 8, press the right button on the free space of the desktop. In the pop-up menu, select "screen resolution" to open display settings (they helped in the last article).
There is another way to get to the settings for changing the resolution. ... Set small or large icons in the preview area. Find "screen" from the list of options, click it.

Note: if all screens are not displayed, click "find", if you are not sure which display you need to change the resolution, click "define". This will briefly show the large serial number of the screen to uniquely identify it.
In the settings of the screen you click on which the vertical slider will become available. To decrease, increase the screen resolution in Windows, drag the slider. The native resolution is marked as "recommended" and is the highest, it is this that is optimal.

Click OK, then you will see a preview of the selected resolution and a message, if you are sure click save change.
You can change the screen resolution in Windows 7, 8 from the list of ready-made options. In the screen settings, click on "advanced options". Next, on the "adapter" tab, click "list of all modes". Modes consist of 3 elements: resolution, color depth, refresh rate (in Hz). Select the mode, press OK, OK, confirm the changes.

In Windows 10, the screen resolution changes in a slightly different way. When you open the menu, by right-clicking (on an empty place on the desktop), you need to select "screen parameters".


Click on the current resolution, then set your own. Don't forget, the optimal one is the one with the “recommended” mark next to it. Click "apply" and then "save changes." This way, you can change the screen resolution in Windows 10. If you have problems, read on.

I present a program for changing the screen resolution - Carroll. She also allows you to ask each account your permission. Download the zip archive, unzip it. Install Carroll on your computer.
After launching the program, many resolution options (other parameters) will be available in its interface, select the optimal one. To change the screen resolution to Windows and save it every time you start your PC, click on the first link and in the "yes" message.

Enabling screen settings
Sometimes when trying to adjust the screen resolution on Windows 10, 7, 8, the options become pale and cannot be changed. There are 2 ways to enable these settings.
1. Download the archive with the reg-file, unpack it. Run vkl-razresh.reg, when prompted by user account control, click "yes", then "yes", OK. Restart your computer to apply the changes.
2. Open the Group Policy Editor. To call it, enter gpedit.msc, click OK. In the editor, get to the "screen properties window" section (see screenshot). On the right side, double-click on the display setting option. In the next window that opens, mark one of two states: "not set", "disable". Then click OK, close the windows. In this case, you can change the screen resolution without restarting your computer.

Troubleshooting problems when changing resolution
Users are faced with the problem that the screen resolution does not change in Windows, or changes, but before the first restart or exit. It is recommended to first restart the system, if the problem persists, try using these tips:
- Recently installed programs may well interfere with the resolution setting in Windows. You will need.
- Make sure there are no problems with your graphics drivers. Check if the drivers are installed in general, and also make sure that the latest versions are installed.
- , see if it helps or not.
- Press Win + R, enter msconfig, press enter. In the system configuration options, navigate to the "boot" tab. Make sure Base Video is unchecked. If unchecked, click OK, restart your PC.

As you can see, changing the screen resolution in Windows 10, 7, 8 is quite simple, especially in most situations it is not worth it, because by default the OS already selects the optimal settings. Following the recommendations, you can easily calculate and eliminate any problems with the display of the monitor (display).
During the development of Windows 10, Microsoft redesigned the experience of Display Settings. It has become simpler, allowing users to make various settings intuitively. The determination of the optimal screen parameters occurs already during the installation of the system in automatic mode. All that remains is to configure them for a specific user, if the need arises. The parameters set should correspond to the maximum capabilities of the display screen and video adapter. This achieves the clearest drawing of graphics and colors.
Adjusting the screen resolution
Customizing the screen on a Windows 10 personal computer, tablet or laptop is not a big deal for any user. Its interface is simple and intuitive, which allows you to modify the screen to your liking in a few mouse clicks. To configure:
- Click on the "Parameters" icon. From the Start menu, click on the Settings icon
- Click on the "System" icon in the "Options" window.
 In the "Options" window, click on the "System" icon
 - Open the "Display" tab.
 Review your screen options
 - Check your screen resolution. It must match the recommended resolution of the device.
- If the resolution is set correctly, then click on the "Graphics adapter properties" button.
 Click on the "Graphics adapter properties" button
 - Make sure that your adapter is selected in the "Adapter type" tab.
 Check if the video adapter is installed correctly
 - Close "Graphics adapter properties" by clicking on the "OK" button.
- Change your screen resolution if necessary.
- Close the system settings window.
- The screen setup is complete.
The rest of the screen parameters can be adjusted as needed.
When installing Windows 10, all screen settings are usually configured automatically. The exception is rare or outdated types of video adapters, drivers for which are not available in the database on Microsoft servers. In this case, the driver is downloaded from the manufacturer's website or installed from the optical disc supplied with the computer or laptop upon sale. It contains distributions of all drivers for installed devices.
Video: How to Change the Screen Resolution on a Windows 10 Computer, Monitor, or Tablet
Increase or decrease screen brightness and contrast
Brightness and contrast are some of the main screen settings. Each user adjusts them individually to suit their own requirements.
Contrast on laptops and tablets is automatically adjusted. On monitors and displays personal computers there is a Menu button, with which you can adjust the contrast using the device menu.
There are several options for changing the screen brightness settings that you can apply.
Change screen brightness in system settings
There are two ways to call the screen parameters:

Video: How to Change Screen Brightness via Windows 10 Settings
Changing the screen brightness using the keyboard
Almost all modern types of keyboards have the ability to change the screen brightness without resorting to system settings. Previously, only laptops had this feature, but now this function is inherent in many types of personal computer keyboards. As a rule, you can change the brightness using two keys, which are marked with a sun icon and an arrow, indicating an increase or decrease in brightness. They are most often found in the upper or lower case of the keyboard.
 Adjust the brightness level of your screen with the keys
 In some cases, to change the screen brightness, you must press the Fn key with these keys.
If the keys do not respond to commands to change the brightness, download and install the keyboard driver from the manufacturer's website.
Change the screen brightness through the "Action Center"
In the "Notification Center" you can set the screen brightness level only in fixed positions. Follow the steps below to change the brightness level:

Changing the screen brightness using the battery indicator in the taskbar
Laptops and tablets have a battery indicator on the taskbar, which can also be used to change the brightness of the screen:
- Left-click on the battery charge indicator.
 Click on the battery indicator
 - Click on the tile for changing the screen brightness.
 Adjust the brightness level of the screen
 - You can change the brightness level at fixed values from 0 to 100% in 25% steps.
- Click on the Power & Sleep Settings tab.
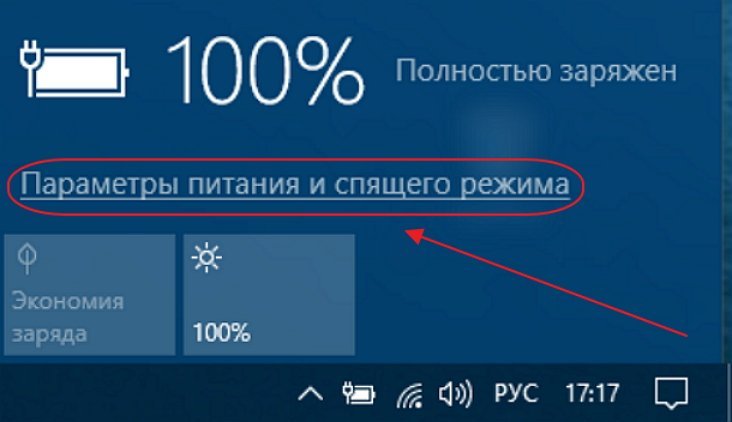 Click on the Power & Sleep Settings tab
 - Click on the line "Additional power settings" in the right side of the opened "Settings" window.
 Click on the "Advanced Power Options" tab
 - In the "Power supply" window, set the required brightness using the "Screen brightness" slider.
 Adjust the brightness level of the screen using the slider
 - Click on the Power Scheme Setup tab.
 Click on the "Power Scheme Setup" tab
 - In the opened panel "Changing the parameters of the scheme" using the slider "Adjust brightness" achieve its optimal level when powered from the mains and from the battery.
 Adjust brightness on AC and battery power
Changing the screen brightness from the start menu
You can also use the Start key to navigate to the panel for changing the screen brightness settings. To do this, you need to do the following:

What to do if the screen blinks
Frequent screen blinking in Windows 10 can be caused by two problems:
- using outdated video adapter drivers;
- incompatibility of the installed on the computer software application and system requirements.
The problem is not as common as it was during the period when Windows 10 was just beginning to spread.
This is due to the fact that the main companies that produce components for computers have brought their software applications to the required parameters. On those computers where video adapters made 6-7 years ago are installed, incompatibility is possible, since their drivers were developed without taking into account modern requirements.
To fix the error, you need to find out if the driver or software application is the source that creates the screen blinking. To solve the problem and restore normal operation of the display and video adapter, you must use the following method:
- Right-click on the "Taskbar".
- Click on the "Task Manager" line.
 In the menu, click on the line "Task Manager"
 - Check for blinking in the Task Manager pane. If the panel blinks along with the screen, then the reason is in the old video adapter driver. If this does not happen, then the reason is in one of the installed software applications.
 Check for blinking of the Task Manager panel
 - Double-click the Control Panel icon on the Desktop.
 On the Desktop, double-click the Control Panel icon
 - Click on the "Administration" icon in the "All Control Panel Items" window.
 Click on the "Administration" icon
 - Double click on "Computer Management" in the "Administrative Tools" window.
 Double click on "Computer Management"
 - Expand the Event Viewer tab in the Computer Management window.
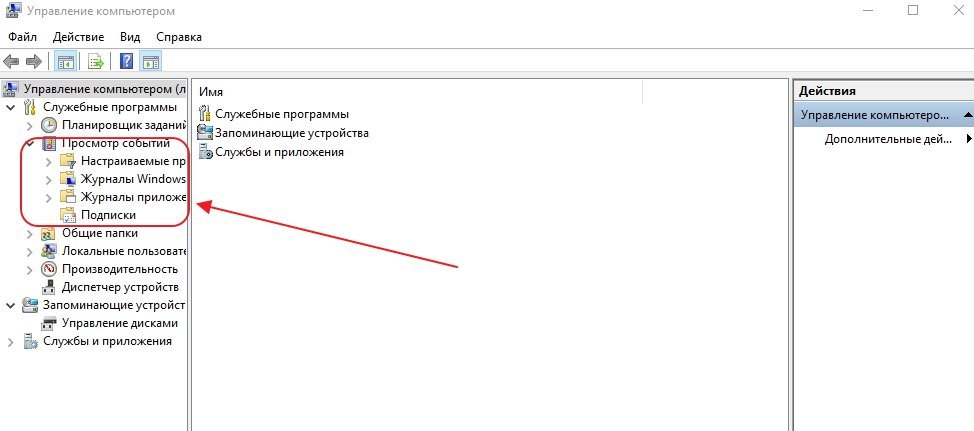 Expand the Event Viewer tab
 - Expand the Windows Logs tab.
 Expand the Windows Logs directory
 - Check the Application and System tabs for errors.
- If a software application compatibility error is found in the Application tab, uninstall it. Then download the latest version of the application from the developer's website and install it on your hard drive.
 Click on the Application tab and check for errors
 - If an error in the System tab indicates that an updated video adapter driver is required, perform the replacement operations in the same way as for the software application.
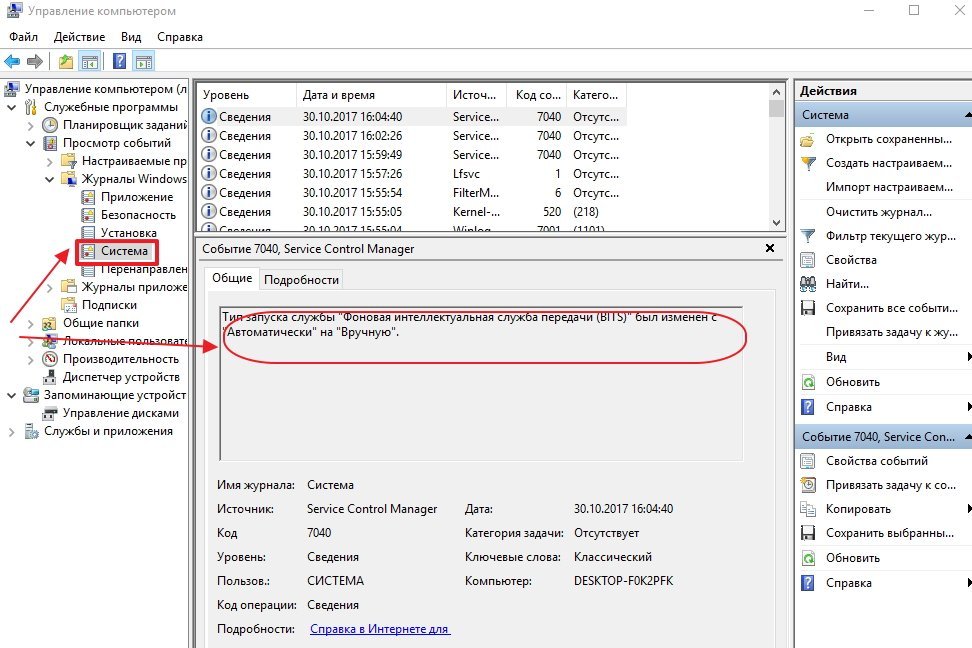 Click on the "System" tab and check for errors
Video: How to update video drivers in Windows 10
What to do if apps or games don't open in full screen
All modern programs automatically adjust to the size of the screen. If you install an application or game that was developed many years ago for old Windows editions, then they can be deployed in a reduced size. In this case, it becomes necessary to expand them to full screen. There are several ways to solve this problem:
- Application of "hot" keys:
- press the Alt and Enter keys on the keyboard at the same time;
- the application will expand to full screen;
- pressing the keys again will return the application to its previous state.
- Changing launch parameters:
- right-click on the game or application icon on the "Desktop";
- select "Properties" in the drop-down menu;
 In the drop-down menu, select the line "Properties"
 - in the panel that opens, click on the "Compatibility" tab;
 Click on the Compatibility tab
 - click the Run Compatibility Troubleshooter button;
 Click on the Run Compatibility Troubleshooter button
 - if the application has not expanded to full screen, then put a check mark in the "Compatibility mode" box and select the required Windows edition from the drop-down list. Please note that Windows 10 edition is not listed. Last on the list will be Windows 8.
 Select the required Windows edition
 - click the "OK" button.
- Updating the video adapter drivers:
- determine the model of the video adapter in the "Device Manager";
- go to the website of the manufacturer;
- download and install the new driver.
- Changing the graphics settings of the game:
- start the game;
- go to settings;
- find the item to change the screen parameters;
- set full screen mode;
- restart your computer.
- Changing the screen resolution:

If a game or application requires a screen resolution of 640x480, then you can set it in the "Options" block on the "Compatibility" tab. But it must be a very old game or application that was created during the introduction of Windows into the software market.
Video: How to Run an Application in Compatibility Mode in Windows 10
Calibrating the touchscreen on Windows 10 tablets
You must calibrate the touchscreen for the tablet to respond appropriately to finger touches. If the device is not calibrated, then instead of the pressed letters, others will appear on the screen or the image will rotate one hundred and eighty degrees.
To calibrate the touchscreen, follow these steps:

Disable screen off or dimming
With prolonged inactivity, the display screen goes out after a certain period, and after a few minutes the computer goes into sleep mode, completely shutting down. In the system parameters, you can set the option when the transition to sleep mode and screen dimming will be turned off. To turn off the energy-saving mode, you need to carry out a number of operations:
- Click the left mouse button on the "Start" button.
- Open Options.
- Select the "System" section.
- Click on the Power & Sleep icon.
- Click the Advanced Power Options button.
- In the Power Options window, click on the Power Scheme Setup button.
 Select "Customize Power Scheme"
 - In the "Disable display" line, turn off screen dimming when operating on AC or battery power. To do this, select "Never" in the drop-down lists.
 Select "Never" in the drop-down list
 - Likewise, in the fields next to the "Put the computer to sleep" icon, disable the transfer of the computer to the off state.
 In the drop-down list, click on "Never"
 - Click "Save Changes".
Video: a non-standard way to turn off screen dimming
Brightness, contrast and color gamut are considered one of the main criteria of a graphical interface. The clearer the display of graphic objects looks, the more comfortable the work will be for the user. Therefore, you should not neglect the waste of a few minutes in order to achieve maximum effect when displaying graphics and text documents. It should be remembered that incorrect adjustment of the screen parameters also affects the user's visual apparatus and can lead to a gradual deterioration of vision. You can use the methods provided in this article to adjust the screen and fix minor image problems. If they also do not lead to the desired result, then it is worth contacting the specialists of the service center.
Related entries:
No related records found.
The screen resolution directly depends on the diagonal of the monitor (physical characteristics). It determines the number of dots (pixels) horizontally and vertically, as well as their ratio. The higher the resolution, the smaller the screen image and vice versa. Choose one resolution for widescreen monitors, and another for square monitors.
If initially it was set incorrectly, then the picture quality will be noticeably lower. These can be defects such as:
- black stripes on the sides;
- a disproportionate "slid to the side" image;
- blurry, indistinct picture (especially seen in the text);
- too large or, conversely, small icons, etc.
To prevent this from happening, the permission must be set based on technical characteristics devices. You can find it out from the instructions or look at the manufacturer's official website. Typically, after downloading the latest drivers for your graphics adapter (video card), your computer will automatically set the recommended settings. If this does not happen, then the user will have to do it manually. The article will address the question of how to find out the screen resolution on Windows 10.
There are several ways to define this parameter. The simplest and fastest is through the desktop. For this:
- Right-click on an empty area (wallpaper) on your desktop. In the context menu that appears, select the "Display settings" item.
- A new window will open with the current display settings. The resolution, scale, orientation (landscape, portrait, portrait format) of the monitor are indicated here. If other screens are connected to the PC, they will be displayed in this menu. As for the main one, you can specify the desired parameters for them, turn them over.
You can get to this menu in another way. It is convenient to use if you have a laptop, and the key responsible for calling the context menu (via the right mouse button) does not work on the touchpad. For this:
- Call "Start" and in the list that appears, start typing "Options". Choose a classic app from the Best Match category. Or just click on the gear icon.
- Windows Settings will open. Find and click on the "System" category. She will be the first on the list.
- By default, you will immediately be taken to the screen with the desired settings. If this did not happen, then from the list on the left side of the window, click on the inscription "Display" to display the resolution on the right side.
- Alternatively, on the main Windows Settings page, immediately start typing the keyword Display into an empty field to start the search automatically. Select Change Display Settings from the options provided.
An extension that is correct for the monitor will be marked with “Recommended” next to the digital designation. It is detected automatically if there are drivers for the video adapter.
If any other is selected, then it must be changed to the one recommended by the system. If none of the parameters have such an inscription, then this indicates that there are no drivers for the video adapter. In this case, you need to download them.
How to change
You can change the value to the desired one through the display parameters. You can get into them by following the instructions described above. Or you can use another method:
- Run the system utility "Run". It can be found through the Start menu or by pressing the Win + R key combination on your keyboard.
- In the opened window, enter the command "desk.cpl" and click "OK" to call the display settings.
- The screen options will open. Change the resolution through the appropriate category. To do this, click on the digital designation (which is currently installed) and select the desired parameter from the drop-down list.
- You can do the same by scrolling down the page and clicking on "Graphics adapter properties".
- A small window will appear in which you need to select the "Adapter" tab, then click on the "List of all modes" button.
- All extensions available for the monitor are displayed here. And even those that are not available through the "Display" menu (for example, 1920x1080 Full HD). This is useful if you want to set a custom parameter. Select the one you want and then click the "OK" button.
- Confirm the action to save your changes.
Please note that in the properties of the graphics adapter opposite the recommended parameter there will be no corresponding inscription. Therefore, to check if the selected option is suitable for your computer, try switching to each one in turn. If you choose the right one, you will immediately notice improvements in image quality.
Possible problems
By default, Windows OS (x32 Bit and x64 Bit) automatically determines the optimal display settings. In some cases, this does not happen, and when you try to specify the required extension manually, it simply is not in the list of available ones.
Most often this happens due to the lack of drivers for the graphics adapter or monitor (especially for non-standard devices). You can update them directly by downloading from the developer's official website, or through special software.
Other reasons:
- If you are sure that the latest version of the drivers is installed on the PC, then try installing the required extension through the properties of the graphics adapter (mode selection). The method is described above and differs in the presence of a wider selection of available permissions.
- If you are using a non-standard monitor (for stationary PCs), then make sure that the drivers are loaded for it as well (not to be confused with the drivers for the video card). Some monitors require additional software to work properly. It can be downloaded from the manufacturer's official website.
The problem with the choice of resolution may arise when using low-quality adapters, adapters, cables. Even if you are using a laptop and connect an additional monitor to it via HDMI. In this case, try connecting the screen with a different method.
Sometimes the reason for a bad image on the screen is the diagonal of the monitor (physical characteristic) does not match the screen resolution. If so, try:
- Go to screen settings. To do this, open Start and start typing "Display" in the search box. From the list found, select and run "Change display settings".
- In the window that opens, find the "Scale" item and check if the recommended parameters are set. If not, then return them to the default.
- If the recommended settings do not suit you and the image is too small at the optimal resolution, then increase its size by choosing a different value. For example, scale it up from 100% to 125%.
- For more fine tuning click on the caption: "Custom scaling". Here specify the desired parameter (the maximum available is 500%) and save the changes. To do this, click "Apply".
In some cases, this can help eliminate a number of problems associated with poor image quality. If you wish, you can try to select a different screen resolution, adjust the scale. To solve the rest of the problems, most often it is enough just to download the latest version of the drivers for the video card.
How to find out the model of the video card
To download drivers for your graphics adapter, you need to know your graphics card model. Without this information, you will not be able to download them manually, since the automatic online detection of the device does not always do it accurately.
This can be done through the special utility dxdiag. To run it:
- Open "Start" and enter the name of the application. Then click on the found option.
- The DirectX Diagnostic Tools window appears. Here go to the "Display" tab. The "Device" block will contain the name of the video card. In our case, this is the Nvidia GeForce GT 220M. Copy its name to find the drivers. The block opposite will contain additional information about the version of the current software, the date of the last update.
If dxdiag does not start or other problems occur in the process, then you can find out the model of the video card in another way, using standard tools from Microsoft. For this:
- Open "Options" and go to the display settings (the method is described in the instructions above). Here find the inscription "Graphics adapter properties" and click on it.
- Click on the "Adapter" tab. The blocks "Type" and "Information" will contain information about the model of the video card.
Knowing the name of the graphics adapter, you can download the driver from the manufacturer's official website. After that, you can set the optimal screen resolution on Windows.
How to download drivers
Once you know the model of the graphics adapter, you can easily download and install manually new version software. For this:
- In the search engine, enter the name of the manufacturer of the video card (for example, Nvidia) + driver. Then go to the official website. To do this, click on the first suggested link from the search results.
- The browser will redirect you to the "Drivers" tab, but if this did not happen, then from the main page go to it yourself. Here, specify the type, series and family of products, following the information obtained earlier and the version of the OS. Click on the big green Search button.
- Agree to the terms of the license and click "Download". The software download starts. Wait for it to complete, then run the installation file and follow the instructions of the Windows wizard.
The screen resolution will automatically change to the optimal resolution. If this does not happen, then follow these steps yourself. Through display parameters.
How to update drivers
You can find out the model of the video card and immediately update the drivers for it through the standard features of Microsoft Windows as follows:
- In the Start menu, start typing Control Panel, and then launch the classic application that you find.
- For a more comfortable experience, change the way you view the available options to large or small icons. Then find "Device Manager" in the list. Click on the label with the left mouse button to launch the application.
- In the window that opens, find the "Video adapters" category. Please note that depending on your computer, there may be several subcategories available. If any drivers were installed for the device, then there should be the model name (in our case, it is Nvidia GeForce GT 220M). If they are not available, then you will see the inscription "Unidentified device".
- Specify the path to the files. To do this, click the "Browse" button and select the folder with the downloaded drivers. Click Next to start the installation.

After the process is completed, the best one for your screen will appear in the list of available resolutions. Remember that there will be a corresponding "Recommended" text next to it.
If you are already using the latest drivers, the system will display a message stating that the most suitable drivers are already installed on this PC. This notification may also indicate that Windows could not find updates. In this case, you can try to download them manually, through the official website (the method is described above).
Conclusion
You can find out the screen resolution through the display parameters or by right-clicking on the desktop. After that, you can see the current value, and, if you wish, change it to the required one. Please note that it must correspond to the technical parameters of the monitor (diagonal).
If these characteristics do not converge, then the image quality will be noticeably lower. If the required screen resolution is not available, you will most likely need to update the drivers for your graphics adapter. This can be done using the built-in Windows tools.
Video instruction
Below you will find a video on this topic.
After switching to a new operating system, many users have replaced the disappearance of the item regarding screen resolution in Windows 10 in the Personalization section. In this regard, difficulties arose. Some users get used to the wrong screen enlargement, others start to return to the old familiar Windows 7. How to change the screen resolution in Windows 10 different ways?
The first way to change the screen resolution
To adjust the size of your computer monitor, click "Start" and select "Options".
We select the "System" section.

Go to the "Screen" tab.

Scroll down the slider. Here you can change the size of your monitor. We select the required screen resolution. Click "Apply".

Second way to change screen resolution in Windows 10
We press "Start" and in search string enter the query "Control Panel". We choose the classic Windows 10 application.

A new window will open. Select "Screen Resolution Settings".

Select the desired format, namely increase or decrease and click "Apply".

We save the result. After updating the computer monitor, the scale will be changed.
The third way to adjust the screen resolution
If you have upgraded to Windows 10 and your monitor screen is stretched, and the change options are inactive, you can adjust the scale using the drivers for the video card. It should be noted that the drivers must be up-to-date and from the official developer of the device, and not from Microsoft.
We recommend using the Device Manager to find out which drivers are installed on the video card, and you can fix the monitor settings as follows:
- Right click on the desktop and select "AMD Catalyst Control Center" or NVidia graphics card tool.

- A new window will open. We select "Desktop Options" (in NVidia) or Desktop Management ".

- Click "Desktop Properties" and select the desired scale in a small window.

The stretched screen will now be the correct size. Therefore, if you still don't know how to fix or how to change the screen resolution in Windows 10, these recommendations will help you solve the problem.