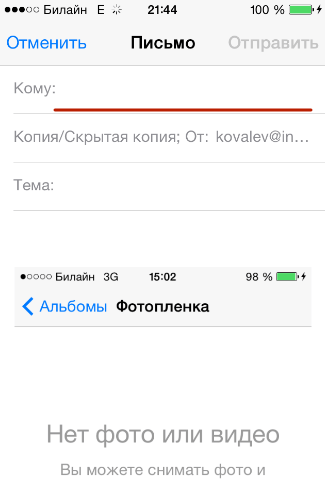
How to transfer skin from phone to computer. Transfer photos from your phone to your computer via cable and wireless protocols. How to save photos from your phone to your computer without cables and special programs
Instruction
We insert the flash card into the card reader that we removed from the camera. Next, the computer determines the device and you can read information from the flash card in the same way.
Related videos
Sources:
- upload photo from camera
The popular VKontakte service is not only a powerful and largest social network, but also a convenient storage for a huge number of media files, including - graphics and images. If you find photos on the site that you would like to have on your computer, then the most common action of yours will be mechanical saving photos one by one to each folder. However, if photos too much, this procedure will take too long. You can simplify your task by using the VKMusic 4 program, which allows you to upload photos from VKontakte albums in the highest published quality.

Instruction
The VKMusic program (version 4 and higher) is absolutely free, takes up little space on your hard drive, has an intuitive, simple interface, and in addition to the convenient function of downloading audio from the site, it can also effectively upload photos at once with entire albums that you specify for.
A window will open in which top line you need to enter a link to the album that needs to be downloaded, and in the bottom line you need to specify the folder in which the photos will be saved.
Check to see if a green checkmark has appeared next to the line for the link - if it does, the link is correct and the album can be downloaded. Specify in the line below the exact path to the directory to save the files.
After that, click the button with the plus sign and the inscription "Download photo album".
Sources:
- The best funny photos online for free - see
Nowadays, many gadgets are quite easy to store and move information. Flash cards, players, s, cameras interact very easily. The main thing is to learn how to dock them.

You will need
- Telephone
- card reader
- USB cord
- Bluetooth
Instruction
For the first way to move photos from to a computer, you will need a special USB cable that will connect the computer to each other. There are those that work when connected in flash drive mode, while some may require a special driver. When the phone is initialized by the system, the photos can be copied normally from the media to the computer.
Related videos
note
While transferring photos via bluetooth, it is better not to press any keys on the phone so that there is no failure in data transfer.
When dropping photos, it is better to use copying so that backups remain on the phone just in case.
Sources:
- how to transfer photos from phone to computer in 2018
The Internet has allowed people at a distance
from each other, to communicate freely with each other. Now they can exchange messages, make voice and video calls, and send files, including photos.

You will need
- computer, internet access, mail client, or an account in one of the mail services.
Instruction
Open the desired folder and highlight the photos you want to transfer to memory . This can be done with the left mouse button while holding down the Ctrl key. Without releasing the button, drag the objects to the created resource.
If there is no USB cable, use a card reader. It contains connectors for various memory cards, there is sure to be a suitable one for yours. Insert media into the device. Wait until the green or light on it lights up, and the removable disk is displayed in the "My Computer" folder. Further, the sequence of actions is the same as when using the transmission cord.

Instruction
The most convenient are those with removable memory cards. Purchase a card reader compatible with the card installed in the machine from a computer accessory store. Find out in the instructions for whether it is necessary to carry out any additional actions before removing the card from it (close all applications, select a special item in the menu, turn it off by itself). Perform these steps if necessary, and then remove the card. Place it in the card reader (depending on the design of the latter, directly or through an adapter). Connect the card reader to the computer, and it will be recognized (regardless of the OS) as a normal one. Find a folder with photos on the card (usually called Images) and transfer them to your computer's hard drive in the same way as if you were transferring them from . Next, turn off the card reader using the OS (also similar), disconnect it physically, remove the card from it and install it back into the phone. If the latter was disabled, enable it.
A phone with a non-removable memory card will have to be plugged in directly. Take it with you to the store and ask for a suitable cable. At home, connect it with this cable to your computer. Perhaps, immediately after that, a menu will appear on the screen of the mobile phone with several connection options (“Modem”, “Drive”, PictBridge, and so on). Select the mode called "Storage" (on some devices - "Removable disk"). After that, it will be recognized as a flash drive, and it will be possible to transfer files from it to a non-hard drive computer, as indicated above.
There are phones that can connect to a computer, but are unable to work in flash drive emulation mode. There are two ways to work with them. The first is to connect a Bluetooth device to the car (it usually has one). In the file manager phone select the image you want to transfer, and then select the computer as the receiving device. When the latter accepts the file, specify in which folder you want to save it. The second method involves installing a software package downloaded from the phone manufacturer's website. Note that this package will most likely not work on Linux.
Very cheap camera phones may not have a memory card, or a connector for connecting to a computer, or Bluetooth. The only way to extract images from them is to use MMS. Contact your carrier to find out if your area has an unlimited sending service. It usually allows you to send up to 300 such messages per day for a subscription fee of about 60 rubles per month. Please note that if a regular MMS message can be up to 300 kB, then the one sent within this service is often no more than 150. Include several pictures in the message, the total size of which does not exceed the specified one. Instead of the sender's number, enter your own email address. Send an MMS, and in a couple of minutes you will find photos (most likely in a reduced form) in your email inbox. Similarly, you can send Pictures and on if you agree that the recipient will know your phone number.
Related videos
Tip 15: How to transfer photos from phone to computer
accumulated in your mobile phone photos that you want to send to computer? Theoretically, this can be done in several ways. Which one suits you in practice depends on the model and configuration of your phone and technical equipment of the computer.

You will need
- - data cable;
- - bluetooth adapter;
- - adapter and slot for reading memory cards;
- - BY.
Instruction
Transfer photos from phone to computer via bluetooth. If your computer does not have a built-in bluetooth adapter, purchase an external one. After connecting the device to the computer, install the drivers - all the necessary files should be supplied with the adapter.
Activate the bluetooth adapters of your phone and computer. Start a search on any of your devices. For example, on the phone. Find your computer in the resulting list. To confirm the connection, you will need to enter a code. Depending on your equipment, this code will be offered to you by the system (it will be displayed on the display of one of the devices, and you will need to enter it on the second) or you will need to set it yourself (in this case, you will need to enter this code yourself in both devices).
Select the photos on your phone that you want to download and transfer them to the connected computer using context menu your phone. In case of difficulty, check the user manual. Or log in from a computer file system connected phone, select the desired photos and copy them using the normal OS tools.
Connect the phone to the computer using a data cable - it should be included with the phone. If necessary, select the USB connection mode "File transfer", etc. - Look for information in the user manual of your phone. Wait for the OS to recognize the connected device. If your phone comes with a CD with drivers, install them.
Make sure the PC recognizes the phone connected via the cable, and transfer the desired photos using standard means OS copy. Or install a special program for synchronizing your phone with a computer - it should be supplied with the phone or distributed free of charge on the phone manufacturer's website.
Please note that if your photos are stored on your phone's memory card, your computer is equipped with a card reader (Memory Stick, etc.) and you have a suitable adapter (usually supplied with miniature phone cards), you can just insert your phone card into your computer and transfer your photos via windows explorer.
Don't despair if you don't have a data cable and a bluetooth adapter at hand. If both your computer and phone are connected to the Internet, you can transfer files by email. If you do not have an alternative email address and you do not want to create one, you can send photos to your e-mail using a regular MMS, and then download them from the received letter to your computer's hard drive.

Instruction
If the picture needs to be loaded quickly, and the computer is not at hand, then use Mobile Internet. Having email box on your cell phone, you can easily email photos from your cell phone to your PC email. Of course, this method also has some disadvantages, for example, in the cost of services and the slowness of the process. But there are situations when you are on vacation and want to send a photo to your friend, then this option, of course, is simply irreplaceable.
Use the Bluetooth function. It allows the exchange of information between devices such as personal computers, Cell Phones, printers, laptops, digital cameras, etc. Bluetooth allows them to communicate with each other when they are located within a radius of up to 100 m from each other. Therefore, you also need an appropriate USB device (the connector used to transfer data between a PC and a mobile phone) to connect to your computer. With this method, the exchange of photos and other files from a PC is also quite simple.
Establish communication via the Bluetooth function as follows. Select a device by network name, enter a code for communication, after that the connection will be established. Now you can exchange information.
Connect your phone to your computer with a USB cable. For any model of mobile there is a special program for working through such a wire. If it is not there, then transfer the desired photo to a USB flash drive in your phone. Her computer will determine without first installing a special program. You just have to transfer the data. Using this method, you can transfer many photos to your computer quite quickly.
You can simply send the image to another phone. Specify the recipient in the contact list to whom you will send the picture. Now it remains to press the "Done" key, and the message will go to the desired subscriber. If this method for transferring files does not suit you, then try another option.
Use file hosting. These resources provide users with a place to various files and public access to them on the web. There are many similar services, but you choose the one that you like and is easy to use. To do this, you need to open a picture in your phone and click the "Download" button on a specific page of the resource. After the download has occurred, you will receive a link to download the file.
Tip 17: How to Transfer Files from Computer to Samsung Phone
Modern phones Samsung are positioned as full-fledged multimedia devices that support forms of content such as audio, photo and video. Use one of the following to upload files. simple ways.

Instruction
The most common way is to synchronize using a data cable. You can find data cable and drivers, as well as software for synchronization in the phone package. If they were not included in the kit, download the drivers from the official website samsung.com or from any of the company's fan sites, and buy the data cable in the store cellular communication or order online.
Install the software and drivers, then connect your phone to the computer. Follow these steps in this order. Launch the software and download files to the phone.
Many modern laptops are usually equipped with a Bluetooth module. If your computer is one of them, or you have the above-mentioned module at your disposal, and it is also present on your phone, activate it on your mobile and set the mode to “available to everyone”.
After that start the device startup with computer and find your phone. Send files by confirming reception on your mobile. After that, wait until the transfer is completed and turn off the Bluetooth interface on the mobile.
If your phone has a memory card slot, remove it from your mobile. Connect the card reader to the computer and insert the card into it. Wait until it shows up as a removable hard drive. After installing the drivers, which should happen automatically, copy the files to it that are intended to be sent to the phone. Safely remove the PC from the computer and insert it back into the phone.
You can also use the services of free wap-exchangers. Consider this method on the example of http://www.amobile.ru/. Follow the link http://www.amobile.ru/wapload, then enter your nickname and verification numbers. Select “ ” from the list of phone manufacturers, then deploy and upload the file to be sent. Once the download is complete, you will be redirected to a page with a download link. Follow the link from mobile phone and download the file.
Related videos
Modern mobile phone models allow not only making calls and sending or receiving text messages, but also making photos relatively good quality. And sooner or later it becomes necessary to copy the mobile phone to the hard drive computer. And it can be done different ways.

You will need
- Data cable or bluetooth adapters
Instruction
Via data cable Connect your phone and computer with a data cable. It should come standard with your mobile. Set the connection mode to “File transfer” (“Data transfer”, etc. - the exact name of the connection mode depends on the model of your mobile phone). Install drivers if necessary. They must be supplied with the phone, or freely distributed on the manufacturer's website. If you have any difficulty, please read the user manual.
Copy photos With phone using the standard tools of your OS. Depending on the software, the connected phone may be recognized by the system as an external drive. If you have a special synchronization program installed on your computer, copy photos With phone through her - detailed instructions how to do this, look in the help system of the synchronization program or in the user manual phone
Via a bluetooth adapter, use to copy photos from phone Bluetooth connection to the computer. If your computer does not have a built-in bluetooth adapter, purchase and connect an external one. To establish a bluetooth connection, enable the adapters on both devices. If you have any problems, please refer to the help system or user manual.
Enter the password for the bluetooth connection. Most often, it consists of four numbers, which you must come up with yourself and enter on both devices. But it happens that the system itself sets the password, and you only need to confirm this code on the second gadget. After establishing a connection photos can be passed through the context menu phone or computer. Or, if this function is supported, through a special synchronization program that comes with the phone.
note
As a last resort, you can copy photos using MMS. Required files it will be enough to send it to your own e-mail address, and then copy it from the received letter to your computer's hard drive. However, for this, a fee will be charged from the personal account of the phone in accordance with your tariff plan.
Helpful advice
Some older mobile phones are equipped with infrared ports. To transfer photos in this case, you will need to purchase and connect an infrared port (IrDA adapter) to your computer and place both devices in close proximity, pointing the infrared ports at each other.
Related article
Mobile phones and smartphones are often equipped with such a convenient functional device as camera. The quality of images in the latest models of all manufacturers is quite high, and it can already be compared with the quality of images obtained by popular cameras - "soap dishes". WITH phone You can transfer photos to your computer in several ways.
In recent years, it has made tremendous progress: even the very first models of smartphones from Apple took very decent pictures - the latest ones are completely impressive with their photographic capabilities. What is technology worth? living photo available on iPhone 6 and 6S?
However, for the outstanding quality of photos, users have to pay with the free memory of the gadget. A live photo alone weighs about 4 MB, and users bring hundreds of them from vacations. iPhone owners now and then have to transfer photo albums from the device's memory to a computer. Luckily, this is pretty easy to do.
Users who frown in disgust at the word " iTunes», should be happy with the fact that you can transfer photos from iPhone to computer without using this program. Actually, most iPhone owners use this method - there is no need to disturb iTunes for no good reason.
To download photos to a PC, you need a USB cable. After you prepare it, follow the instructions:
Step 0 (preliminary). Create a folder on your computer where you will drop the photos, and remember its location.
Step 1. Connect smartphone to PC with cable.
Step 2. Wait a few seconds for the computer to detect the iPhone. After you hear the sound characteristic of a USB connection, you can proceed further.
Step 3. The smartphone screen will prompt “ Trust this computer?- click " Trust».
Step 4. On the computer monitor, you will see a window " Conductor».

Click on the option " Open device to view files».
Step 5. Go to the internal storage of the device - " Internal Storage».

Step 6. Open folder DCIM- inside you will see several more folders, each filled with photos and videos.

The number of folders in DCIM depends on the number of photos you have taken during your entire iPhone use: after the first thousand shots, a second folder is created, and new photos are saved in it.
Step 7. Cut photos from folders - use combinations CTRL+A (« Select all") And CTRL+X (« Cut»).
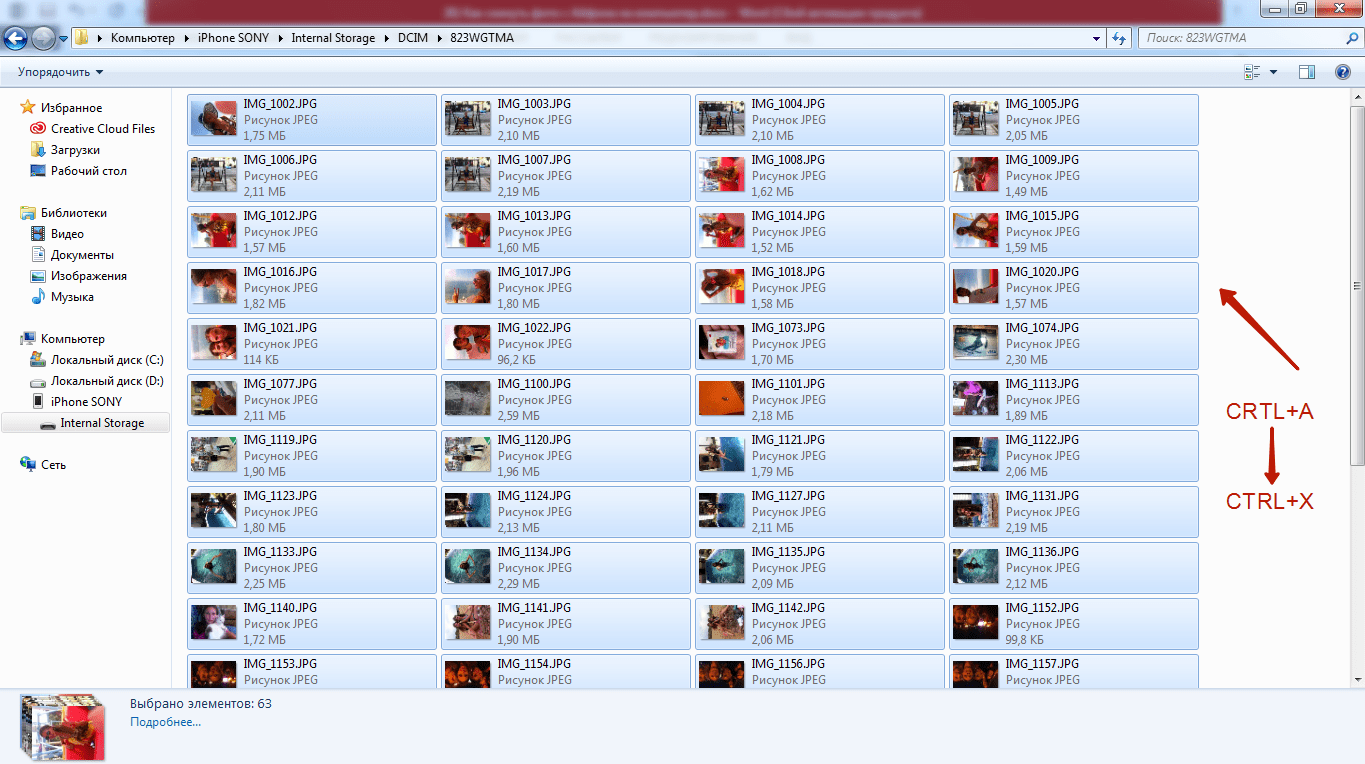
Step 8. Paste the pictures into the folder you prepared in the preliminary step - for this you can use the combination CTRL+V.
You need to follow the order - start cutting out the photo from the next folder only after copying from the previous one is completed, otherwise the computer will give an error.
Return photos to smartphone memory the same way will not succeed - will have to use iTunes. Therefore, when clearing memory on an iPhone, act prudently and carefully.
How to transfer photos from iPhone to Mac?
Despite the high integration of operating iOS systems and OS X, the iPhone still doesn't show up as a physical storage medium when connected to a Mac. Therefore, the transfer of information from iPhone to Macintosh occurs approximately according to the same algorithm as on Windows.
Step 1. Connect your mobile device to your Mac.
Step 2. Run the built-in program " Image capture". You can find it in the " Programs» or through the internal search engine Spotlight which invokes by pressing the combination CDM + space. The program looks like this:

Step 3. Select the photos you want to upload to your computer and drag them into the pre-prepared folder.
Transferring images to a Mac can also be done through other programs, such as iPhoto or Aperture, however, this software is not built-in - it must be installed separately.
Uploading photos via iTunes
Transfer to computer via iTunes you can only those photos that were loaded into the device's memory in the same way. In the application " Photo» albums with such pictures are marked with the caption « From my computer».
Camera photos cannot be exported via iTunes.
If necessary, transfer the photo back to the computer using iTunes act like this:
Step 1. After connecting iPhone to PC, launch iTunes.
Step 2. Go to the gadget control menu - to do this, click on the icon with the image of a smartphone.

Step 3. In the block " Settings» select the tab « Photo».

Step 4. Make sure that opposite Synchronize» was ticked. If it's not there, put it on.

Step 5. In field "Copy photos from:" Press " new folder "(someone will have -" Images"). From the drop down menu, select " Select folder».

Step 6. Find on your computer the folder from which you downloaded the photos to the iPhone's memory, and select it.
Step 7. Click the button Synchronize” and wait for the operation to complete.
There is another, unpopular way to get through iTunes photos stored on iPhone extract from backup.
All local copies of data are stored in computer memory: for example, on Windows 7 they are located at Start usernameAppDataRoamingApple ComputerMobileSyncBackup, and on a Mac, at usernameLibraryApplication SupportMobileSyncBackup. The backups in the computer folder look something like this:

To work with backups iTunes you need special software - let's say a utility will do iPhone Backup Extractor, which you can download. The need to master new software is the reason for the low popularity of this method.
Uploading photos via cloud storage
Cloud storage (such as Google Drive , Yandex.Disk, dropbox) is the fastest way to transfer a large number of photos from your device to your computer. However, this method has a significant flaw: mobile applications of almost all cloud storages are installed only on iPhone with iOS version older than 8. Owners of iPhones of the 4th modification will not be able to rely on this method, because iOS 8 is not installed on the iPhone 4 at all, and on 4S it works with a creak.
The method is very simple - consider an example dropbox:

This should be the result:
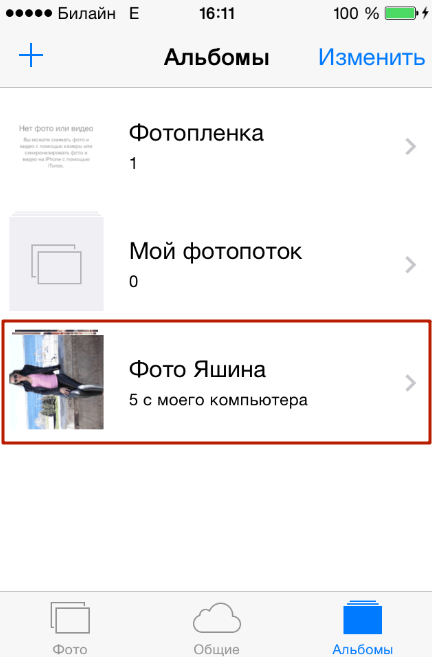
Step 2. Download dropbox from App Store and log in with the same credentials.
Step 3. Open the folder " Photo» in the mobile application and through the button « Download» Throw photos there.
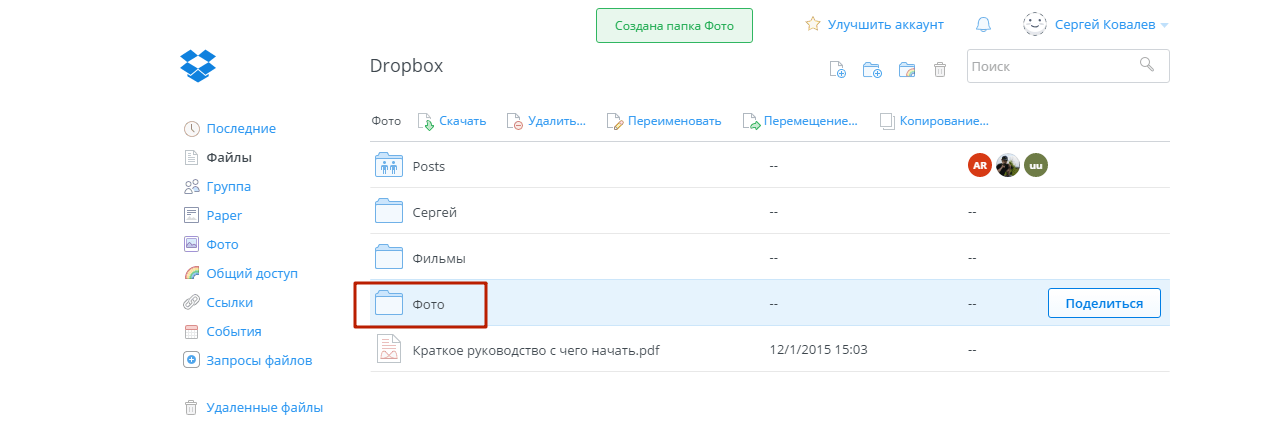
Step 4. Go back to your computer and open the " Photo" On him. You will see that the photo from the iPhone is inside.
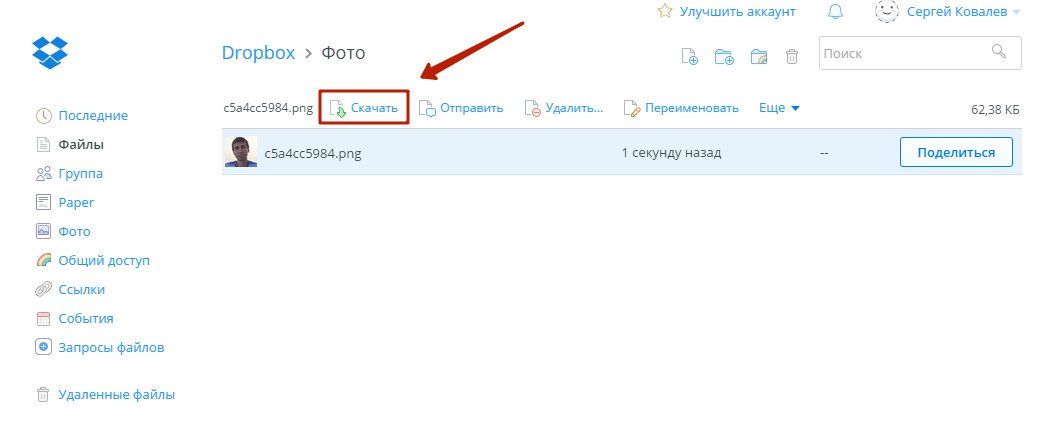
Step 5. Click the button Download” and wait a couple of seconds for the download to complete.
About cloud storage Google Drive And dropbox more details in this article. Users of devices with iOS 8.1 may consider an application as an "intermediary" iCloud Drive, which is installed on iPhones by default, however, this application has a significant disadvantage compared to other storages - there is very little free space.
Uploading photos via mail and other methods
If email is set up on your iPhone, then you can transfer a photo to your computer in just a few elementary steps:
Step 1. Go to the application Photo” and find the desired picture.
Step 2. Click on the arrow icon located in the lower left corner.


Step 4. In the menu that appears, click on the icon " Mail". The photo will be attached to the email.

Step 5. On the next screen, enter the email address to which you will send the email. You can use a mailbox that belongs to you, but is registered on another service - now it's in the order of things when one person has several mailboxes.
Step 6. Click " Send».
Step 7. A message will appear reminding you that you are sending an email without a subject - confirm your intention by pressing " Send».
Step 8. Go to Mailbox where you sent the photo from your computer and download the image.
In addition to email, in the same way, any of the social networks can be used as an intermediary between iPhone and PC ( In contact with, Facebook): You just need to send an image as a message from your smartphone, then open the message history on your computer and download the image to your hard drive. However, this method is only suitable if you need to download a small number of images - in one message " In contact with» fits a maximum of 10 photos.
Conclusion
Photo and video transfer is the only data exchange between iPhone and computer that does not require a launch iTunes. When connecting an "apple" gadget via USB, the iPhone is defined as a digital camera, which allows the user to copy pictures from the device's memory to the hard drive directly. However, even if there is no USB cable at hand iPhone user has a lot of options on how to upload a photo to a computer - for this he can use his email or account on a social network.
upload photos and videos from mobile phone to computerHow to upload photo, video
from mobile phone to computer
Modern mobile phones allow
users to take photos and videos, and then
transfer them to your computer.
Synchronization of mobile phone with computer
Synchronization
mobile phone
with a computer
What is Computer Synchronization?
Synchronization with a computer is the ability to carry out
data synchronization between mobile phone and computer.
You can exchange phone book entries
or sync phone organizer with organizer
on the computer.
That is, what was saved on your phone -
transferred to the computer and vice versa.
Including photos and videos.
To synchronize a mobile phone with a computer -
internet connection required.
USB cable for synchronizing a mobile phone with a computer
USB cable
for synchronization
mobile phone with computer
USB cables are the most traditional and proven way
for communication between a computer and a mobile phone.
We will consider this method.
A USB cable is included with most modern mobile phones. However, a USB cable suitable for your brand of phone can be bought both in computer stores and in stores selling mobile phones. For little money.
Appearance of the USB cable

Connecting a mobile phone to a computer via a USB cable
Mobile phone connection
to a computer via a USB cable
As you can see in the picture - by the USB cable
connectors for connection at both ends.
Larger connector - plugs into the USB port on your computer.
(Like a flash drive, mouse, etc.).

On a laptop, USB connectors are mainly
on the side panels on the bottom of the laptop.
On a desktop computer, the USB connectors may be
both on the front panel of the System Unit and on the back. borrow
both horizontal and vertical position.
The smaller connector on the USB cable is inserted
into the USB port of the mobile phone.
As a rule, a USB connector on a mobile phone
covered by a retractable small panel.
On the panel is a diagram
To connect your mobile phone to your computer, first insert
small USB connector of the cable into the USB connector of the mobile phone. And then
and insert the second USB connector of the cable into the USB connector of the computer
(laptop)
Software for synchronizing a mobile phone with a computer
Software
to synchronize mobile phone
with a computer
After connecting the mobile phone to the computer -
open Windows Photo Gallery.
If in your licensed Windows, Photo album not included –
You can read how and where to download for free.
Click on the picture to enlarge.
In the upper left corner, click the Import button.
The Import Photos and Videos tab opens.

This is a screenshot from my computer, and I have already downloaded the "Software" for mobile synchronization NOKIA phones with a computer. And you, if you have never uploaded photos and videos from your brand of mobile phone to your computer, then click the "Update" button in this tab to download the "Software" for synchronizing mobile phones (your brand) with your computer.
In the future, after opening this tab
You can immediately click the "Import" button.
And if you upload photos from different brands of mobile phones, then you will need to download separate software for each. And the program itself will determine from which brand you entered the computer and select the necessary software.
Download photos and videos from your mobile phone to your computer using Windows Photo Gallery
Uploading photos and videos
from mobile phone to computer
via Windows Photo Gallery
After installing the software, click the "Import" button
at the bottom of the same Windows Photo Gallery tab. Will open new inset
"Searching for photos and videos...", with a search bar.

When the search ends, a new tab will open.

This tab reports how many photos and videos were found on your mobile phone. And initially there is a switch on the button "View, arrange and group elements for import". This means that photos and videos from your mobile phone will be uploaded.
You can immediately click the "Next" button in this tab.
The process of downloading photos and videos from your mobile phone to your computer will begin.
In the "Gallery" of your mobile phone, from where your files (photos and videos) are downloaded, there are files included in the package of your phone. These are "Background pictures", and "Screensavers", and "Graphic clips", and so on. When, during the download, the downloader begins to “encroach” on these files, you will be shown an error message.

The switch, in this message, is on the "Repeat" button, and at the bottom is the active "Continue" button. Switch the switch to the "Ignore all files with errors" button so that only your files are downloaded to the computer, and then click the "Continue" button. If you do not change the switch, but immediately press the "Continue" button, the error message will appear again.
When the download is complete, the "Select groups to import" window will open.
All your photos and videos will automatically be divided into groups by time and date. And placed in separate folders.

Click on the picture to enlarge.
You can, if you like, preview your files first.
To do this, in each group there is a button "View all elements".
And in the window that opens delete unnecessary .
If you do not want to transfer a group completely
on the computer - then uncheck the boxes to the left of the groups.
First uncheck at the top, with "Select All"
and then from a certain group.
Or you can immediately click at the bottom of the window "Select groups to import" -
the "Import" button. All additional windows will close and you
you will see in the Windows Photo Gallery all folders with downloaded
photos and videos.
I must say that the photos from my mobile phone Photoalbum
imported only for the first time. And then uploaded
only new photos.
Viewing photos and videos on a computer after downloading from a mobile phone
Viewing photos and videos
on the computer after
mobile phone downloads
You can view and organize, newly uploaded,
or in Windows Photo Gallery, or in folder Pictures .
Open the Pictures folder and you will see all your new folders.
They do not have an alphabetic name, and the name is a numeric set -
year-month-day-number. Where date is the time the photo or video was taken,
and number - under what number this photo or video is indicated
on your mobile phone.
Open any folder (if there are several) and if at the same time you have
both photos and videos were created at the same time - you will see them in the same folder.
By double clicking the left mouse button you can open each file.
The video will open in Windows Media Player.
The photos will open in Windows Photo Gallery.
Photos from a mobile phone are loaded in a fairly large size.
For example, from my NOKIA - 2048 x 1536. In order to subsequently
upload these photos to some sites, for example, in social network –
The photo must be reduced to the sizes accepted on these sites.
It would seem that sending photos to a computer is very simple, however, sometimes there are problems with this. But any problem can be solved, and in several ways.
With a standard application
Almost every phone or smartphone has its own application for exchanging information with computers running Windows or Apple, or supports the auto-connect function via USB cable. Different platforms mobile applications match their interface programs. For example, Windows phone for Windows Phone 8, for Android mobile devices - Samsung Kies, HTC Sync, LG PC Suite for iOS programs are used by iTunes.
This is the "easiest method" for transferring photos and is described in the instructions for the electronics, and there are usually no problems using it. You can connect to your computer using a cable or via Bluetooth. When connected via Bluetooth, the data transfer rate is slower and some phones refuse to transmit large packets of information. In contrast, transferring files over WiFi is extremely difficult because computers and laptops rarely support WiFi Direct.
This method works ironically, but has one significant drawback. You are permanently tied to one computer with the appropriate software. Except for those mobile devices that have a connection mode as an external drive.
In this mode, it is very easy to merge the material. Connect your phone with a USB cable to the car. If you are doing this for the first time, then wait a bit until the machine finds a suitable driver on the network and installs it.
Go to Start → Computer. In the window, in addition to the disks of your personal computer, you should see a new device with the name of your phone. Double-click on its icon and go into the device's memory space. There you will find a folder with photos, which in different models called differently. Something like: DCIM, Pictures, Photo. After the photos are found, copy them in the usual way for you to a place convenient for you.
Live example
The Fly DS120 phone has built-in software for connecting to a USB port.
When docking with the system unit, within literally 5 seconds, a prompt appears to select the mode in which the device will operate:
- SD card.
- Webcam.
With the help of both, you can transfer pictures. In the first case, they have already been made in advance, and in the second they will be filmed directly in the process of work.

In SD card mode, the phone is directly visible among the drives in File Explorer. All sections are available, including pictures (Photos).

When I tried to connect as a camera, the image immediately appeared in the system. The picture quality was great. And you could safely take pictures, immediately saving them to your computer.
Bluetooth transmission
Bluetooth must be enabled on both devices. For smartphones, the setting is in the networks section.

Then you need to go to the network and find the name of the paired device.

To send him a request, just click your finger.

On the other side, a question will appear about whether the code of both devices matches.

If yes, then you need to click Pairing, and a connection will be established via BlueTooth. To transfer images, just go to the file manager and make a long tap on the desired picture. After that, she will be marked with a daw.

Upon entering the menu (upper right corner), the Send option is selected.

From a long list of targets, you need to select BlueTooth. This will open a list of paired devices, among which you need to click on the file receiver.

Using cloud servers and mail servers
If you don’t know how to transfer photos from your phone to a computer without a cable, specialized applications and Bluetooth, then you can use cloud services. There are a lot of them, but it is better to use the one that is set to default by default. mobile device, or applications specially designed for your phone platform. Among them:
- [email protected] - provides free 100GB of virtual space, works with devices running Android, iOC, Windows Phone;
- com - at the start allocates 15 GB to the user, has mobile programs for Android, iOS, and Windows Phone;
- Bitcasa - after registration, it provides 20 GB for free, it can work on Android, iOS, and Windows Phone platforms;
- OneDrive is a very handy tool with free 15 GB of space to work on iPhone, Android, Windows Phone.
To understand how it works, let's try with an example cloud storage OneDrive.
First you need to download the distribution kit from the link: onedrive.live.com. To do this, you will first need to go through a short registration procedure. Next, distributions must be installed on the appropriate devices: smartphones, tablets, PC and MAC. After that, in OneDrive on your phone, select the synchronization function and after a while all the photos will be on the cloud storage.
Left for small. On the computer, open OneDrive under the same account as on the smartphone, and copy the photo that you like from the photo folder.
This global way is good, but again tied to software that is installed on a particular computer. If you are visiting, then the method may not work, because the owner of the PC on which you would like to merge the photo may not want to install a cloud server under your account, and you don’t need to accounts scatter.
How to save photos from a phone to a computer without cables and special programs?
There is an absolutely simple way, not devoid of course, disadvantages. Send a photo to your or someone else's email. Open your email on your computer and save the photo.
The disadvantage of this method can only be that it is very uninteresting and too complicated. Also, if the photos are large, then they can “eat” expensive traffic when using some tariffs mobile communications especially if you are roaming.
With a memory card
This radical method will work hard if the smartphone is equipped with a card microSD memory. The storage medium is located in the slot behind the back cover of the phone.

The type of card is indicated by paint on its surface. But most modern phones have the same SD storage format - micro.

Card-reader runs on one of the internal dual USB ports motherboard and works great. The advantage is that the SD card is seen as a normal removable drive.

The desired slot in the Card-reader is found by size and marking.

The following notation is used:
- SD / MMC - Secure Digital Card (SD-cards - cameras),
- T-Flash - microSD, microSDXC (smartphones, new cell phones).
- XD - XD-Picture (obsolete Olympus format).
- M2 - Memory Stick Micro 15x12.5x1.2mm (Sony memory cards are currently unpopular).
- MS/MS Duo - Memory Stick 31×20×1.6 mm (Sony)
- CF/CFII - CompactFlash (one of Sandisk's formats, still popular today)
To begin with, immediately after the first installation of the card in the smartphone, in the settings, determine that the photos are saved to the card.

Some older generation Cadr-readers do not support microSD.

Why then are they needed at all? Not everything is so bad - microSD is usually sold in one package with an adapter to SD / MMC. When you need to transfer a photo to HDD, carefully remove the card from the phone and insert it into the adapter. You must have an adapter, it is sold with the card.

If you have a laptop, then it usually has a corresponding slot. If the car is stationary, then it will probably need to be purchased. This is a very inexpensive device (from 450 rubles).

When you connect a memory card, it will be defined as an external drive. You can copy anything from it, including photos.
But what about WiFi?
At first glance, it is not possible to transfer files between your phone and computer via WiFi. But it's not. On the Internet, you can download the program Share.it, which will allow you to do this.

Clients of this program must be installed on both devices.

There is a version for Android on Google Play.

Immediately after installation, the application starts to search wireless network. And if there is another device nearby with the package installed, then both will be able to communicate without the participation of a router. Please note that the versions must be the same. Otherwise, the connection will not take place. A typical example is shown in the figure: the program version is 3.5.0, and the QR code refers to 4.0 beta. They are incompatible with each other.

Now even the simplest push-button phones have a camera, not to mention smartphones. Very convenient, "camera" is always at hand. Taking a photo is easy and simple, only the screen size, with age, seems small, I would like to see a larger photo, or share it with relatives and friends. There is a desire to transfer photos from your phone to your computer. I will try to tell you how to do it.
There are a lot of models of phones and smartphones. Each case has its own features of connecting and transferring photos. It is impossible to tell about each model, I will try to explain the general principles that will help you solve this problem.
Modern phones have universal charging, which is connected by a microUSB-USB connector. We need to connect to the USB connector of the computer. Older phones had different connectors, often only suitable for a given phone model. But if there is a connector from the phone - USB, then it will also work. Here is a drawing of the USB types.
To enlarge the picture, click on it with the left mouse button, restore the previous size - again
Under the numbers 1 - USB, 2 - miniUSB, 3 - microUSB.
We connect the cable to the phone, the second side is connected to the computer. After the first connection, it tries to automatically install the necessary drivers (as we remember, a driver is a program that connects our device, in this case a phone, and operating system computer). An icon appears on the taskbar, 
in the figure is highlighted with a red frame, here is a larger one, the same figure. If you click on it, a window will open in which we can see the installation progress.
The example shows connecting an LG Leon smartphone. 
After installation, a new icon appears in the "My Computer" window  – “LG Leon”, circled in red in the figure.
After clicking on it with the left mouse button, a new window opens in which we see two disks. 
You may have one if no memory card is installed. In our example, this is “Internal memory and CD card”. Open the "Internal Memory" folder. 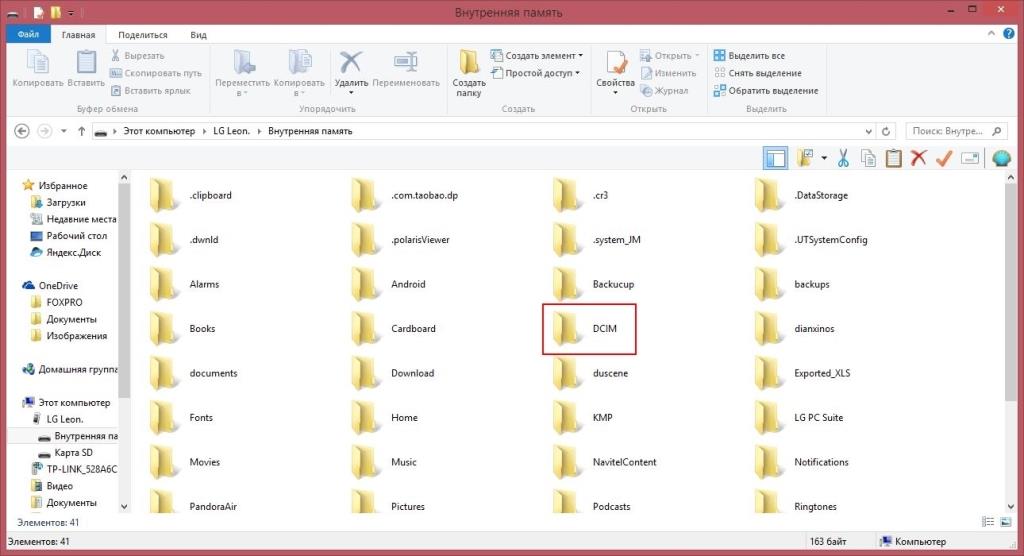 Here we see a lot of folders. We are interested in the DCIM folder, this is the phone's camera folder.
We open it. There are service folders and a “Camera” folder 
We open it, here are photos from our photo module. 
If, as we have, the files go in a list, click “View” and select 
“Small Icons” or “Large Icons” (More on how to change the view in .)
Next, the standard actions - right-click on the photo we have chosen, select the "Copy" item in the menu that opens, go to the "Pictures" folder on the computer, or you can right-click the mouse again right on the "Desktop" - select the "Paste" menu item. Our task is completed, the photo from the phone is transferred to the computer.
Comment:
If you have a memory card in your phone and your phone settings are set to store photos on it, then there will be no photos in the DCIM folder in the phone's internal memory. All of them will be stored in the same folder - DCIM on the CD card.
Now consider another case. The first time you connect your phone to a computer, a driver installation error occurs, or the driver is installed and the phone does not appear in My Computer. You can try to go to the phone manufacturer's website, find required driver and install it manually. But this is a rather difficult task, and not everyone will be up to it.
What to do in this case? Is there any other way to solve the problem “Transfer photos from phone to computer”. Yes, if the phone has Internet (via WiFi or mobile). We go to the email on the phone (I hope you already have a mailbox, if not, you can create it - instructions.) And write a letter to yourself, attach the desired photo or several and send it. Your email will appear in your inbox. On the computer, go to e-mail and save the attached photo on the computer.
If you have Wi-Fi, then with the help of the additional SHAREit program, you can very easily transfer photos from your smartphone to your computer in a few clicks. Step by step installation programs on a computer and a smartphone, and the exchange between them is described in detail
In contact with